
In today’s software and application development terrain, Continuous Integration (CI) and Continuous Delivery (CD) have secured their position as essentials. In recent years, many companies have started using these practices, establishing that it’s not just a trend. In fact, research shows that they lead to faster development, better quality, and smoother deployments.
To give you a little context, CI/CD is a simple yet powerful practice in software development. It’s all about ensuring that your software is always ready for delivery. This is achieved by automating the testing and deployment steps in the development process.
Quick Tip: CI/CD is a cornerstone of the Agile manifesto. If your team follows agile practices, as is the norm in today’s software development landscape, you’ll find CI/CD pipelines to be a familiar and essential tool in streamlining your development workflow.
Coming to this blog, I’ll discuss the hurdles that CI/CD encounters in mobile app development and reveal the optimal solution to overcome these challenges. Also, you’ll get acquainted with the steps to seamlessly integrate this solution into your system, maximizing results for your organization.
So, keep reading!
Challenges in Implementing CI/CD for Mobile App Development
While CI/CD is widely adopted in software companies, particularly in web development, it becomes a bit tricky when applied to mobile development. Some of the common challenges can be as follows:
- Handling different platforms poses a challenge, given the variety in mobile ecosystems.
- Numerous SDKs (Software Develop Kit) may not always be compatible with each other, adding complexity to the development process.
- Specific hardware, like a Mac device for iOS development, becomes essential, even with cross-platform SDKs.
- Even with cross-platform SDKs like Flutter or React-Native, compatibility and seamless integration can be demanding.
- Challenges arise in automating code signing and other intricate procedures crucial for mobile app development.
To address such challenges, there are two main approaches to setting up CI/CD. The first is an on-premises setup using tools like Jenkins on dedicated build machines. The second option is to go for a cloud-based CI/CD solution like CodeMagic.
Now, which one should you choose?
Choosing on-premise solutions might appear cheaper and quicker initially, but it comes with challenges. You need dedicated machines and skilled personnel to write scripts for automation and troubleshoot issues. Relying on third-party scripts and plugins might also limit your support options.
So, despite the initial appeal of on-premise solutions, cloud-based options like CodeMagic bring notable benefits.
Experience the magic that’s coming up next!
What is CodeMagic?
CodeMagic is an advanced solution designed for Continuous Integration/Continuous Delivery (CI/CD), tailored for mobile developers working on apps with Flutter, React Native, native iOS, native Android, and Unity. It simplifies intricate processes like code signing and distributing apps to various stores using its dedicated command-line tools.
What sets CodeMagic apart is its ability to stay up to date with the latest Xcode versions, Android SDKs, and other development tools. This ensures that you have access to the most current resources without the need to install them during the build phase.
Here’s what it can bring to your table:
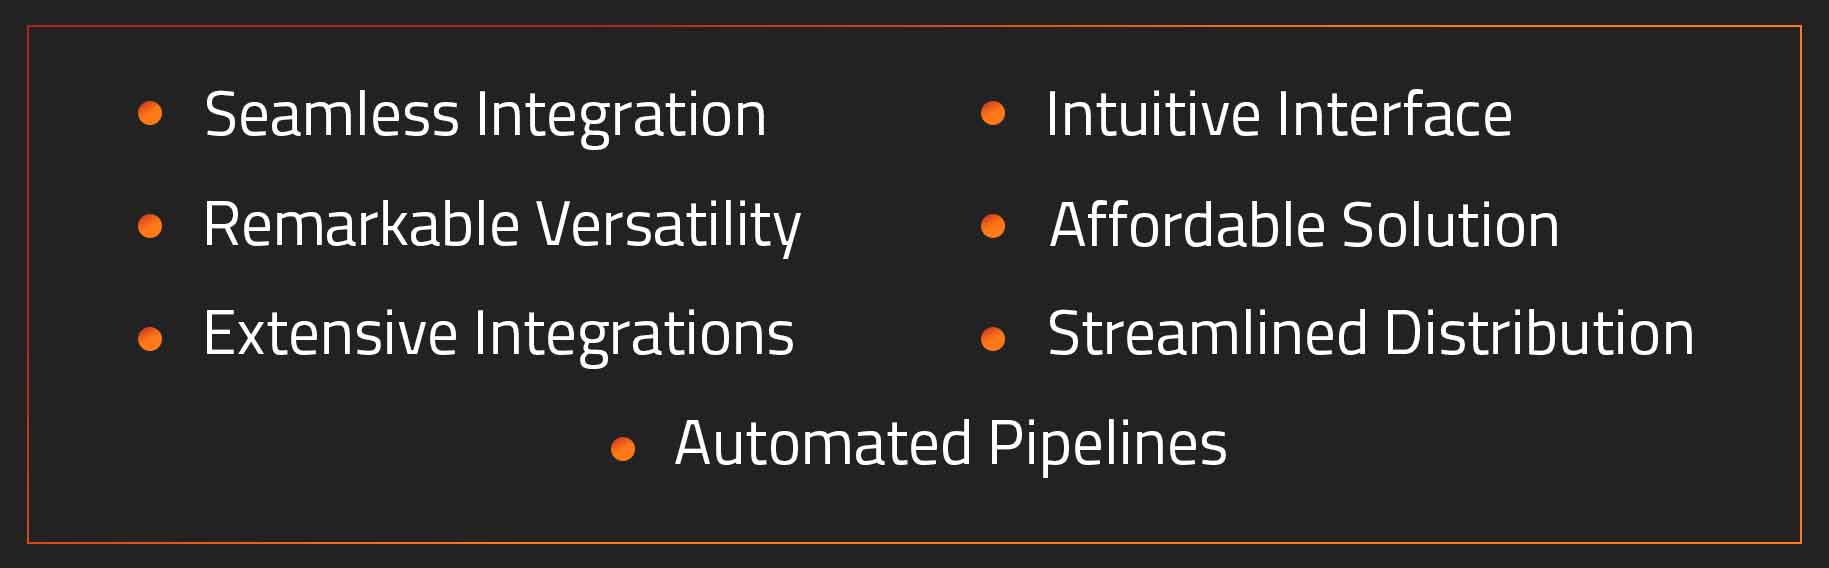
- Seamless Integration: It effortlessly connects to your existing source control systems.
- Intuitive Interface: Its user-friendly design makes it easy to use, saving valuable time with efficiency gains of 10-15%.
- Remarkable Versatility: It supports building for both iOS and Android platforms.
- Affordable Solution: You can enjoy a free tier offering 500 build minutes per month, with the flexibility to pay only for the additional minutes you use.
- Extensive Integrations: You can benefit from a wide range of integrations with popular tools such as Slack, Jira, GitHub, and more.
- Streamlined Distribution: It simplifies the distribution process, providing a straightforward way to share your app with testers.
- Automated Pipelines: The platform allows you to automate the entire build, test, and release pipeline with codemagic.yaml, seamlessly integrating with your existing tech stack.
Interesting, right?
If you still need a clear distinction between self-hosted and cloud-based CI/CD, I’ve got you covered in the next section.
Difference between Self-Hosted (on-premises) and Cloud Base CI/CD
| Aspect | Self-hosted (on-premises) CI/CD | Cloud-based CI/CD |
|---|---|---|
| Setup | Setting up an on-premises CI/CD system can take a lot of time and money. You need to buy hardware, update the operating system, make sure it works with the latest Xcode/Android versions, update the mobile toolchain, manage who has access, and cover costs like electricity and cooling. | With cloud-based CI/CD services, you can skip the complicated setup. Instead of dealing with tasks like buying hardware, updating the operating system, and managing various tools, you just pay a subscription fee and start using the service. It’s a simpler way to get things done without the hassle. |
| Security | Here, you’re in charge of the CI system’s security. This means making sure everything is secure, creating an isolated environment, promptly addressing any security issues, and implementing strong access controls. It’s all about keeping your CI system safe and sound. | In this model, the SaaS provider is responsible for security, isolation, and updates |
| Need for dedicated hire | You might need to hire specific staff to handle extra responsibilities that go beyond your team’s skills. This could raise the overall cost of managing your system. | No need for special hires when the CI/CD provider handles everything for you. But having a Mobile DevOps advocate is still essential! |
| Speed and Performance | If your apps are hosted on-premises, on-premises CI/CD can offer better performance. Shifting from a cloud-based platform to on-premises servers might slow down deployment in such cases. | Cloud-based CI/CD solutions usually provide faster speed and performance. They are more scalable, and if your applications are hosted in the cloud, you can deploy them directly from there. |
I trust that this distinction provides you with a clearer understanding of both!
If you’re impressed with CodeMagic’s capabilities, let’s explore how to leverage it to establish a robust CI/CD pipeline for your projects.
How to integrate your app with CodeMagic?
By following these steps you’ll be able to fully utilize CodeMagic during your mobile app development journey:
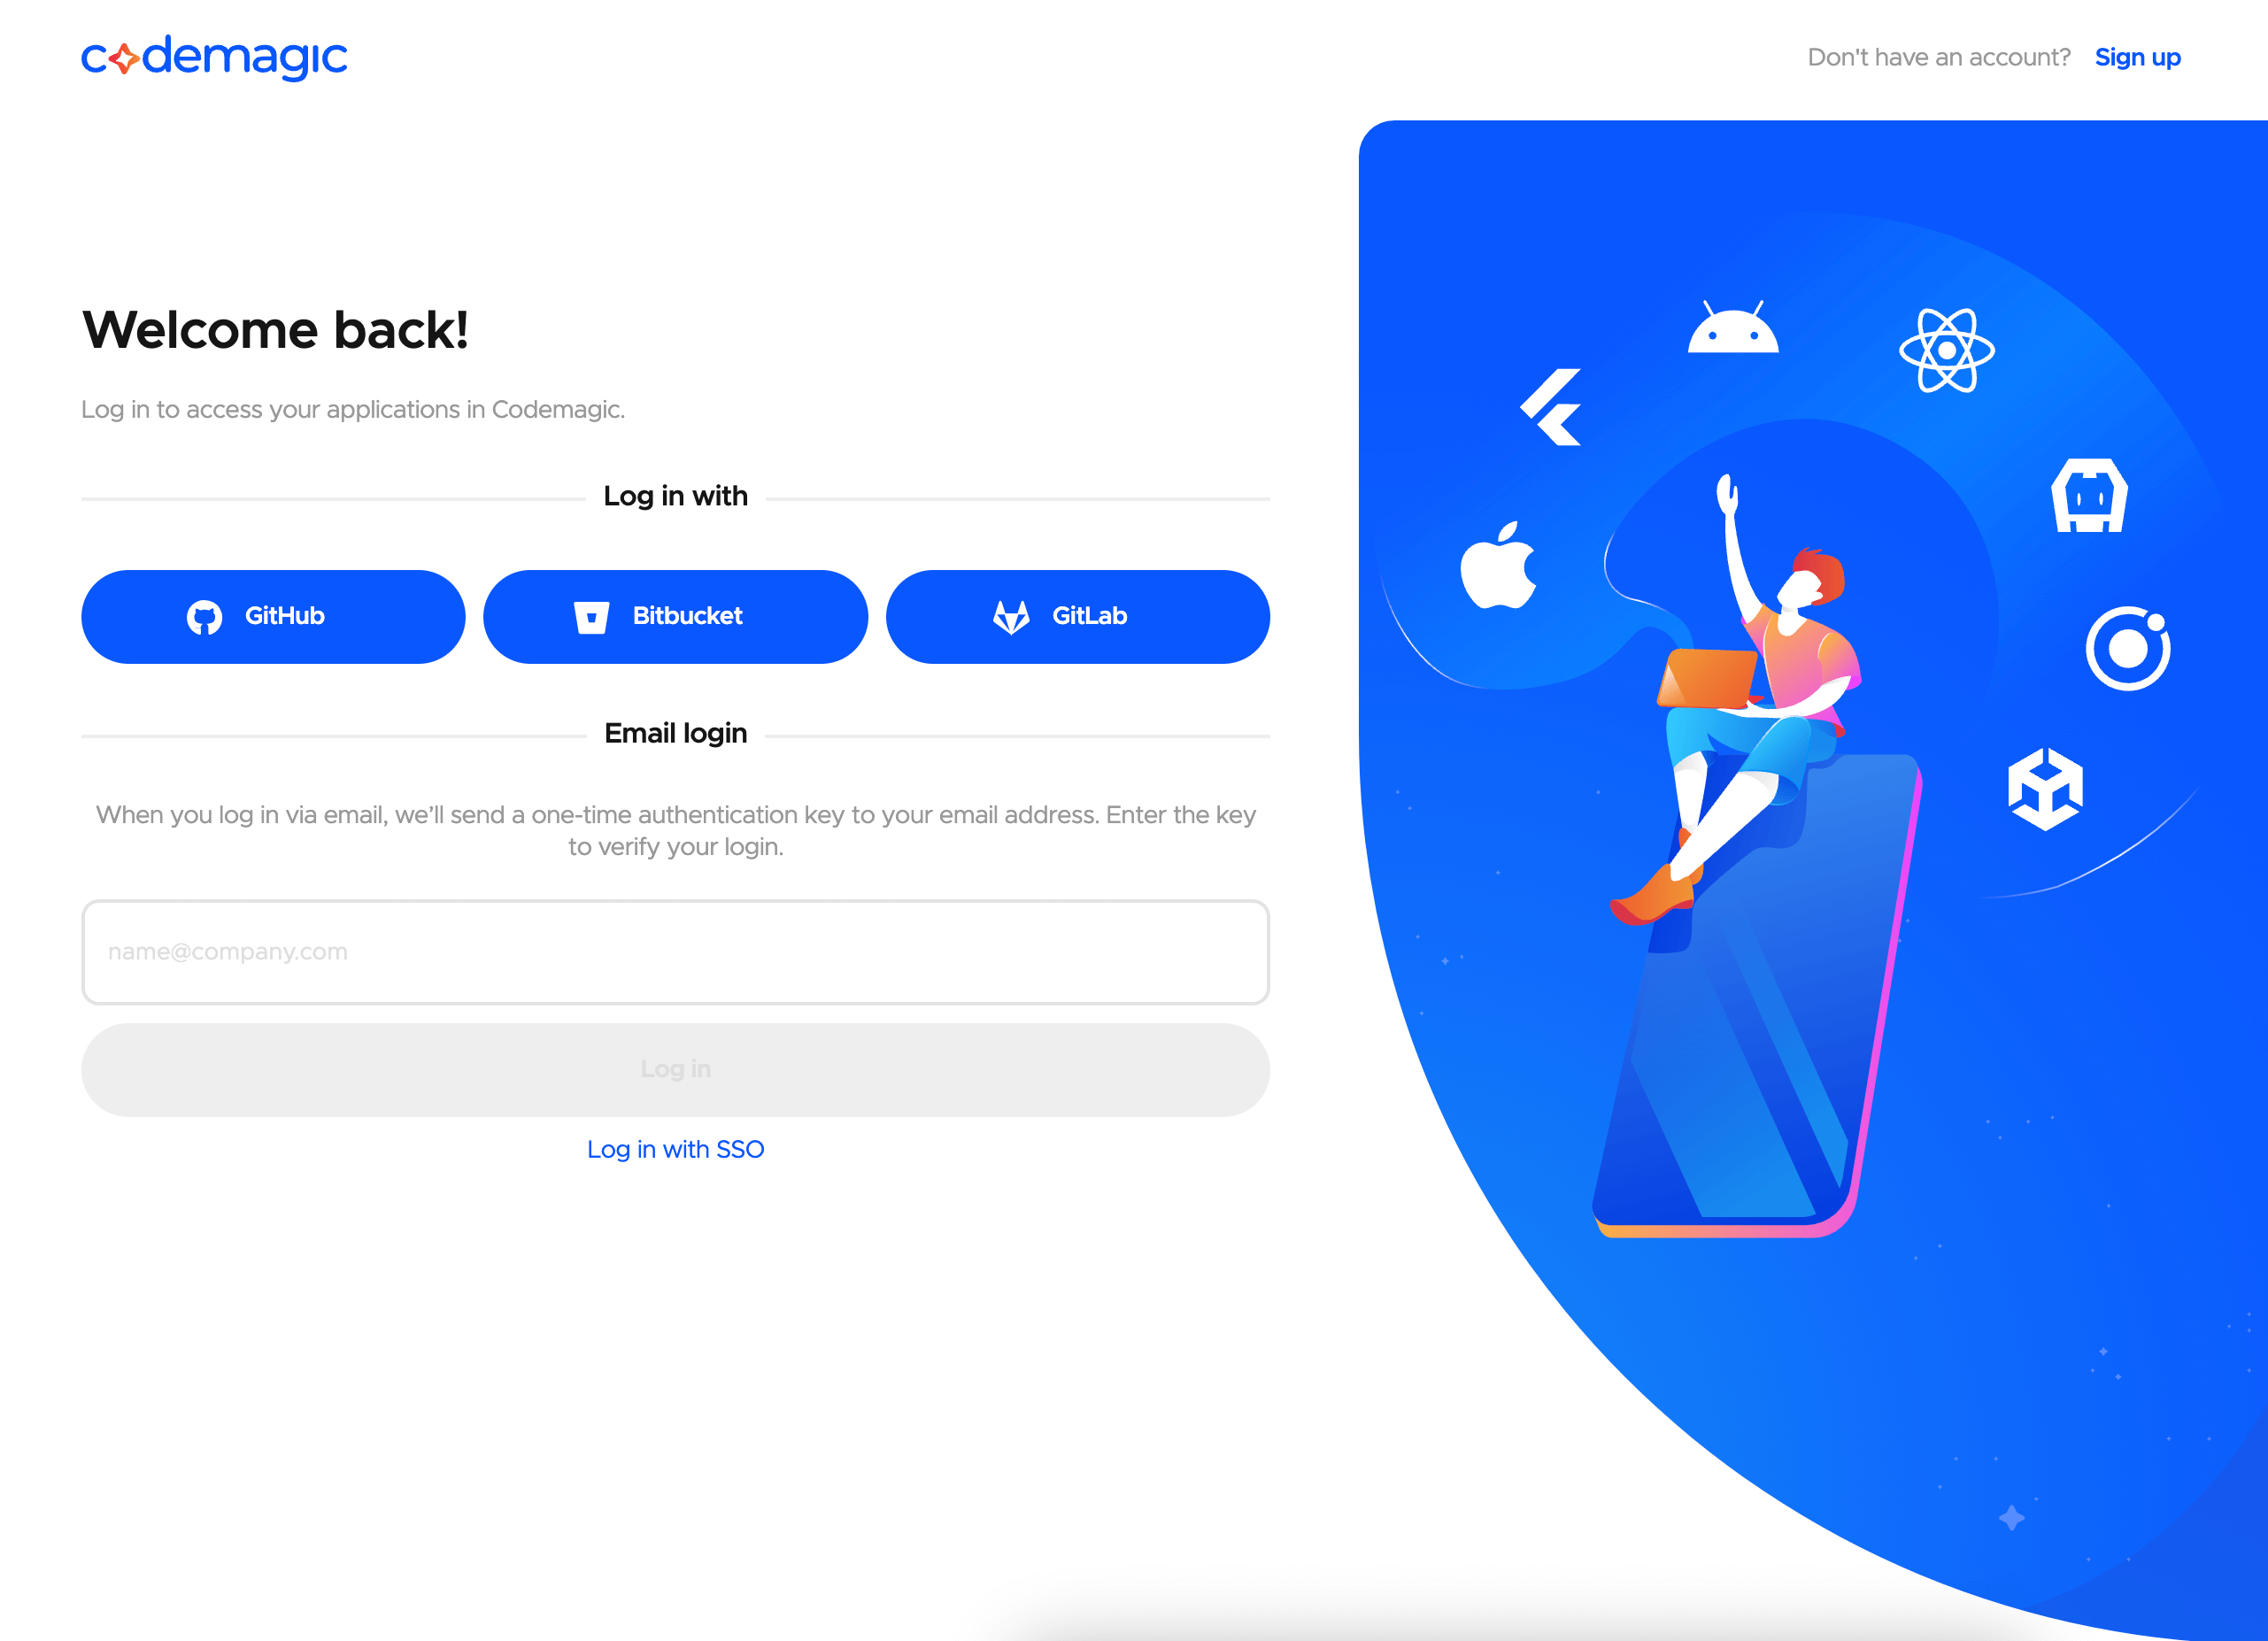
Step 1: Log in to CodeMagic using your email or by linking your source control account from platforms like Bitbucket, GitHub, GitLab, and more.
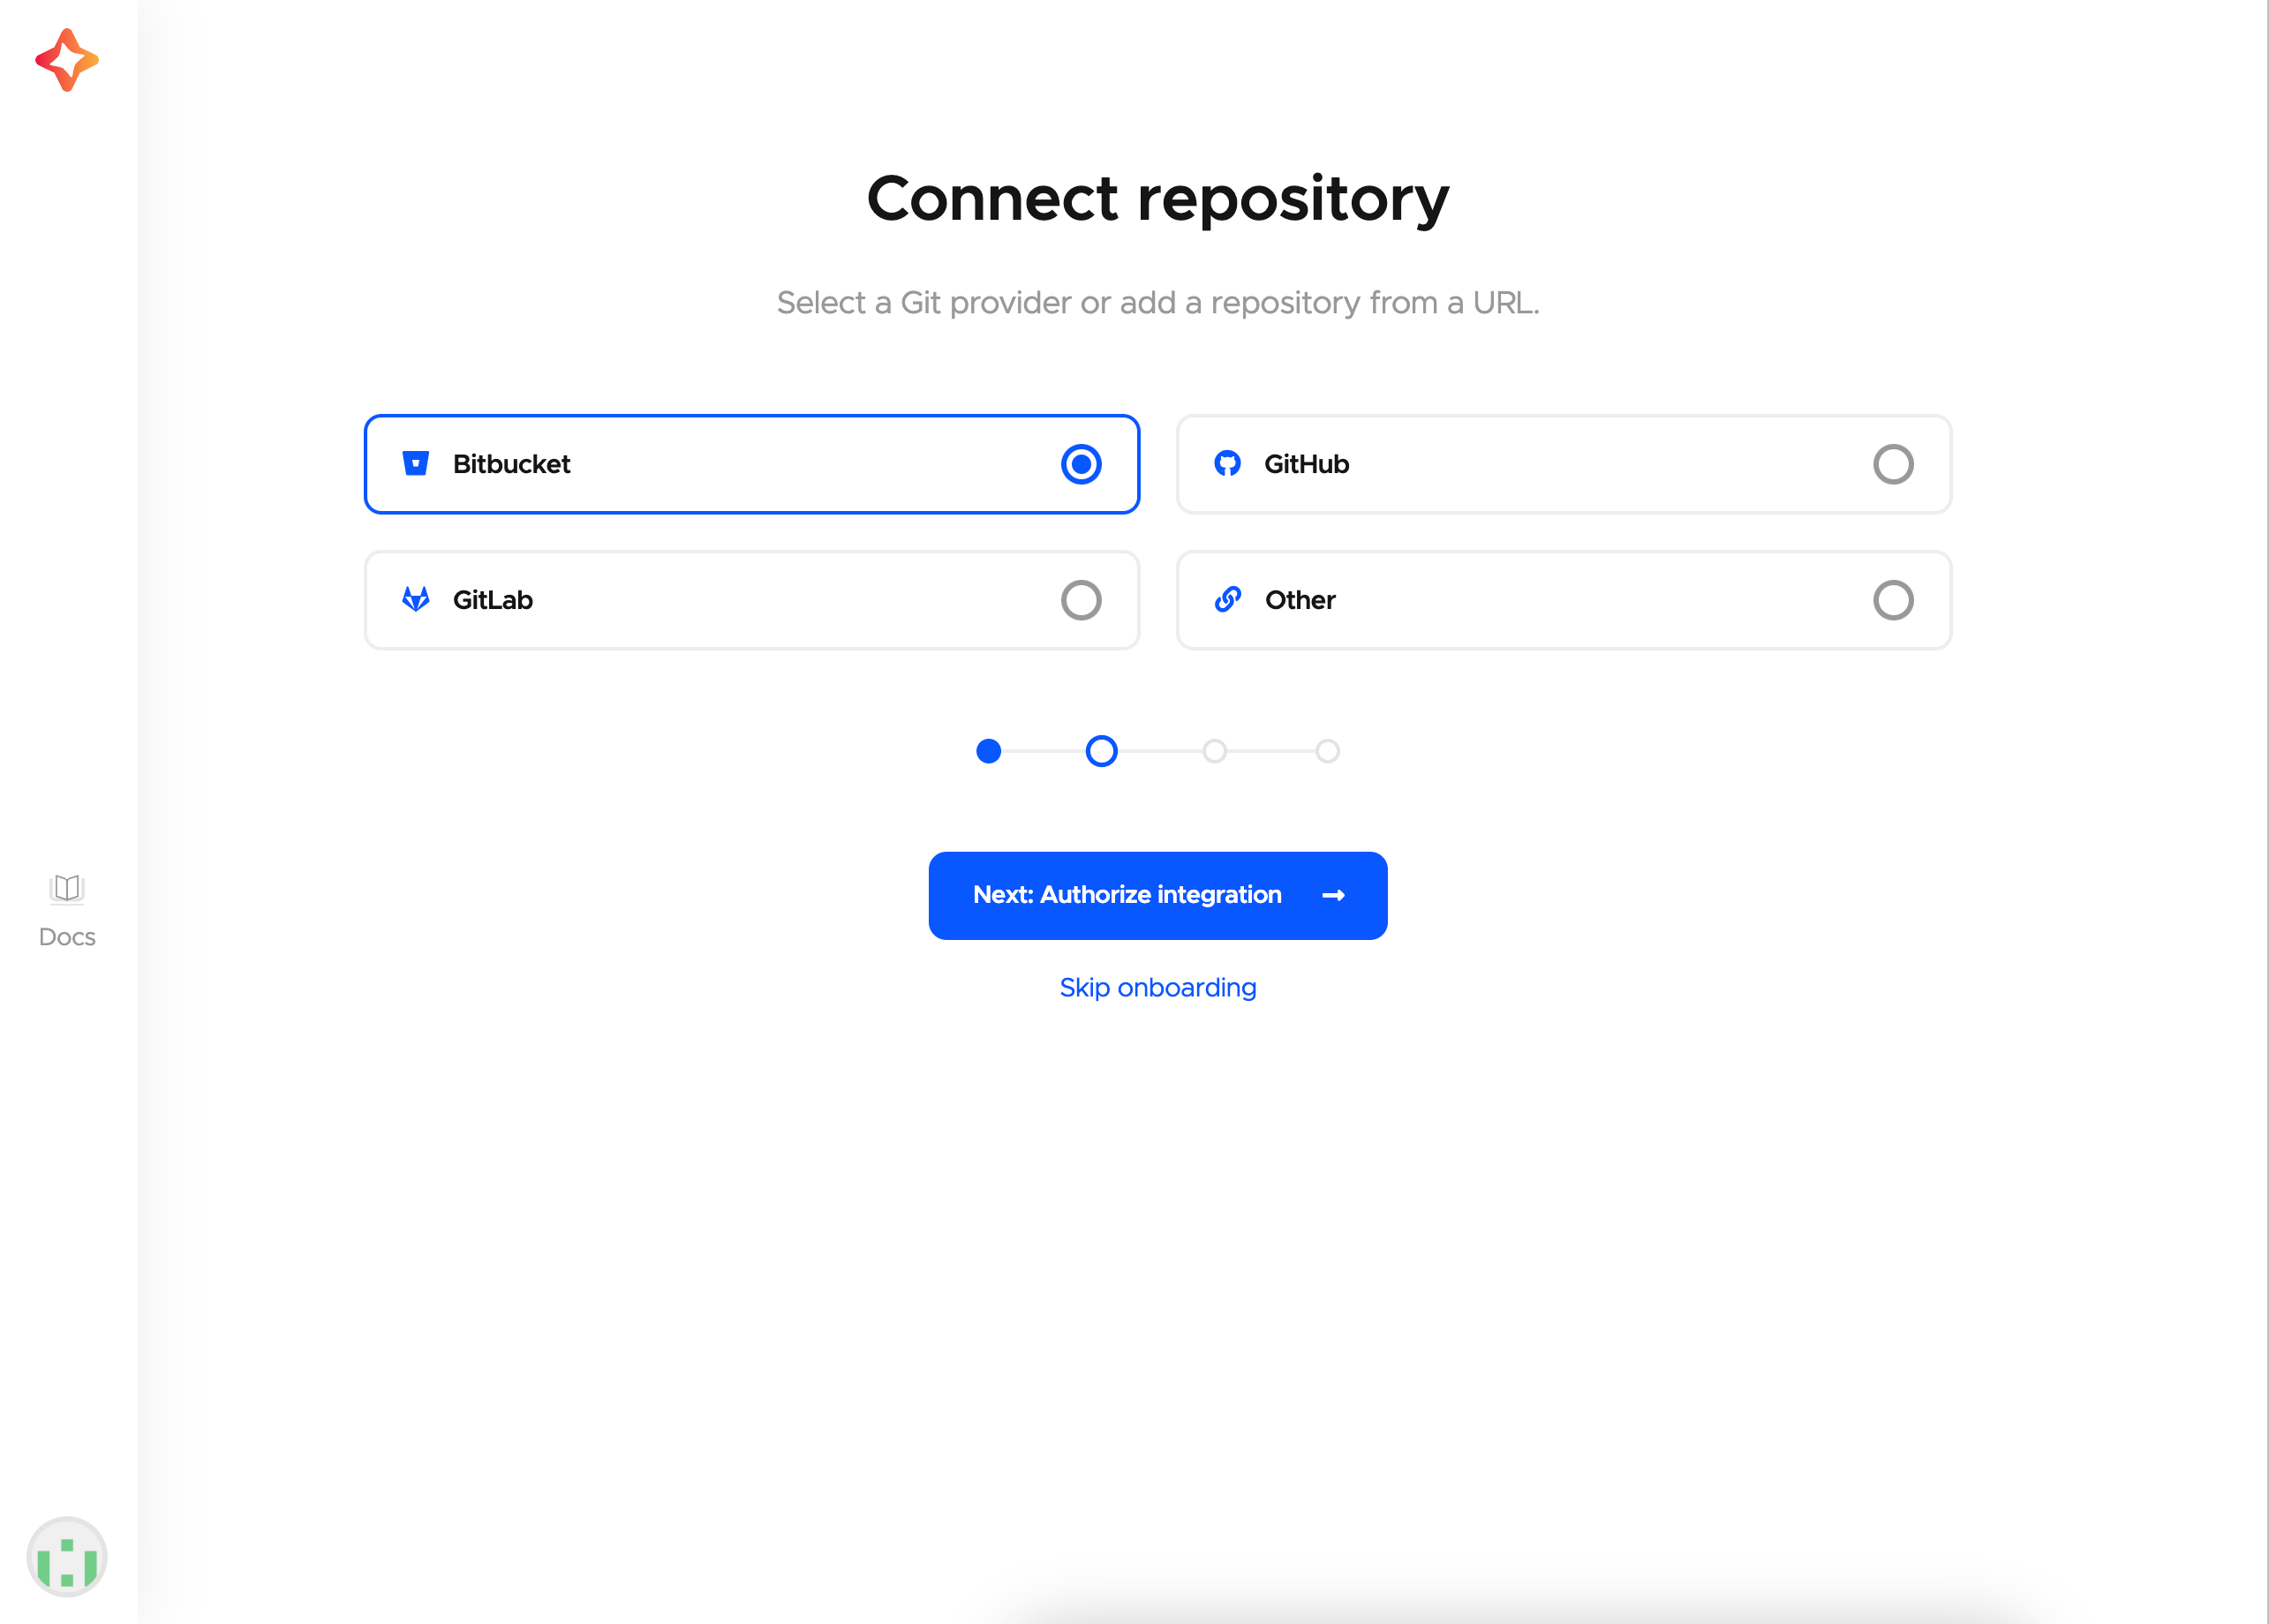
Step 2: Connect your repository by choosing a Git provider or adding a repository from a URL. For this demonstration, we’ll use Bitbucket as an example.
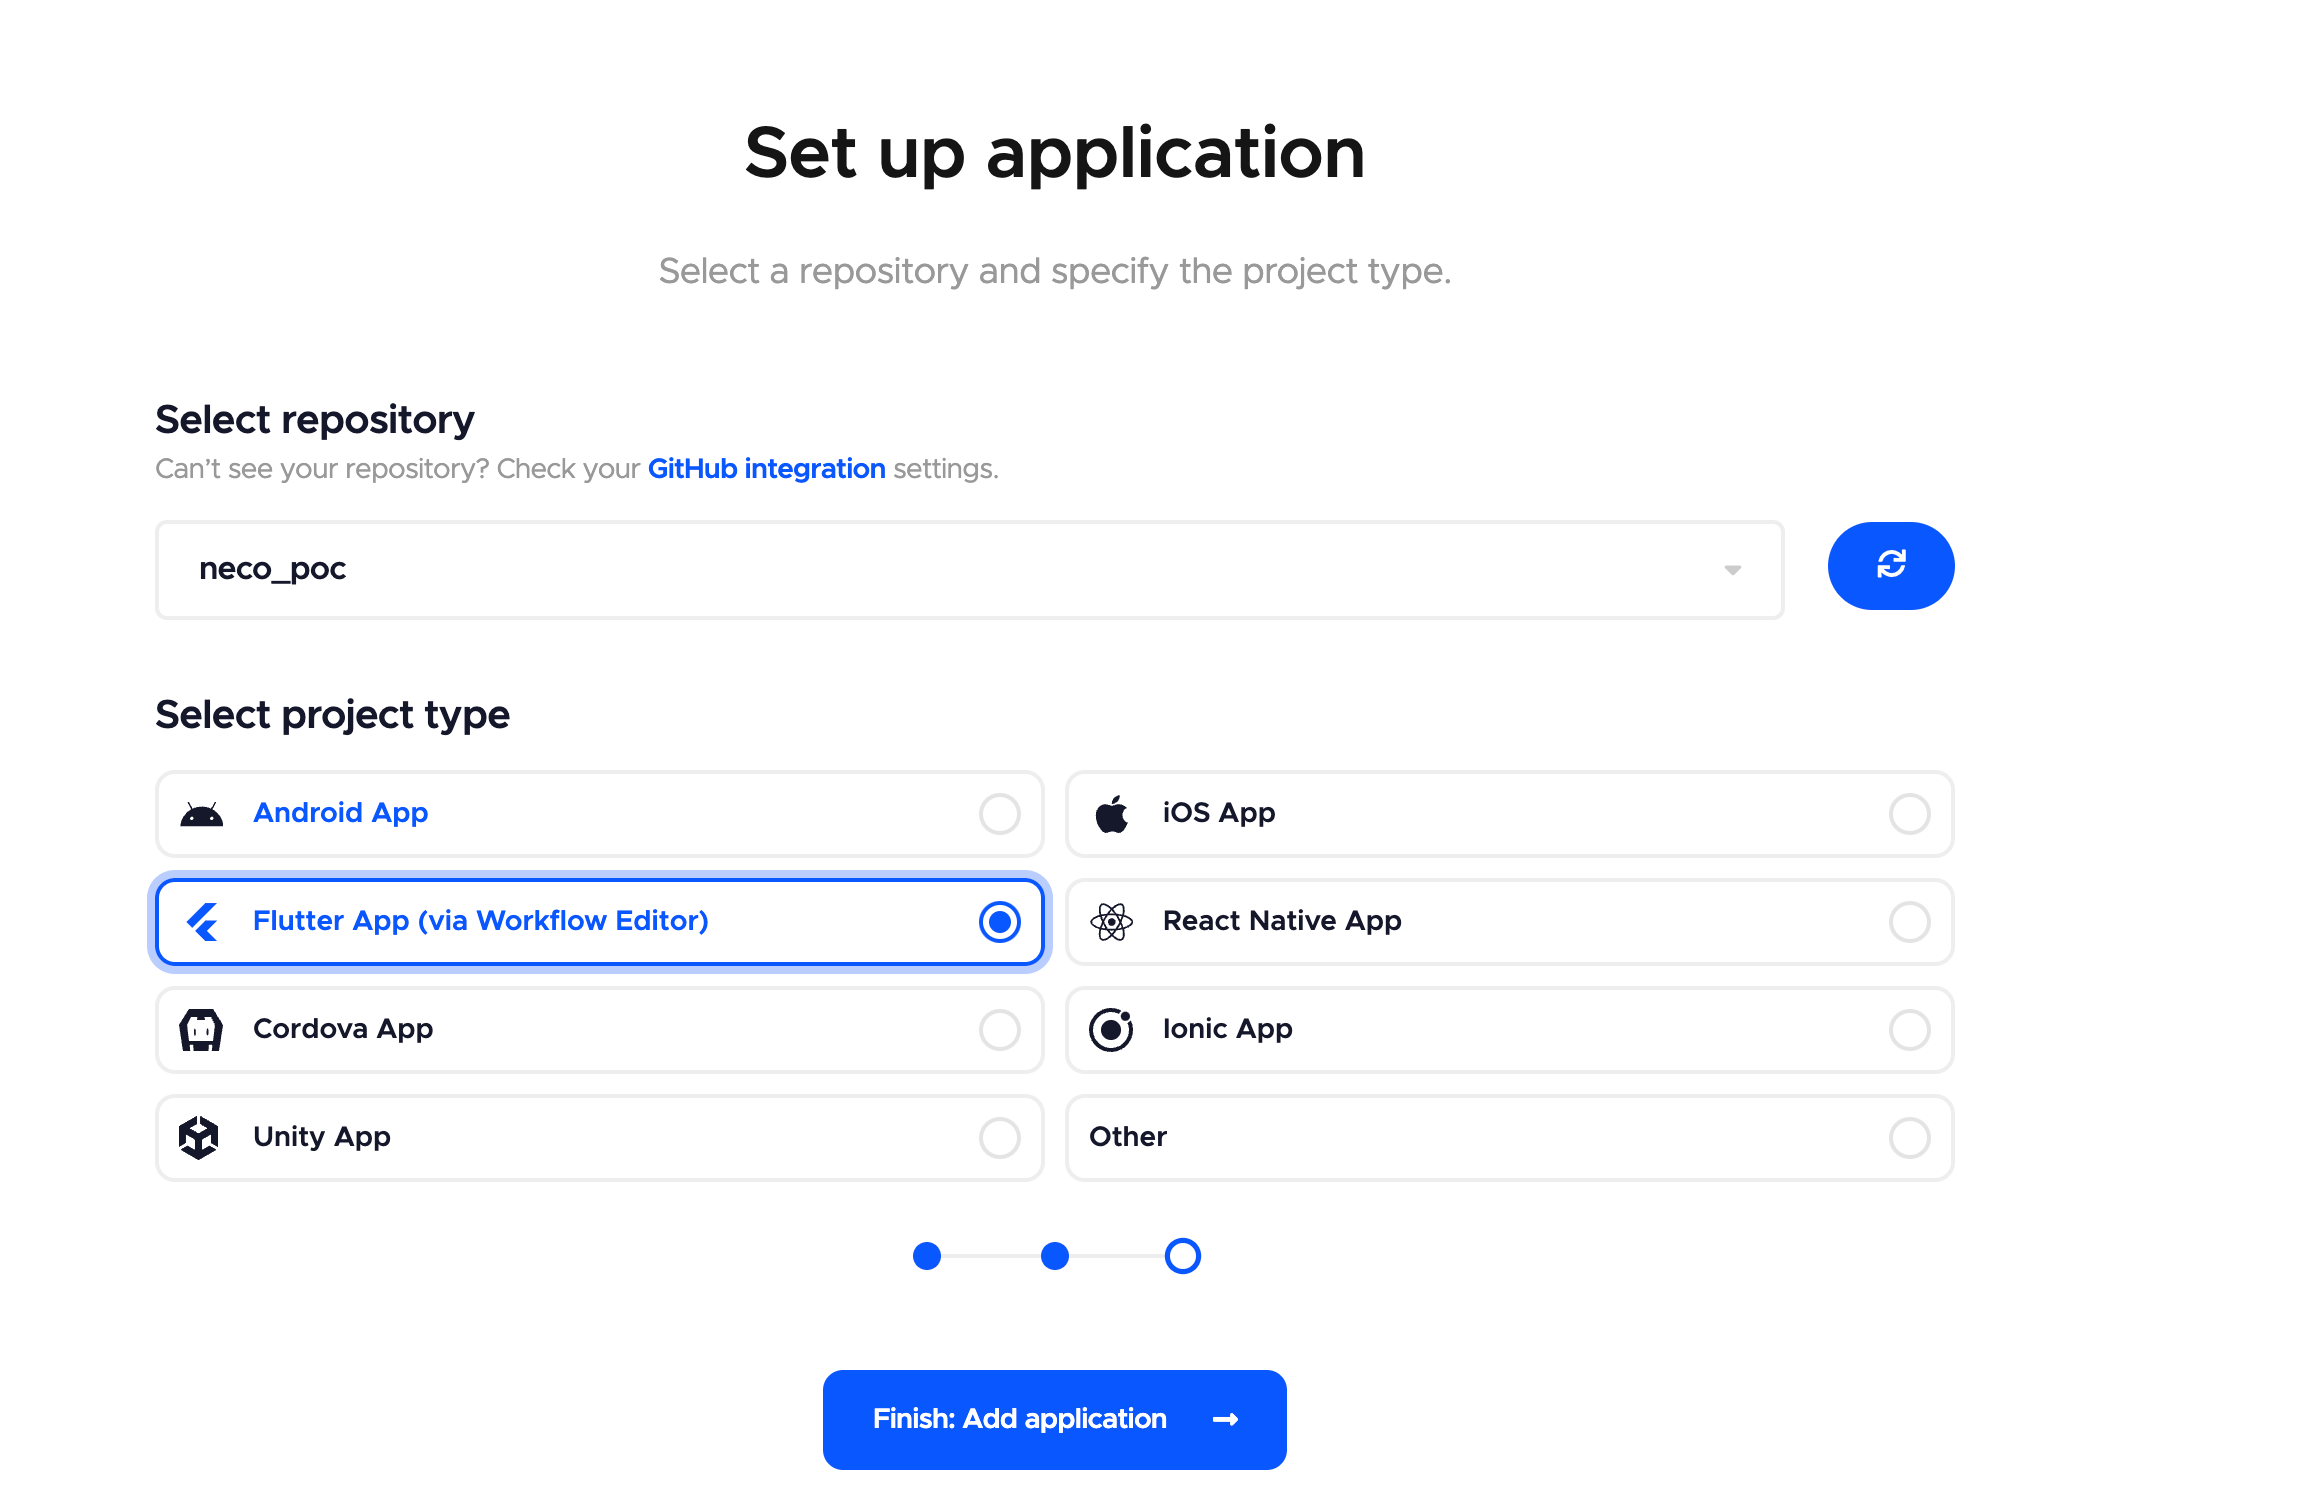
Step 3: Set up your application effortlessly on CodeMagic. The platform automatically retrieves your repositories from source control. Simply select a repository, specify the project type, and click on Finish.
For this demonstration, we’ll be building a Flutter app.
Step 4: Once your repository is set up, customize your build settings, and click the “Start new build” button to initiate the build process. Here, you’ll have various options, including selecting target platforms and configuring workflow settings.
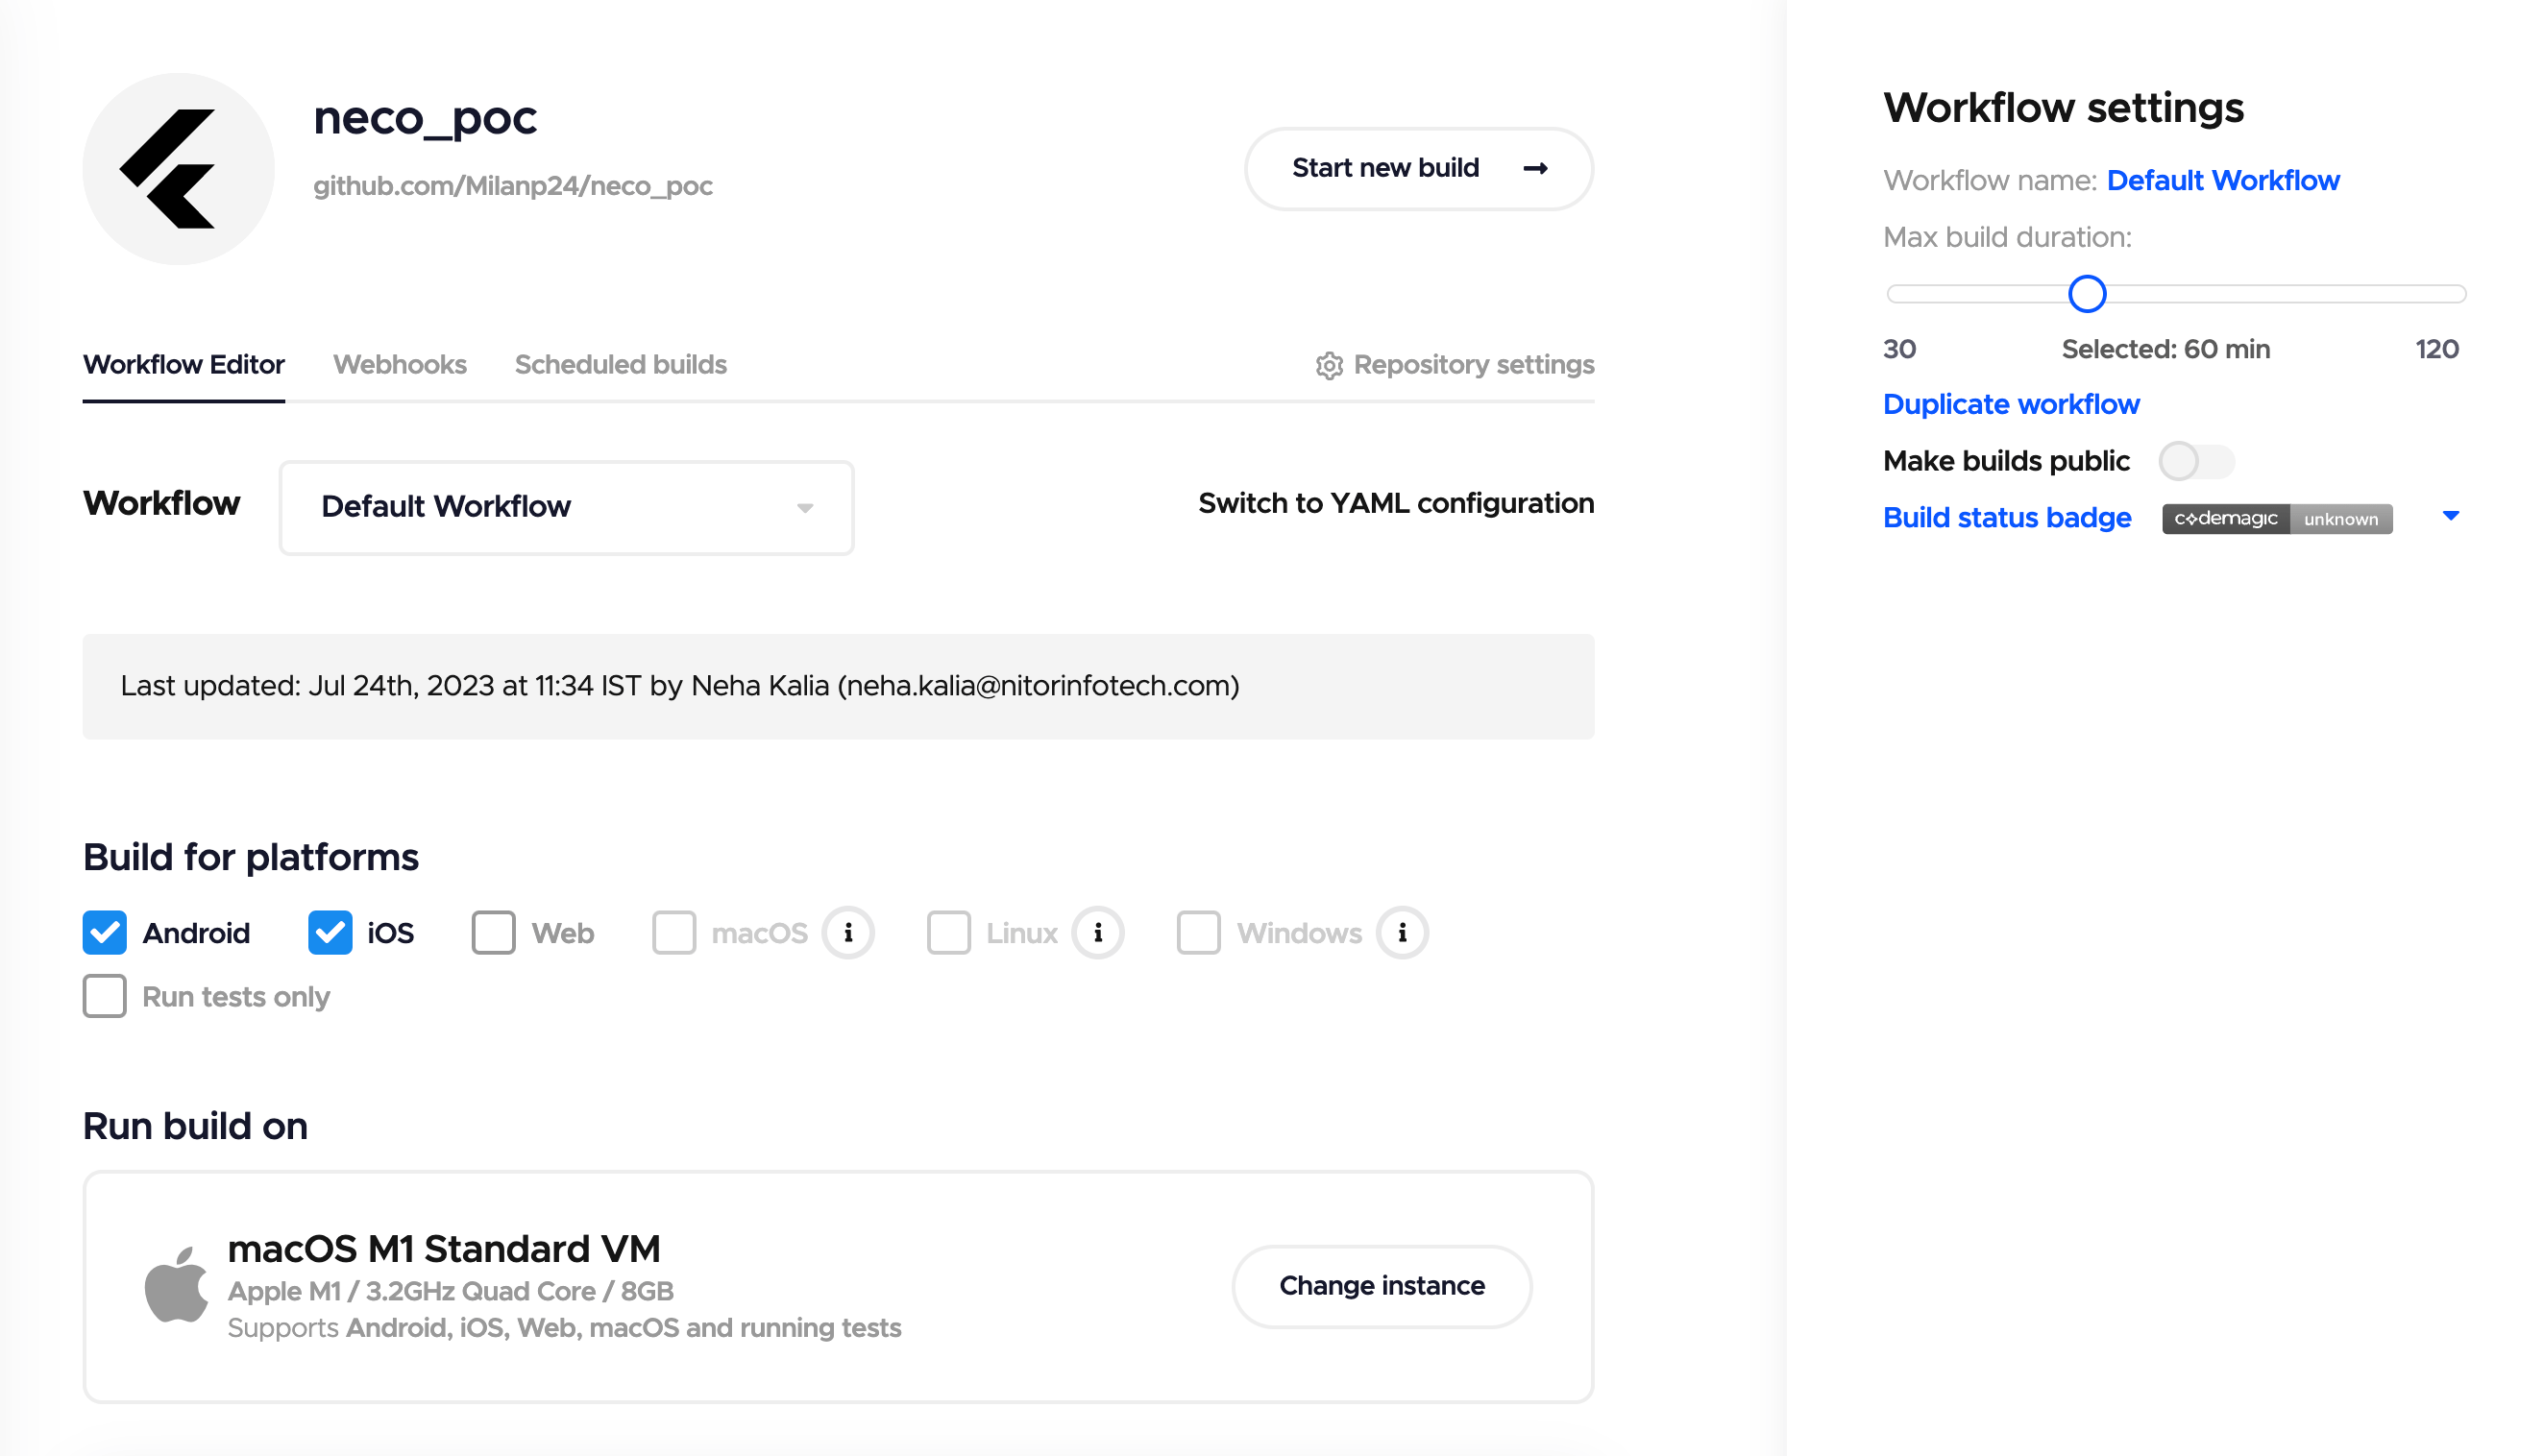
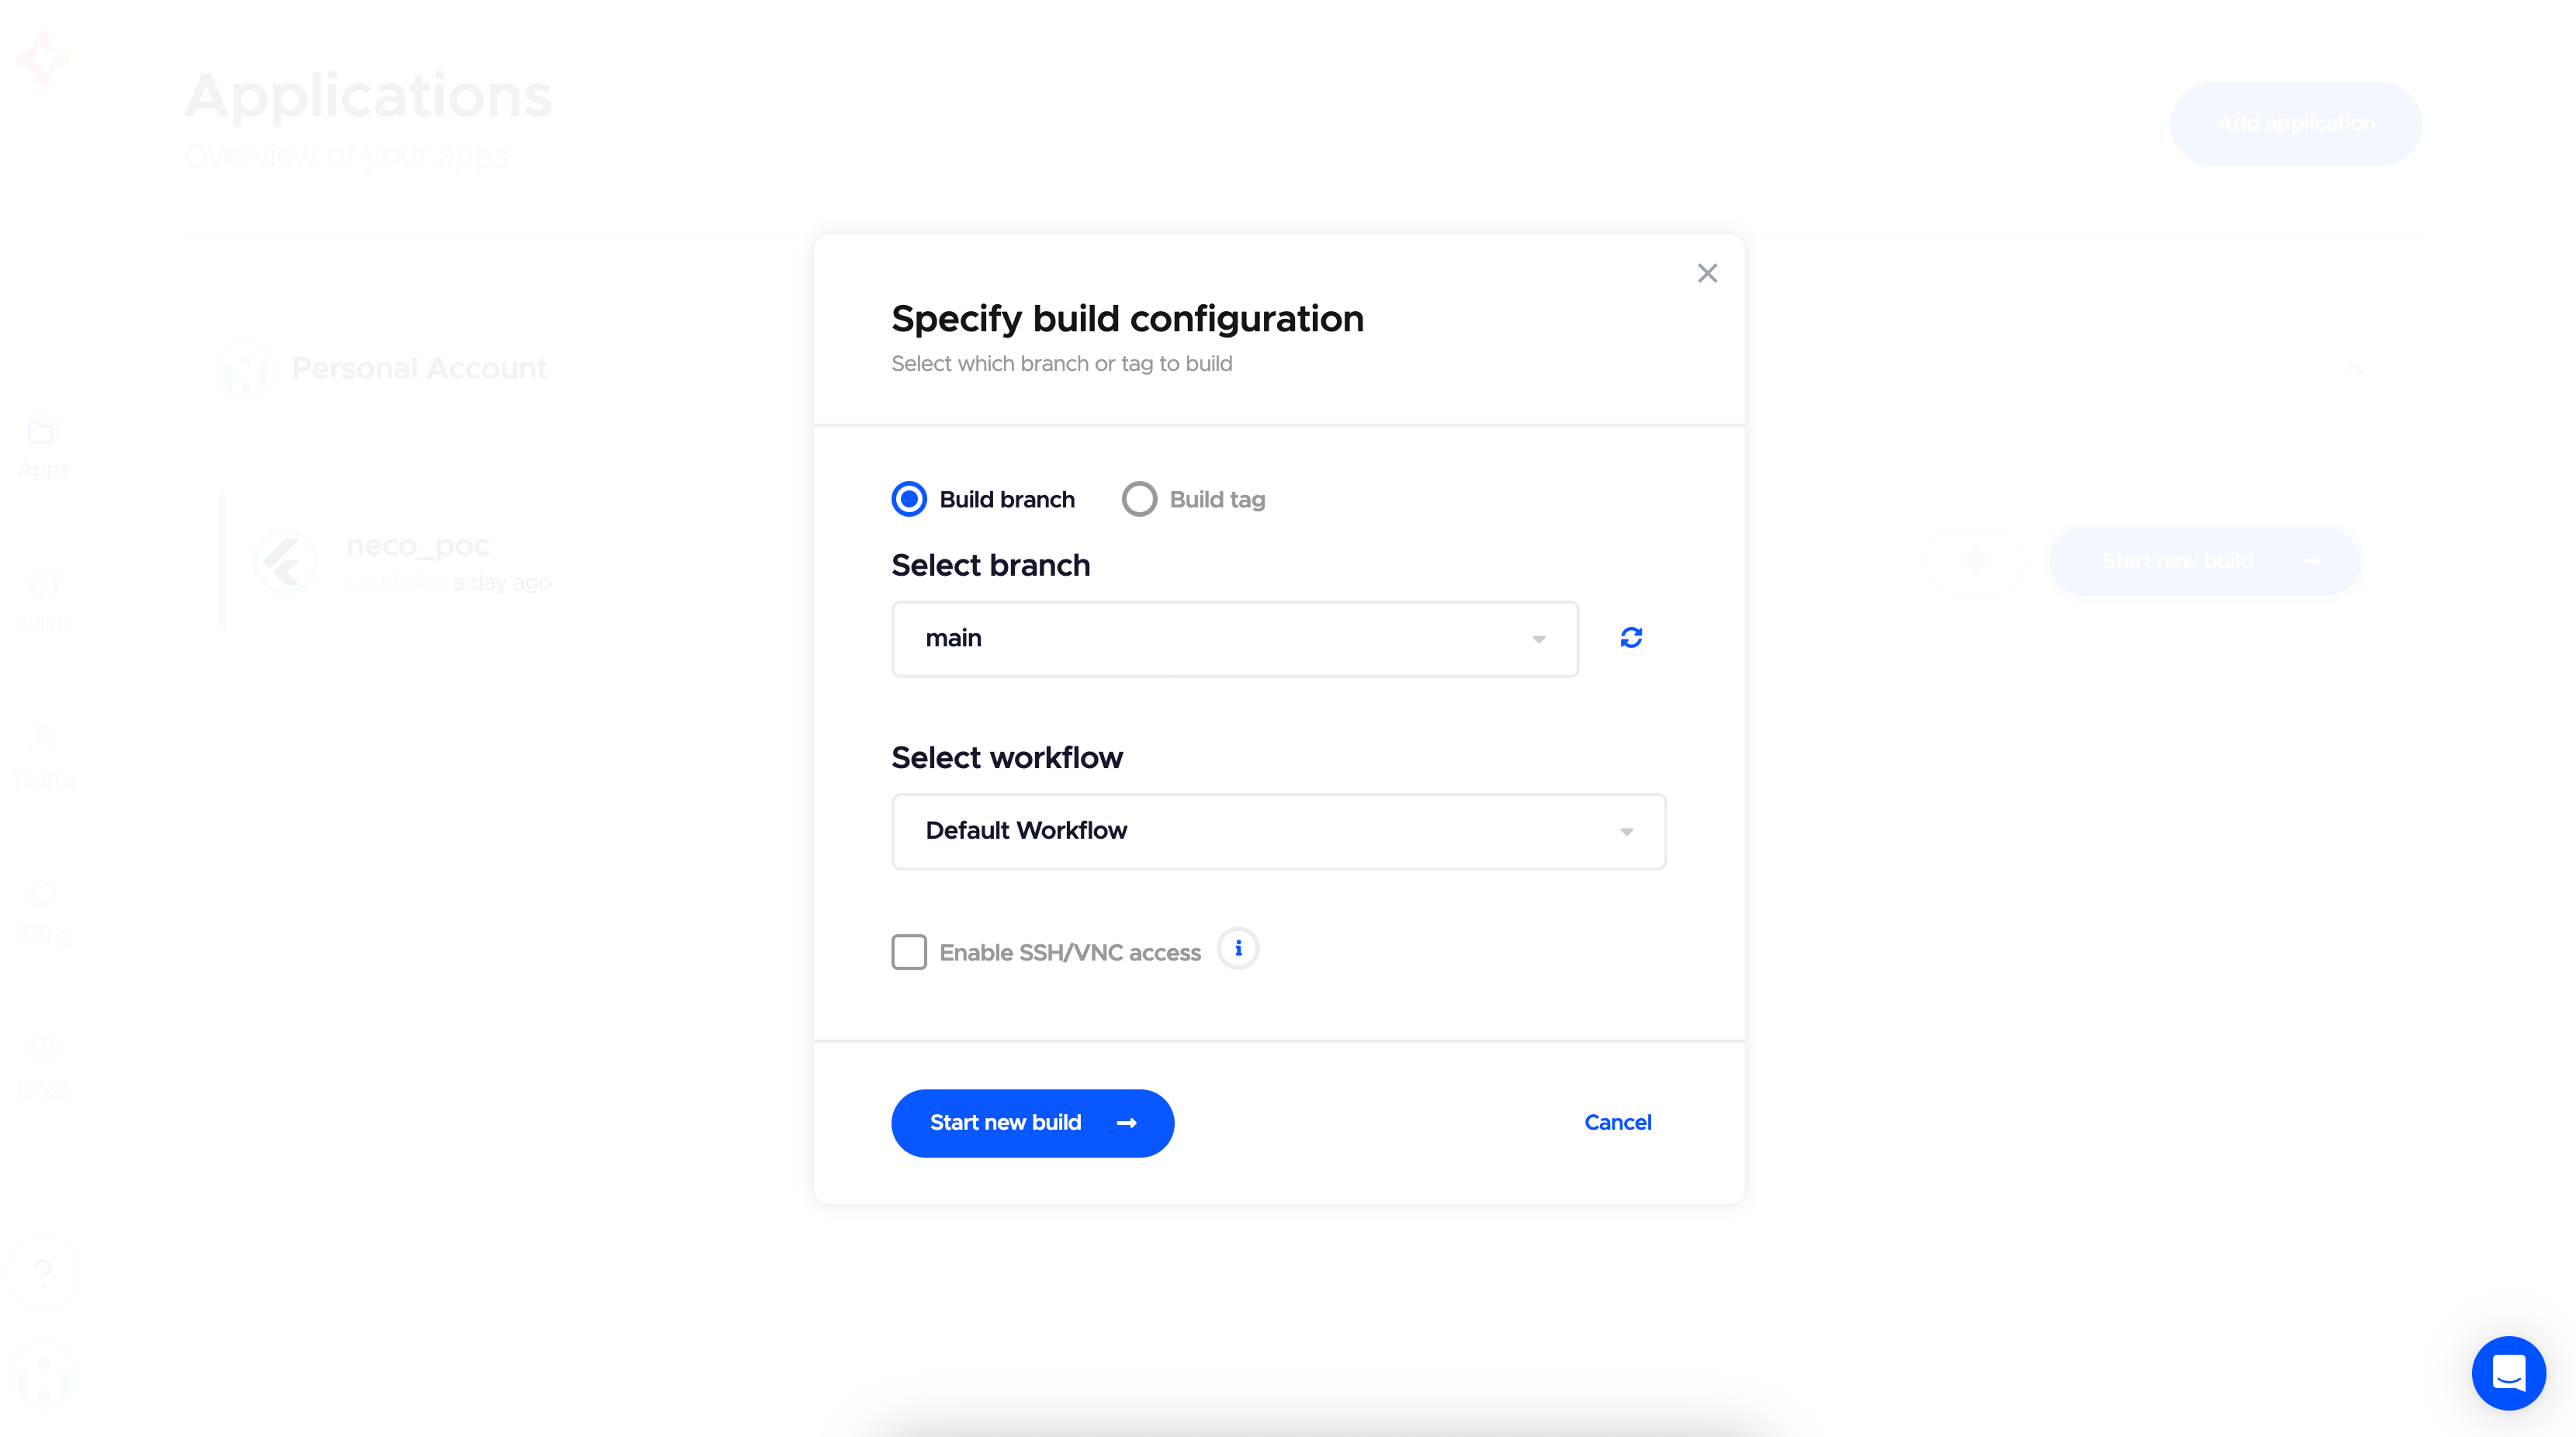
Step 5: When initiating a new build, select the branch from which you want to create the build. In my case, I’ve chosen the main branch.
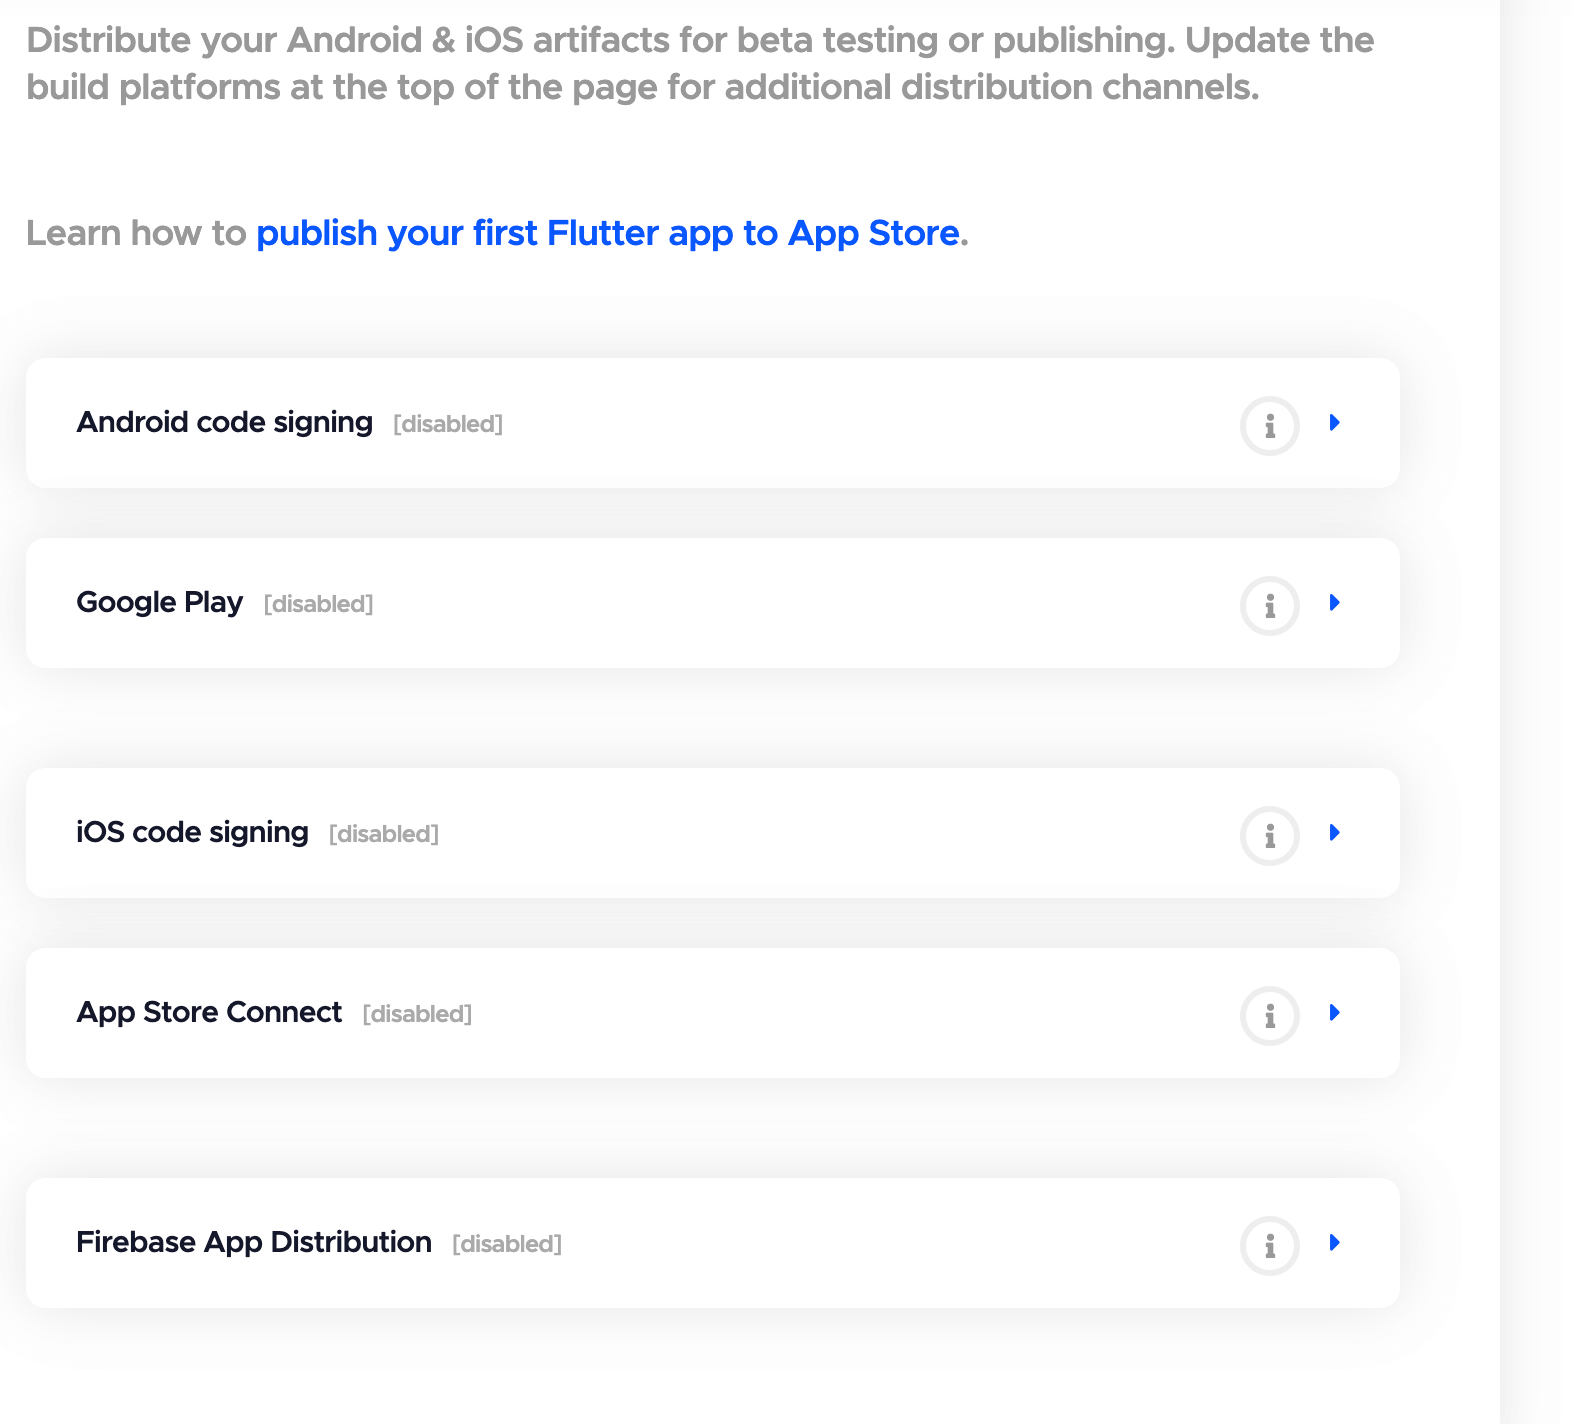
Step 6: CodeMagic streamlines the process of publishing your app on the Google Play Store or Apple App Store seamlessly within the workflow. To achieve this, navigate to the Distribution section in settings.
Here, set up Android Code signing, iOS Code Signing, App Store Connect, and Google Play Connect. CodeMagic guides you through this setup process with a user-friendly flow directly within the platform.
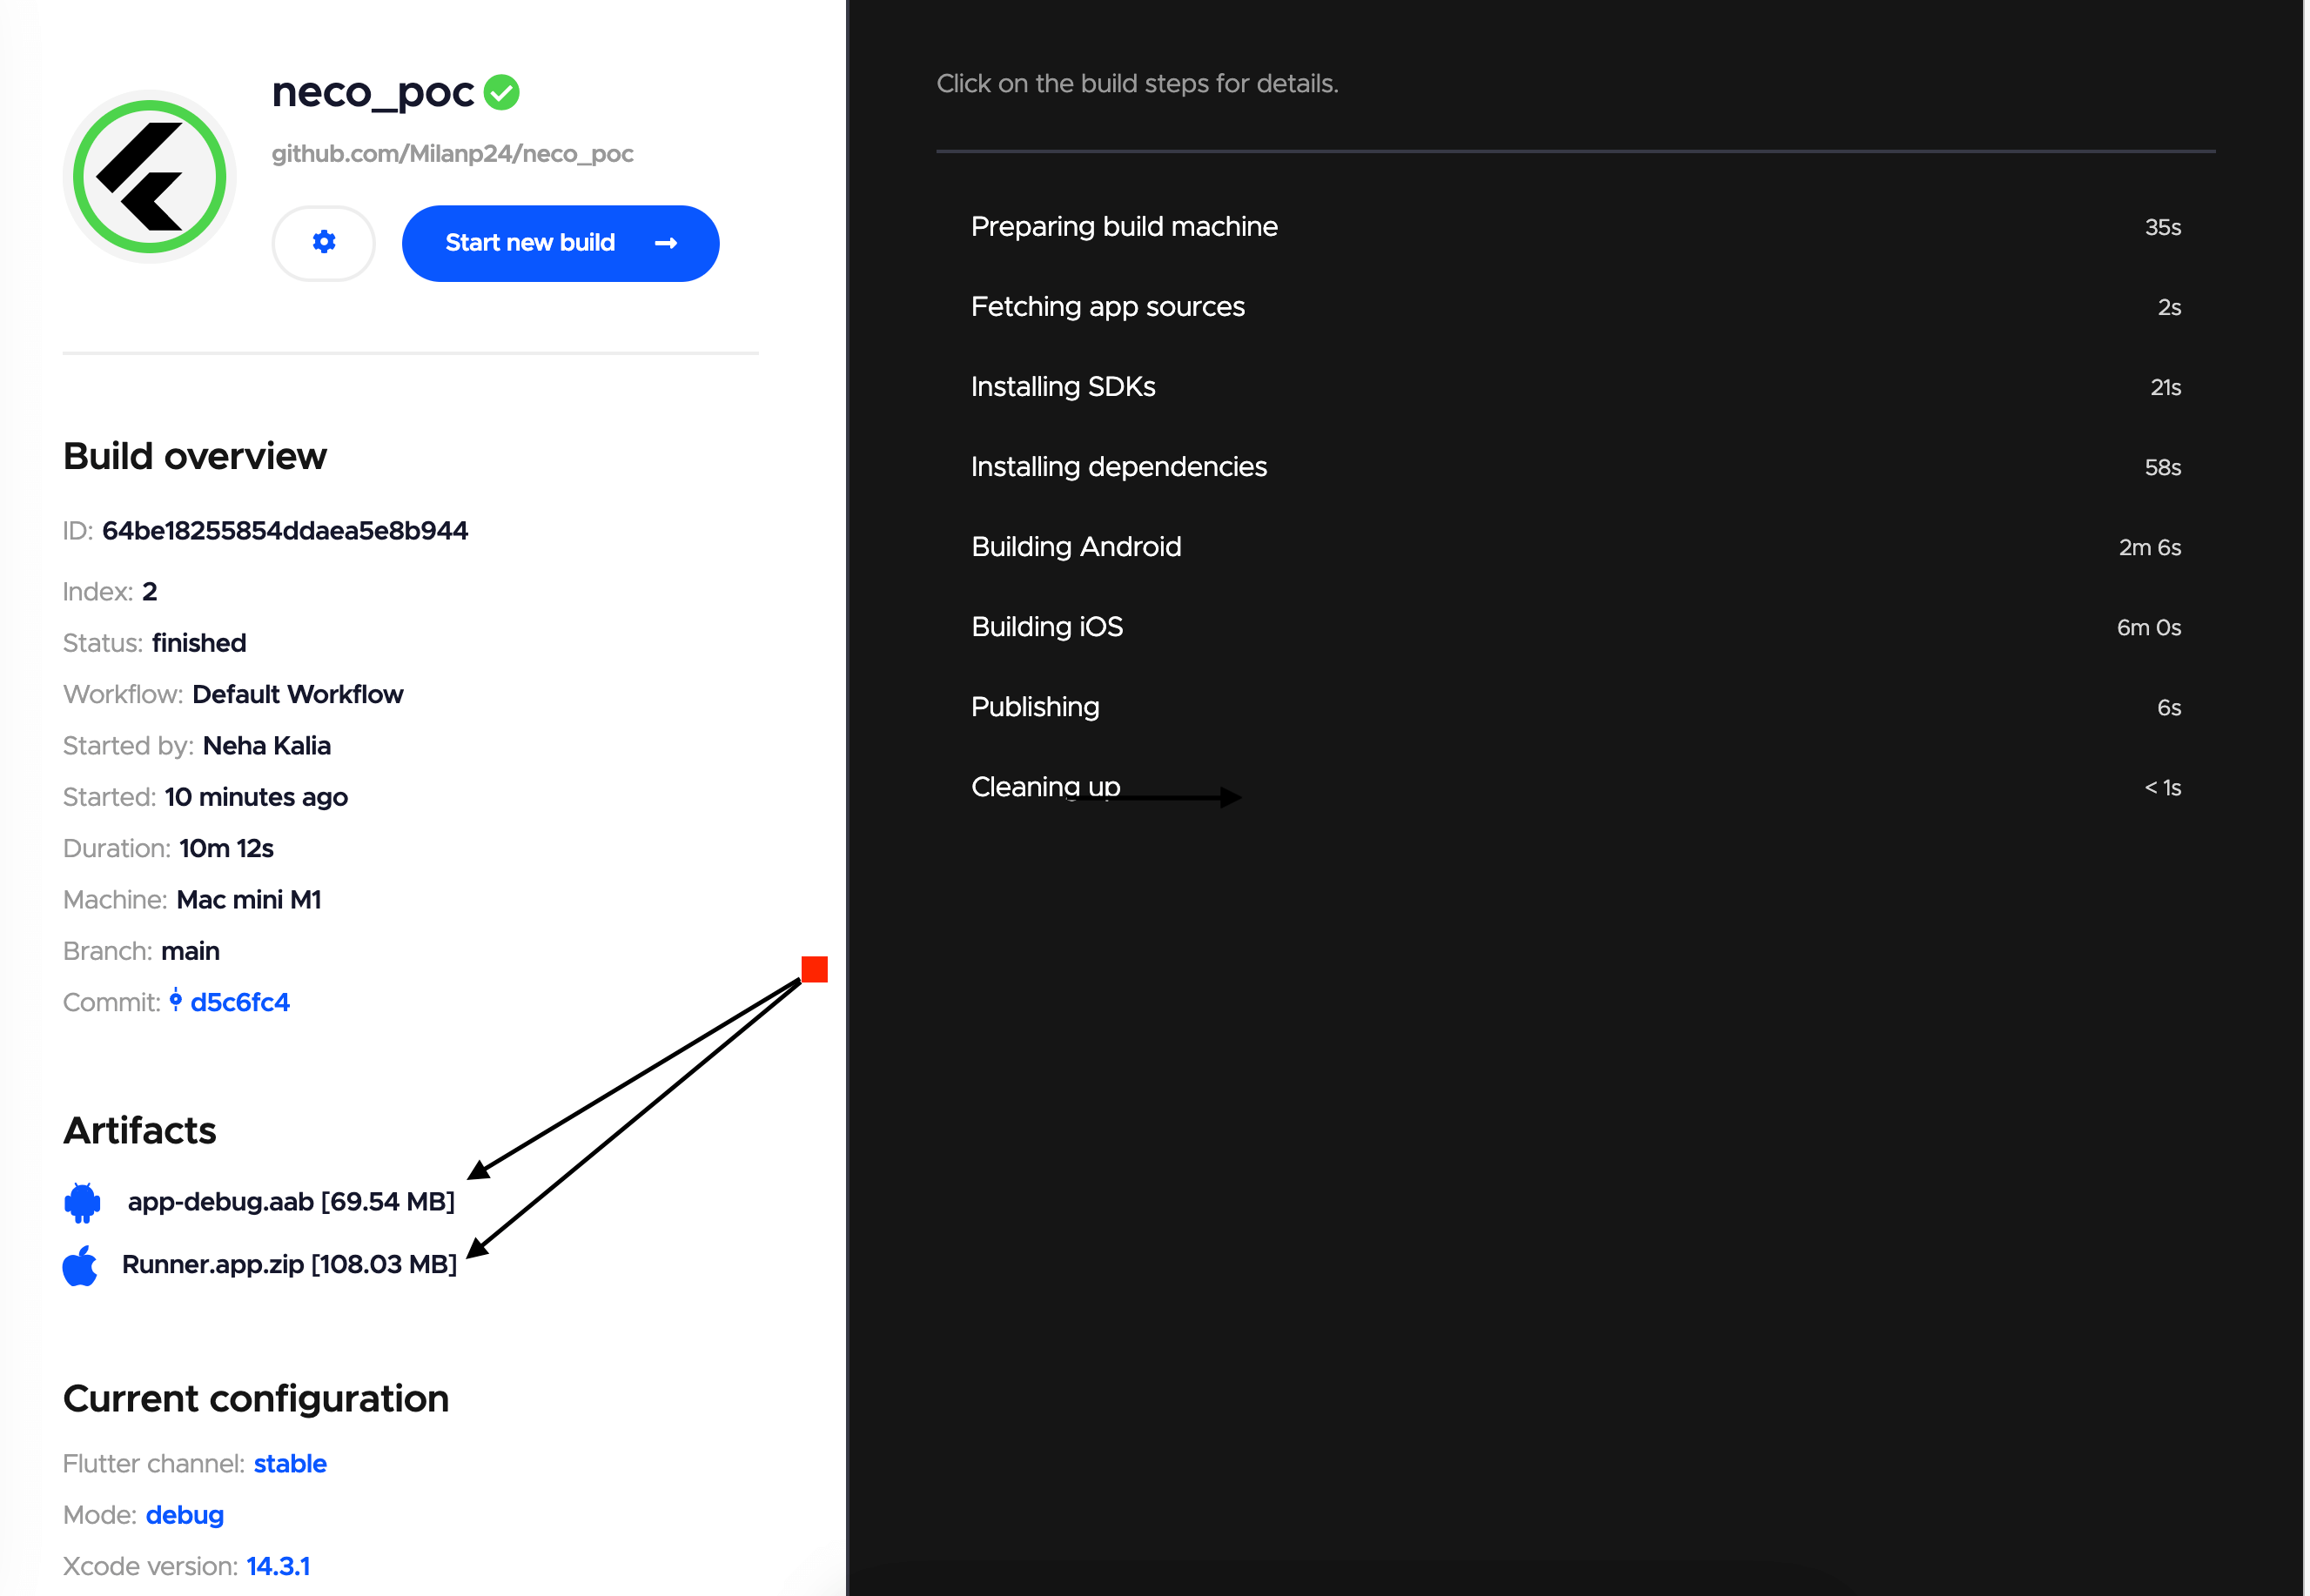
Step 7: Once a new build is initiated, CodeMagic will automatically progress through several steps. Once the process is complete, you’ll find the build showcased in the artifacts section, as illustrated in the screenshot below:
Congratulations! You’ve successfully integrated CodeMagic.
What’s next? Well, I’d like to keep you informed about its offerings, sparing you from scrolling through endless pages.
Plans & Pricing
CodeMagic provides a diverse array of pricing options, with plans falling into three main categories:
1. For Individuals: It offers a complimentary allocation of 500 macOS M1 minutes per month, allowing users to build an unlimited number of applications. Additional minutes are available through the Pay-as-You-Go pricing model. Users can run a single build at a time, and the build history along with artifact storage is accessible for 30 days.
2. For teams: Here, CodeMagic provides us with two options:
a. Pay-as-You-Go model – meaning you only pay for the resources you utilize. Monthly billing, issued on the first day of each month, reflects the usage of the preceding month. This plan allows for the unlimited building of applications with an unrestricted number of team members. Simultaneously, up to 3 builds can run in parallel. Notably, any additional concurrent builds are subject to separate charges. Build history and artifact storage are accessible for 60 days.
b. Fixed Price model – designed for teams seeking annual cost predictability. Under this plan, users have the flexibility to build an unlimited number of applications with an unrestricted team size. Simultaneously, up to 10 builds can run in parallel. Notably, there are no time constraints on build history and artifact storage.
3. For Enterprise: It offers a comprehensive solution through its singular Enterprise Plan. This plan provides access to all features, and customization options are available upon request to tailor the platform to specific requirements.
You can visit CodeMgic’s website to get further details.
So, the adoption of CI/CD not only results in a swifter and more consistent deployment workflow but also contributes to the creation of high-quality end-user products by reducing the occurrence of bugs.
As a final consideration, choosing a cloud-based CI/CD tool should hinge on the project’s nature, team size, and, most importantly, a pricing structure tailored to specific requirements.
Stay tuned for my upcoming blog, where we’ll dive into the world of CI/CD pipelines.
Also, accelerate your development journey by connecting with us at Nitor Infotech.


