Welcome to the first part of a continuous integration and continuous delivery (CI/CD) blog series!
In this first blog, I’m going to delve into the fundamentals and use the manual trigger workflow as we are going to handle a different scheme. But you can use the steps I am going to discuss with other options as well.
Also, I’m going to use a self-hosted runner and for that, I’m using my personal Mac – the reason is very simple, I exhausted all my free limit balance at a very initial state. Jokes apart, the reason for using a self-hosted runner is that we can go through every step more practically, like folder structure, folder location, and how keychains are being created where cache is stored, and so on.
Coming to the focus of today’s blog, allow me to first tell you about GitHub Actions.
What is GitHub Actions?
GitHub Actions is a continuous integration and continuous delivery (CI/CD) platform that enables you to automate your workflow for building, testing, and deployment. You can create processes that deploy merged pull requests to the production environment, or you can build and test each pull request before committing it to your repository.
Let’s turn to the ‘why’.
Why GitHub Actions?
We use GitHub Actions to build React Native apps for the following reasons:
- Most of the project’s code is kept on GitHub. Therefore, since we don’t need to configure any integrations, having the build in the same location makes the process simple.
- We adore the community that supports GitHub Actions because we can discover actions for practically every task you require. Mostly, we just need to gather the appropriate ones to build more complex workflows.
- For private repositories in an organization, GitHub Action offers 2000 free minutes, which seems sufficient in most cases if you plan to release a new app every week.

Know how we helped a leading software company enhance the CI/CD process and simplify deployment with our DevOps approach.
Prerequisites for GitHub Actions
- A GitHub account
- Familiarity with Git and branching strategies
- Basic knowledge of DevOps processes, GitHub, YAML syntax, Basic Command.
Before moving ahead, I would like to highlight how you can understand this blog series better. It is divided into three parts:
- Initial Set-up (Part 1): In this part, I cover steps like setting up Tigger, defining our runner, cloning the repo, creating .env files, node set-up, JDK, and ruby setup and dependence installation.
- IOS (Part 2): In this part, I cover iOS-specific steps like pod installation, bump version, building and uploading to the App Store.
- Android (Part 3): In this part, I cover Android-specific steps like generating app bundle, signing generated app bundle, and uploading apps to Google Play.
Let’s get started with the initial set-up!
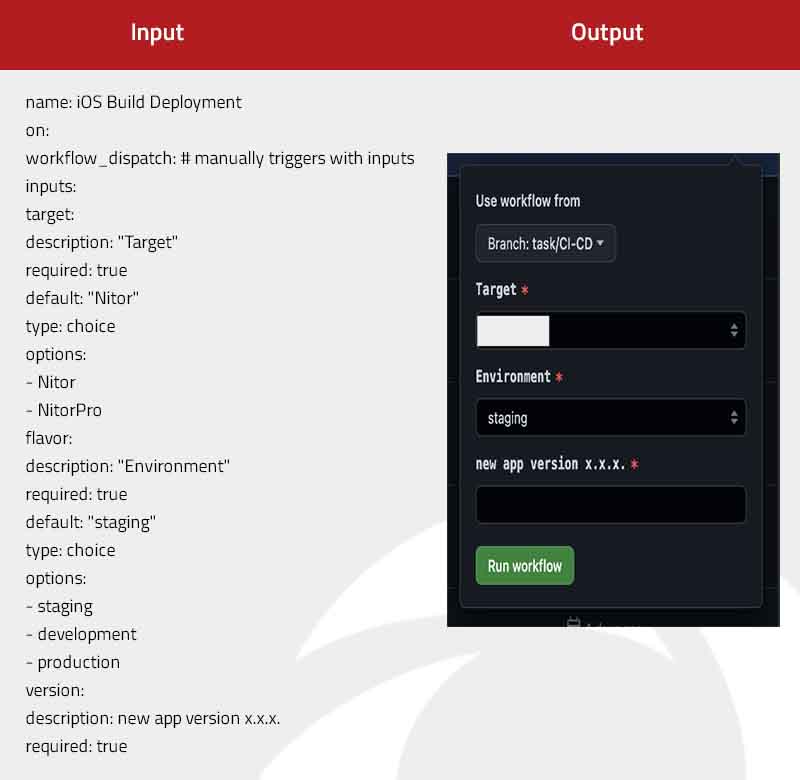
Setting up manual Tigger (iOS)
Let me give you a little bit of context here. We have two white-label applications: Nitor and NitorPro, and for both, we have different environments like staging, development, and production. Keeping that in mind, we created our workflow.
Setting up manual Tigger (Android)
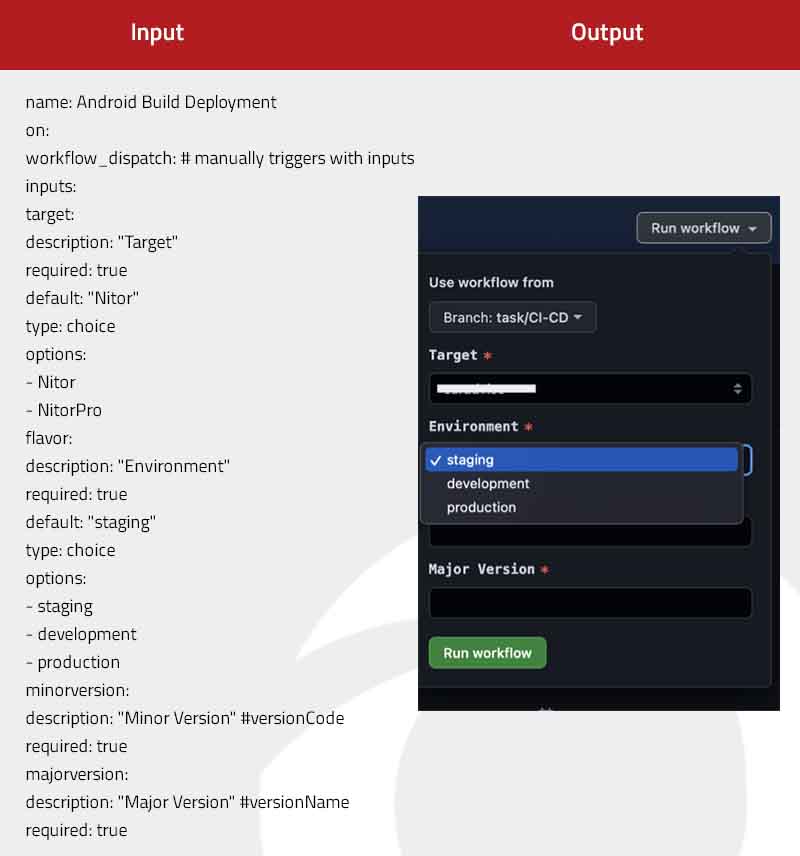
In this step, we define our action with name keyword and with on keyword we define when its trigger. Under workflow_dispatch we define our inputs with description, required, type, options and default. Also, you can add as many inputs as you want.
Defining your jobs and runner
jobs:

ios-build:

name: IOS Production Build

runs-on: self-hosted
We can define our job with jobs keyword and runner in runs-on. Here I’m using self-hosted runner but you can use Ubuntu and macOS-latest.
Cloning the repo
steps:

- name: Check out Git repository

uses: actions/checkout@v2

with:

persist-credentials: false # make it false if you are going to clone private repositories in yarn
We are using “uses: actions/checkout@v2” with “persist-credentials: false” because in our package.json we used a private repo package which can only be accessed by our team.
Setting git config Path
- name: git config with PAT_GITHUB

run: git config --global url.https://${{ secrets.PAT_GITHUB }}@github.com/.insteadOf https://github.com
PAT_GITHUB is your personal access token that you can store inside action secrets.
Setting up our ENV
Every project has .env for production, development, staging which we cannot push to our repo but for the build, we need that .env file. So, how can we get this env?
The approach is very simple – we have to encode our env and decode it in our repo.
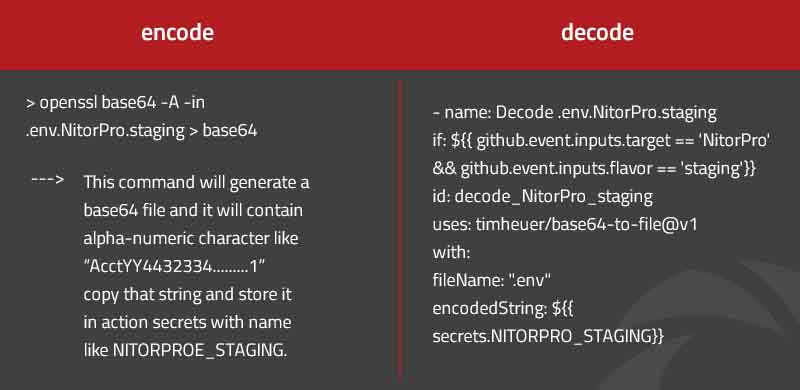
For decode, we are using timheuer/base64-to-file@v1 with filename and ‘encodedString’ options. It will create .env file and store it in a temporary folder. We have to move this file into our current directory.
I’m using this approach because we have almost 50+ ENV variables including dev, and staging. But you can use GitHub Actions secrets as well to store your ENV variables like this:
- run: echo BASE_API_URL=${{ secrets.BASE_API_URL }} >> .env

if: ${{ github.event.inputs.flavor == 'staging' || github.event.inputs.flavor == 'development' }}
- run: echo BASE_APP_URL=${{ secrets.BASE_APP_URL }} >> .env

if: ${{ github.event.inputs.flavor == 'staging' || github.event.inputs.flavor == 'development' }}
- run: echo BASE_UBER_APP_URL=${{ secrets.BASE_UBER_APP_URL }} >> .env

if: ${{ github.event.inputs.flavor == 'staging' || github.event.inputs.flavor == 'development' }}
- run: echo APP_LANDING_PAGE_URL=${{ secrets.APP_LANDING_PAGE_URL }} >> .env
- run: echo GOOGLE_MAPS_PLACES_KEY=${{ secrets.GOOGLE_MAPS_PLACES_KEY }} >> .env
- run: echo GOOGLE_MAPS_API_KEY_ANDROID=${{ secrets.GOOGLE_MAPS_API_KEY_ANDROID }} >> .env
if: ${{ github.event.inputs.target == 'Nitor' }}
This will create a .env file in your root directory and store all your ENV variables.
Move .env into root directory
- name: "move NitorPro_staging"

if: ${{ github.event.inputs.target == 'NitorPro' && github.event.inputs.flavor == 'staging'}}

run: |

mv ${{steps.decode_NitorPro_staging.outputs.filePath}} ./

pwd

cat .env
We use the move command for moving it from source to destination i.e. our source is steps.decode_NitorPro_staging.outputs.filePath and destination is ./
Set up node using action/setup-node@v1
- name: Set up our node configuration

uses: actions/setup-node@v1

with:

node-version: 16.x
Here is how you can get yarn cache directory path using actions/cache@v3:
- name: Get yarn cache directory path

id: yarn-cache-dir-path

run: echo "::set-output name=dir::$(yarn cache dir)"

- name: Restore node_modules from cache

uses: actions/cache@v3

id: yarn-cache

with:

path: ${{ steps.yarn-cache-dir-path.outputs.dir }}

key: ${{ runner.os }}-yarn-${{ hashFiles('**/yarn.lock') }}

restore-keys: |

${{ runner.os }}-yarn-
Initially it will check for cache dir. If it’s not present, I will create one after comletion of all jobs and next time it will use this dir.
Install project dependence
- name: Yarn install #yarn install

if: |

steps.cache-yarn-cache.outputs.cache-hit != 'true' ||

steps.cache-node-modules.outputs.cache-hit != 'true'

run: |

yarn install --network-concurrency 1
There you have it, some tips for the initial setup of CI/CD with GitHub Actions – hope you find them helpful! Stay tuned for Part 2 in this series which will help you set up CI/CD in the world of iOS! Meanwhile, send us an email with your thoughts about Part 1 and visit our website to know more about us.


