Today, nearly every business relies on extensive datasets for conducting tests, developing products, and analyzing market positions, among other essential activities. However, with an increase in the data volume, traditional systems struggle to scale effectively, leading to issues with throughput and performance. On the other hand, integrating different systems is complex and time-consuming which can hinder the development of efficient data pipelines.
To solve this problem, Apache Kafka was introduced by LinkedIn in 2011 as a decentralized fast message system and streaming platform. Later, it became open source under the Apache Software Foundation.
Sounds interesting?
Well, in this blog, I’ll help you understand all the nuances of Apache Kafka, its use case, and its advantages. Additionally, you will get to learn about installing Kafka with .NET apps.
Let’s start!
What is Apache Kafka and how does it achieve its high speed?
Apache Kafka is designed to handle real-time data feeds that provide a high-throughput, resilient, and scalable solution for processing and storing streams of records. It follows a publish-subscribe model where data producers write to topics, and consumers read from them. It is commonly applied in log aggregation, stream processing, and real-time analytics. The platform ensures durability by replicating data across multiple brokers in a cluster.
Kafka’s exceptional speed is coordinated by two key virtuosos:
1. Sequential I/O: Kafka addresses the perceived slowness of disks by brilliantly implementing Sequential I/O. By utilizing a log structure for message storage, Kafka achieves speeds that are close to RAM, optimizing disk access and greatly reducing seek times, ensuring fast and low-latency message delivery.
2. Zero Copy Principle: With this principle, Kafka avoids unnecessary data copies and reduces context switches between user and kernel modes, making it more efficient. The idea is to directly move data to the Network Interface Controller (NIC) buffer through the kernel, significantly reducing transfer time.
Besides these powerful features, Kafka uses extra techniques to make it even better:
- Message Compression: Shrinking message sizes for faster transmission is a game-changer when it comes to handling substantial data volumes.
- Message Batching: Bundling messages together to streamline processing is particularly beneficial, especially in high-volume message environments.
So, Kafka’s lightning speed is achieved through a combination of optimized architecture, smart compression techniques, batch processing capabilities, and efficient utilization of in-memory storage.
Refer to the image below to check out how Kafka works quickly:

Fig: What makes Kafka fast?
If you’re wondering why choose Kafka over other options, I’ve got the answer for you next.
Why Kafka?
Apache Kafka is a popular choice due to the following reasons:
1. High performance: It can handle millions of messages per second and is designed to write data, making it well-suited for situations that necessitate rapid data ingestion and processing.
2. Non-volatile storage: It stores messages on disk, which enables durability and fault-tolerance. This means that even if a consumer goes offline, it can resume consuming messages from the point it left off once it comes back online.
3. Distributed architecture: It can handle large amounts of data and scale horizontally by adding more machines to the cluster.
4. Publish-subscribe model: It follows a publish-subscribe messaging pattern, where producers publish messages to topics, and consumers subscribe to those topics to receive the messages. This decoupling of producers and consumers enables easy scalability and flexibility in building data pipelines.
5. Fault-tolerance: It is made to be always available and handle failures well. This is done by copying data across multiple brokers in a group. So, even if one broker fails, you can still access and use the data from other copies.
6. Scalability: Kafka’s distributed architecture enables horizontal scalability. By adding additional brokers to the cluster, you can effectively handle higher data ingestion and processing demands while maintaining optimal performance.
Overall, Kafka’s design principles and features make it an excellent choice for building fast, scalable, and fault-tolerant data pipelines and real-time streaming applications.
Next, let’s explore Apache Kafka’s use cases to provide you with a clearer understanding.
Use cases of Apache Kafka
Here are the top 5 uses cases of Apache Kafka:
1. Data Streaming: It is a powerful platform for processing, analyzing, and streaming real-time data, making it an excellent choice for building dynamic and responsive applications. Kafka integrates seamlessly with stream processing frameworks such as Kafka Streams, Apache Spark, and Apache Flink. It enables real-time processing of streaming data and provides support for complex event processing, transformations, and analytics.

Fig: Data Streaming
2. Log Aggregation: You can streamline log management with Kafka. It brings logs from different places together for easy troubleshooting and analysis. It excels at log aggregation by collecting log data from various sources and centralizing them, making it easy to monitor, analyze, and troubleshoot distributed systems.

Fig: Log Aggregation
3. Data Replication: Its data replication capabilities ensure data consistency across distributed systems. Whether you need to replicate data between data centers or ensure high availability, it will get you covered. You can also use it for data replication and backup to replicate data across multiple locations, ensuring availability and disaster recovery.

Fig: Data Replication
4. Messaging Queue: It enhances communication between microservices, applications, and components with its reliable message queue architecture. One of the most important uses of Apache Kafka is as a distributed messaging system. It is commonly used for building real-time data pipelines and streaming applications.

Fig: Message Queuing
5. Web Activity Tracker: Its capability to handle high volumes of data and offer low-latency processing makes it a perfect option for developing reliable web activity tracking systems.
![]()
Fig: Web Activity Tracker
In addition to the mentioned five areas, Apache Kafka excels in data integration, event streaming, Internet of Things (IoT), commit log, and facilitating communication in microservices architectures.
Excited to give Apache Kafka a try after all this info?
Worry not! Next up, you’ll learn how to install it with a real-life example.
Apache Kafka Installation and .NET Application Setup
Here, I’ll show you a simple example of installing Kafka on your machine and writing programs in .NET Core 6.0 to connect with a Kafka application for message queueing.
I’ll create two applications: one is the Producer, and the second is the Consumer. The Producer will write messages and send them to the Consumer through Kafka.
Step 1: How to download Apache Kafka?
Scroll through these screenshots as you go through the texts:
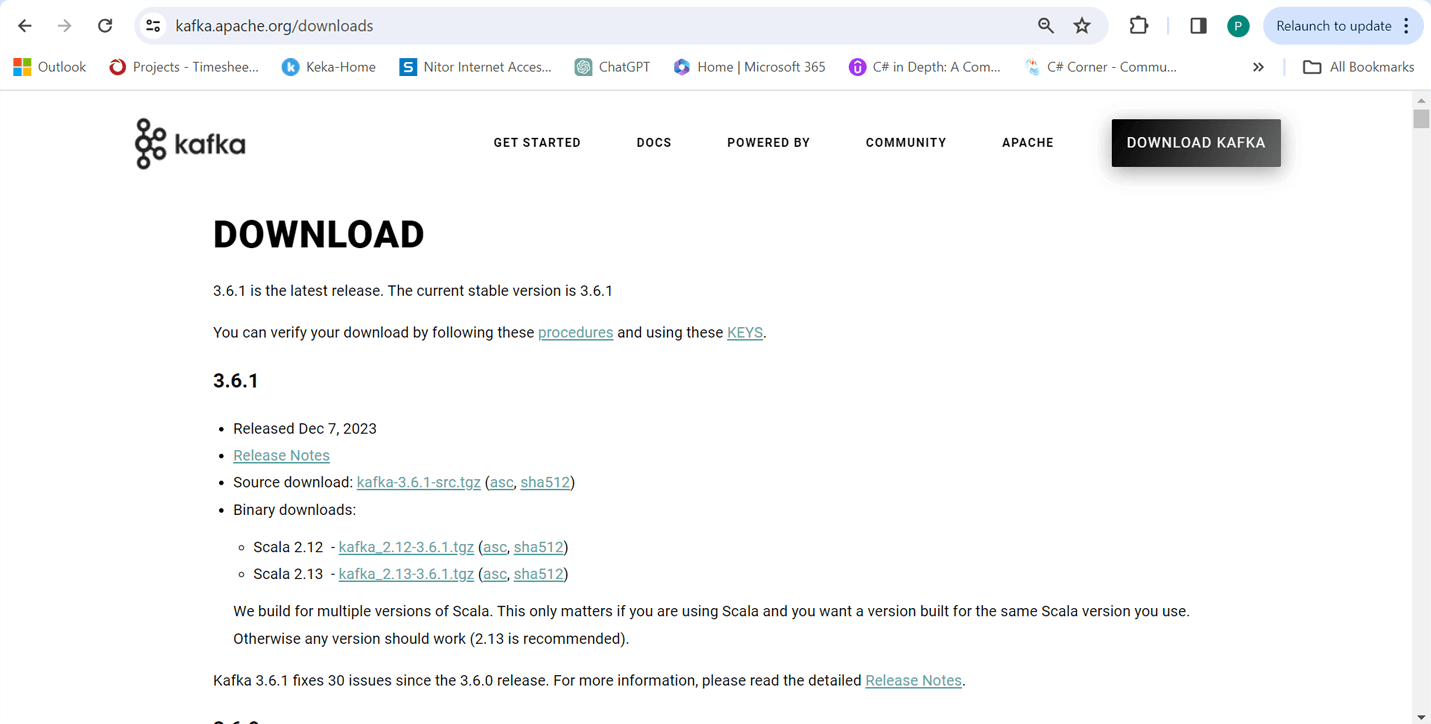
Step 1.1: To download it, simply visit the website and choose the version that suits your needs.
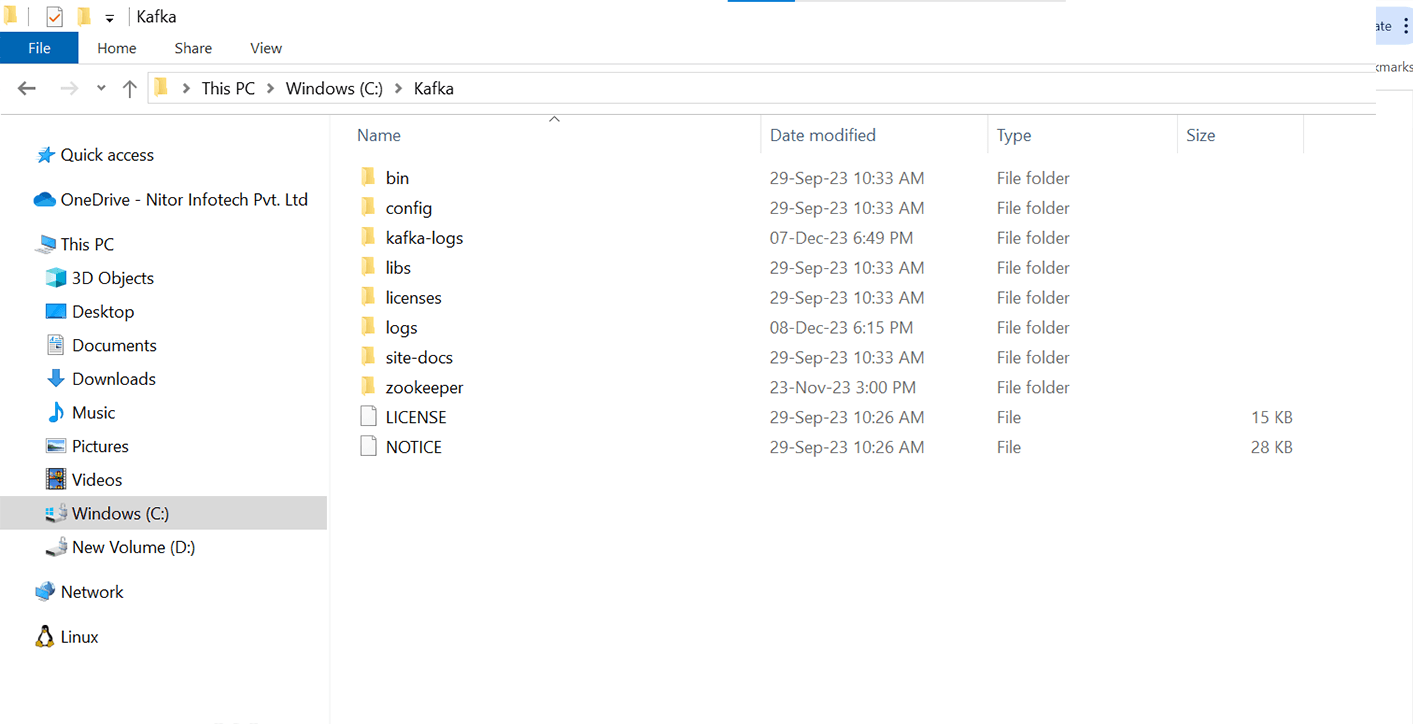
Step 1.2: Once you download it, make a folder named ‘Kafka’ in your C: drive and put the downloaded file in there.
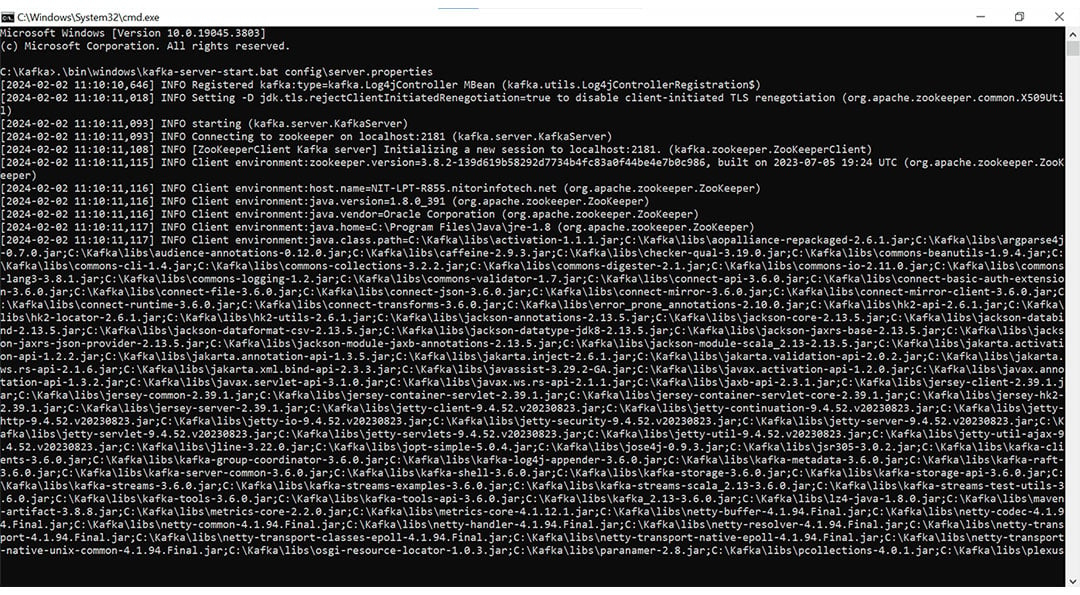
Step 2: How to run Kafka server and Zookeeper?
For running Apache Kafka, there are two important files: the server.properties file and the zookeeper.properties file, both found in the config folder.
Step 2.1: Make sure you have JDK installed on your machine. Open two terminals with the path “C:\Kafka>”.
Step 2.2: Hit the following commands to run Zookeeper and the server.
Server -> .\bin\windows\kafka-server-start.bat config\server.properties
Step 2.2: Run Zookeeper & Server
Step 2.3: Once you run this command, your server will commence on Port 9092. Employ this port when connecting your .NET application to the Kafka server.
Zookeeper -> .\bin\windows\zookeeper-server-start.bat config\zookeeper.properties
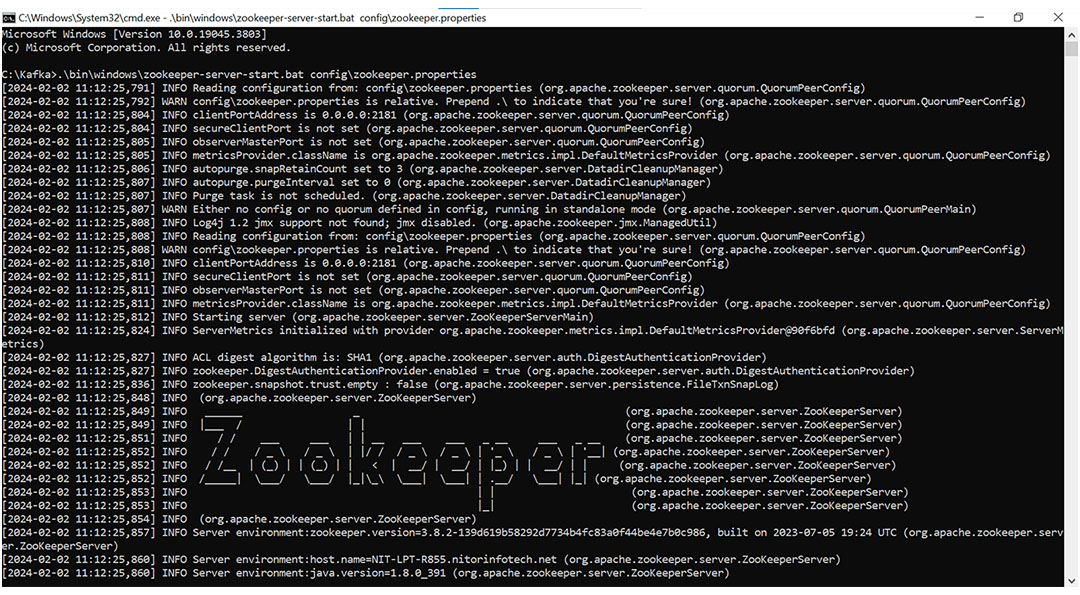
Step 2.3: Post running the command
Step 2.4: After executing these two commands in separate terminals, you can start your Visual Studio instance.
Note: You need to create two applications for consuming and producing Kafka messages: one for the Consumer and one for the Producer.
Step 3: Creating a new Project for Kafka Consumer
Scroll through these screenshots as you go through the texts:
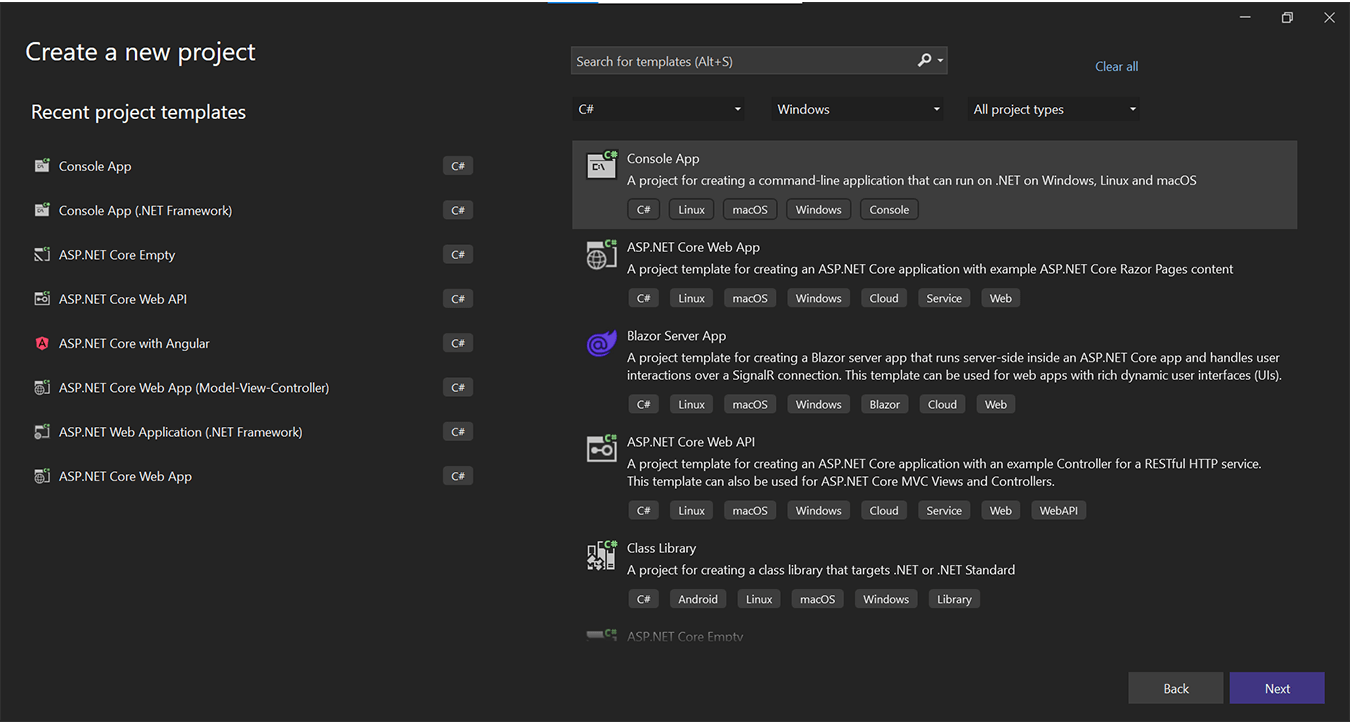

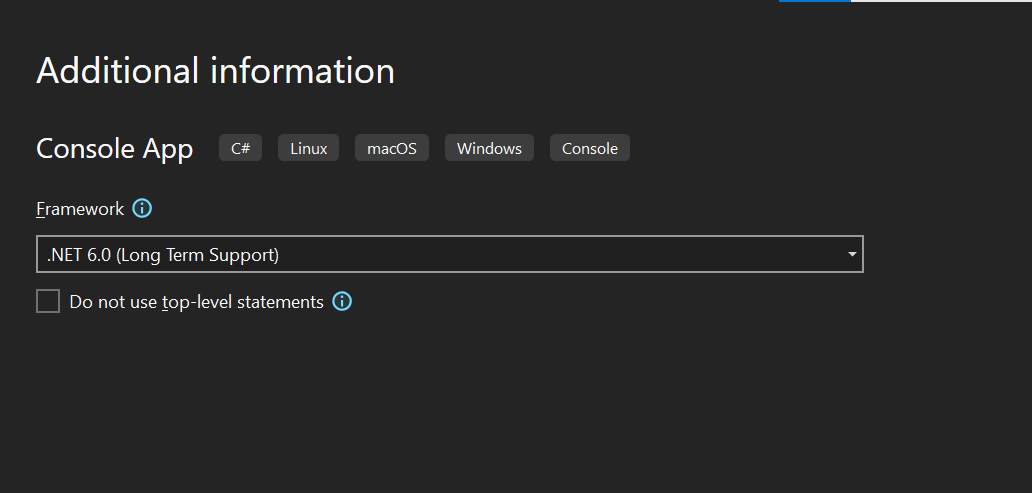
Step 3.1: Select console application in .Net 6 C#.
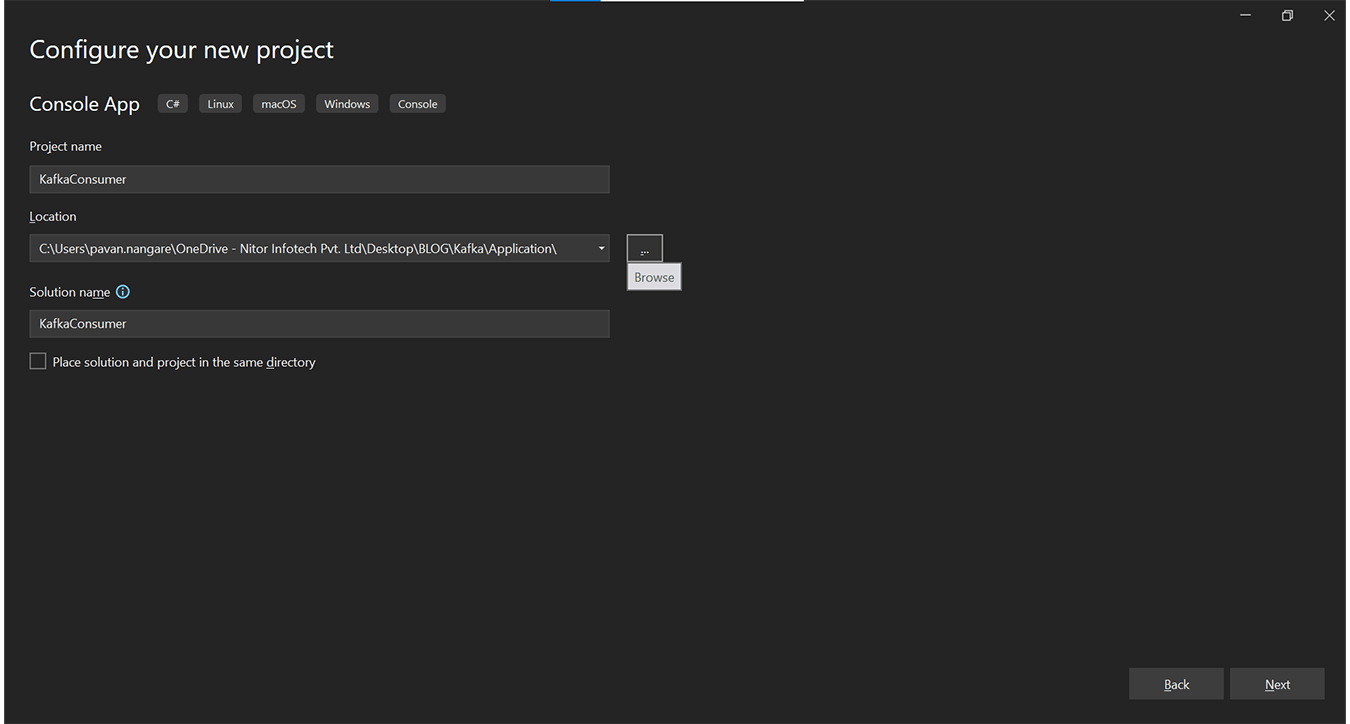
Step 3.2: You can name it “KafkaConsumer.” The application will be responsible for consuming Kafka messages.
Step 3.3: Then, you can select .NET 6.0 (Long-Term Support) and click on Create.
Post these steps, the application will be created successfully.
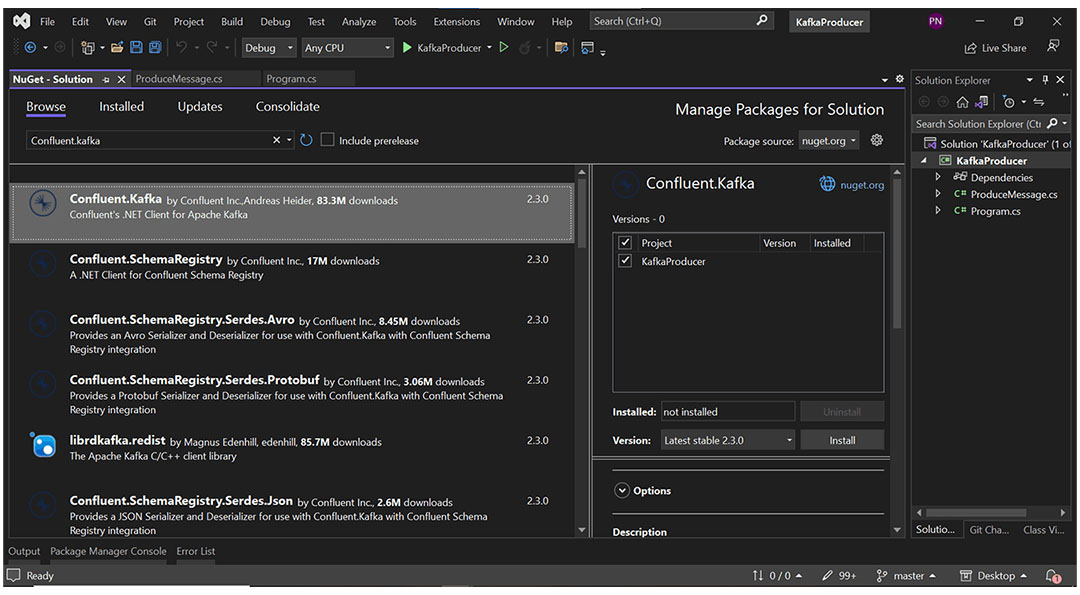
Step 4: Installing Confluent.Kafka package
After starting the application, add the package named “Confluent.Kafka.”

Step 4: Install Confluent.Kafka
Step 5: Write Consumer Program
Write the code below for a consumer, and then create another one for a producer:
using Confluent.Kafka;

using System;

using System.Collections.Generic;

using System.Linq;

using System.Text;

using System.Threading.Tasks;

namespace KafkaConsumer

{

public class ConsumeMessage

{

public void ReadMessage()

{

var config = new ConsumerConfig

{

BootstrapServers = "localhost:9092",

AutoOffsetReset = AutoOffsetReset.Earliest,

ClientId = "my-app",

GroupId = "my-group",

BrokerAddressFamily = BrokerAddressFamily.V4,

};

using (var consumer = new ConsumerBuilder<Null, string>(config).Build())

{

consumer.Subscribe("KafkaTopic");

try

{

while (true)

{

var consumeResult = consumer.Consume();

Console.WriteLine($"Message received from {consumeResult.TopicPartitionOffset}:
{consumeResult.Message.Value}");

}

}

catch (OperationCanceledException)

{

// The consumer was stopped via cancellation token.

}

finally

{

consumer.Close();

}

}

Console.ReadLine();

}

}

}
Step 6: Creating an application for a Kafka producer
Navigate through these snapshots as you go through the content:

Step 6.1: You can do the same for a Kafka Producer application. First, select the console application for .NET 6.0 C#.
Step 6.2: Name the second application as “KafkaProducer” to produce Kafka messages.
Step 6.3: To keep the framework as .NET 6.0 (Long-term Support), click on the “Create” button.
Step 7: Install Confluent.Kafka Package
Once you’ve successfully built a new producer application, install the package named “Confluent.Kafka.”
Step 7: Confluent.Kafka package
Step 8: Write program for Kafka Producer
Write the program below for Kafka producers:
using Confluent.Kafka;

using System;

using System.Threading.Tasks;

namespace KafkaProducer

{

public class ProduceMessage

{

public async Task CreateMessage()

{

var config = new ProducerConfig

{

BootstrapServers = "localhost:9092",

ClientId = "my-app",

BrokerAddressFamily = BrokerAddressFamily.V4,

};

using (var producer = new ProducerBuilder<Null, string>(config).SetKeySerializer(Serializers.Null)
.SetValueSerializer(Serializers.Utf8).Build())

{

Console.WriteLine("Please enter the message you want to send");

var input = Console.ReadLine();

var deliveryReport = producer.ProduceAsync("KafkaTopic", new Message<Null, string>
{ Value = input }).GetAwaiter().GetResult();

Console.WriteLine($"Message delivered to {deliveryReport.TopicPartitionOffset}");

}

}

}

}
Step 9: Run both projects Kafka Consumer & Kafka Producer
To run both the Consumer and Producer programs concurrently, open two separate terminals—one for the Consumer program and the other for the Producer program.
Step 10: Send message from Kafka Producer
This is how the producer terminal will look:
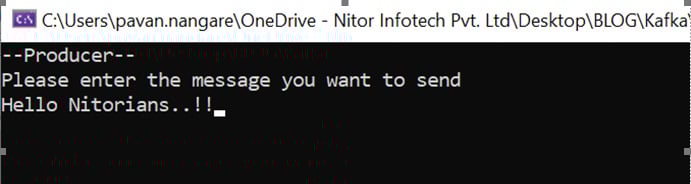
Step 10: Producer Terminal
After hitting Enter, the message will be consumed in the consumer’s terminal, and the consumer terminal window will display the result.
Step 11: Receive messages sent from the Kafka Producer
Here’s what you will see once the Kafka producer receives the message:

Step 11: Message received
Congratulations! You’ve completed navigating through the entire install and implementation process.
So, whether you’re a business seeking real-time data prowess or a developer craving efficient solutions, Apache Kafka stands as the catalyst for transformative data strategies.

Discover our work on a data analytics platform for a business, providing unrestricted access to valuable insights.
To know more about such technologies and other cutting-edge solutions, reach out to us at Nitor Infotech.


