
AI is transforming software testing by making it faster, smarter, and more scalable, and Testim is at the forefront of this change. It leverages AI to automate test creation, maintenance, and execution with features like dynamic locators, seamless test recording, customizable JavaScript code, and flexible CI integration. With Testim, QA teams can accelerate release cycles, maintain high test accuracy, and adapt to evolving application interfaces effortlessly.
When artificial intelligence is revolutionizing every industry, why should software testing fall behind? With software automation testing tools like Testim, you can leverage AI-driven features and transform the way test cases are created, executed, and maintained. Testim isn’t just making noise; it’s setting a new standard for intelligent, efficient, and scalable test automation.
Before we dive in, I recommend that you read a fantastic blog by one of my colleagues. He breaks down Testim’s capabilities, explores real-world use cases, delves into its architecture, and much more.
Done reading? Great!
In this blog, I’m taking the conversation a step further, shifting the focus to how AI is transforming the landscape of software testing, and why Testim stands out as a perfect fit for today’s fast-paced product development environment.
I’ll walk you through the test automation journey with Testim, right from setting up your first test case to running it successfully.
Let’s get started!
Why is AI the New Ally for Modern Software Testing?
The sheer volume of test cases often clashes with the rapid pace demanded by Agile frameworks and continuous development cycles. This is where artificial intelligence (AI) can step in by enabling computers to perform a variety of advanced functions, including the ability to see, understand, and translate spoken and written language, analyze data, make recommendations, and more.
AI has been displaying great potential in identifying testing defects quickly while eliminating human intervention. Such advancements have provided the capability to determine how a product will perform, both at the machine-level and data-server level. Like automation, AI brings a new layer of intelligence and support to boost the overall impact of testing initiatives. So, this exploration of such a superior testing method with AI, is now a necessity to keep pace and equip QA and test teams with augmented efficiencies.
This is where Testim truly shines—with its suite of AI-powered capabilities. Up next, I’ll walk you through these standout features, so keep reading!
Which Advanced Features Set Testim Apart?
Here are some of the advanced features of Testim:
- Seamless Test Recording: Testim allows you to record tests for web, mobile, and Salesforce apps. Creating a test with Testim starts with going to the relevant webpage/application and recording the user journey that you would like to base your test on.Later, you will also be able to edit the properties for each of the steps and add validations. While you’re recording, Testim captures every action as an individual step, displayed in the Visual Editor. You can then run the test immediately to confirm that the entire sequence plays back correctly.
- Customizable Code: It gives you the freedom to go beyond its built‑in blocks by writing your own JavaScript. That is, you can drop in your own JavaScript snippets to handle actions or checks.It allows you to run them right in the browser to interact with the page as it loads or run them in Node.js outside the browser when you need extra setup, number‑crunching, or data checks before the test moves on.
- Dynamic Locators: It can tell when an element’s class name keeps changing. In that case, it automatically uses both methods described earlier to find the element reliably.For instance, Testim determines that the attribute contains random values and automatically updates the locator to search only for the consistent part. Second, as mentioned earlier, Testim’s Smart Locators utilize multiple elements in identifying and locking in the elements.Thanks to this AI-driven scoring system, you’re no longer tied to a single, fragile selector. Instead, Testim evaluates a blend of attributes, such as ID, text, position, and surrounding context, and assigns each one a weight. The combined score lets the platform lock onto the right element even if one or two attributes change, keeping your tests stable as the UI evolves.
- Flexible Test Execution: You can run automated tests exactly where they make the most sense, that is, on real devices sitting in your lab, on virtual machines spun up on demand, or in parallel across third‑party device clouds. This versatility allows you to fit testing seamlessly into any continuous‑integration (CI) pipeline, accelerate feedback loops, and keep release cycles moving at lightning speed.
- Effortless CI Integration: You can connect the automated tests directly to your continuous‑integration (CI) pipeline, so they run automatically with every commit, pull request, or scheduled build. This hands‑free execution helps catch issues early, delivers instant feedback to developers, and keeps the path to production smooth and predictable.
- Insightful Screenshots: When you execute a test, you can log a screenshot of each step. The screenshots are stored in the Salesforce logs as a small image under each user action description. The stored screenshots help in debugging and as visual evidence of the test execution.
- Comprehensive Log Analysis: Console logs include information system confirmations, errors and notifications. During the test execution, console logs are displayed as part of the test results. The console logs can be viewed at the step level or at the test level.
- Granular Debugging Controls: The debugging controls allow test developers to locate and fix issues in their tests while running the test without the need to wait until the test run is completed.If a test lacks coverage (for example, new features have been added to the AUT – Application Under Test), it is also possible to add steps to the test by recording from a specific position. The controls for recording/authoring, running, and debugging the tests are conveniently grouped closely together to create a seamless development environment. This is one where test developers can quickly write, test, and debug their tests, all in one place.
Now that you’ve mastered the fundamentals, let’s put them into action and run your automated tests in Testim.
How to Start Test Automation with Testim?
Your test automation journey with Testim should follow these steps:
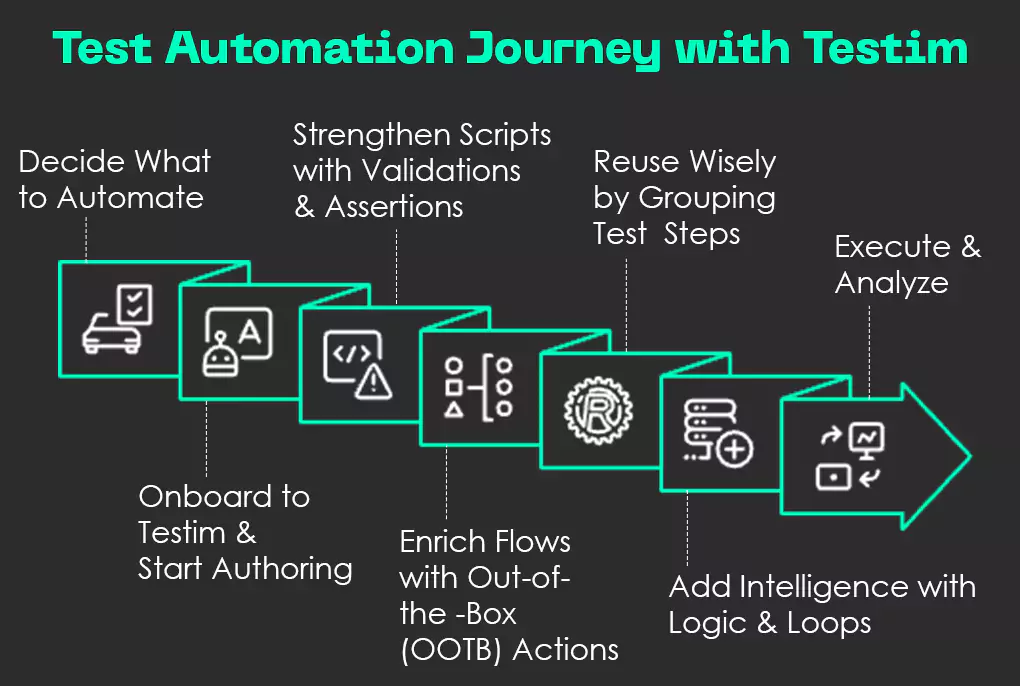
Fig: Test automation journey with Testim
1. Decide What to Automate: The first step is to pinpoint the user flows and edge cases that deliver the highest ROI when automated. Focus on stable, high‑value scenarios, such as login, checkout, and critical APIs. This way, every script you build pays off in faster feedback and fewer production issues.
2. Onboard to Testim and Start Authoring: Next, you need to create a free Testim account, add the browser extension, and start building tests. Capture actions visually with the Recorder or write them directly in code (whichever fits your workflow). This is how you can start generating coverage within minutes.
3. Strengthen Scripts with Validations and Assertions: Shield your tests from false positives by inserting checkpoints that confirm UI elements, text, API calls, or database states. These validations ensure each step does more than “just run”; it actively proves the app behaves as expected.
4. Enrich Flows with Out‑of‑the‑Box (OOTB) Actions: Next, drag‑and‑drop Testim’s premade action blocks, such as clicks, inputs, waits, file uploads, and more, to handle complex interactions without custom code.
Note: Built‑in resilience keeps scripts stable even as the UI evolves.
5. Reuse Wisely by Grouping Test Steps: Bundle repeating sequences into reusable Groups. One change can update every test that relies on that Group, slashing maintenance time and making your suite easier to scale.
6. Add Intelligence with Logic and Loops: You can then introduce conditions, loops, and data‑driven iterations to cover multiple paths in a single test. Smart branching can turn basic scripts into robust scenarios that mimic real‑world user behavior.
7. Execute and Analyze: Finally, run your tests locally or in the cloud, then dive into rich results, such as console logs, screenshots, and performance metrics to catch and fix issues fast.

Times of rapid software innovation call for futuristic tools, tech, and capabilities. Reimagine your testing phase with our advanced, future-ready QA model.
Think that’s all? Almost—but the real payoff comes from setting up your Testim account and launching your first test. The next section walks you through the entire process, from initial setup to executing a live test case.
Enjoy reading the second half!
How to Sign Up and Set Up A Testim Account?
Here are the steps that you can follow to sign up or sign in to your Testim account:
- Visit Testim’s official website.
- Next, sign up with either of these:
a. Email ID
b. Google account
c. GitHub account
- After signing up, verify your email to activate your account and get started.
In case you already have an account, just sign in.
Here’s how the sign-up interface will look:
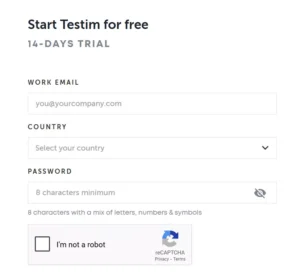
Screenshot: Testim Sign-Up and Sign-In
Once you’re signed up or signed in, you need to set up your account.
Here are the steps that you can follow to set up your account:
- Enter the required information in the provided fields and then click on the Continue button to proceed.
- From the available options, select your role as Automation Engineer to personalize your experience.
- Choose how you’d like to use Testim. In this case, select Web as your preferred platform.
- Once logged in, the user will be directed to the Dashboard screen, where the main controls and features are accessible.
Here’s how the setup will look:

Screenshot: Setting Up a Testim Account
How To Create, Validate, and Execute Your First Test in Testim?
The initial phase starts with the creation of the test case. To create your first test case, you can follow these steps and recommendations:
- The first thing that you’ll require is a Chrome extension installed on the browser.
- The Test Editor requires either Google Chrome or Microsoft.
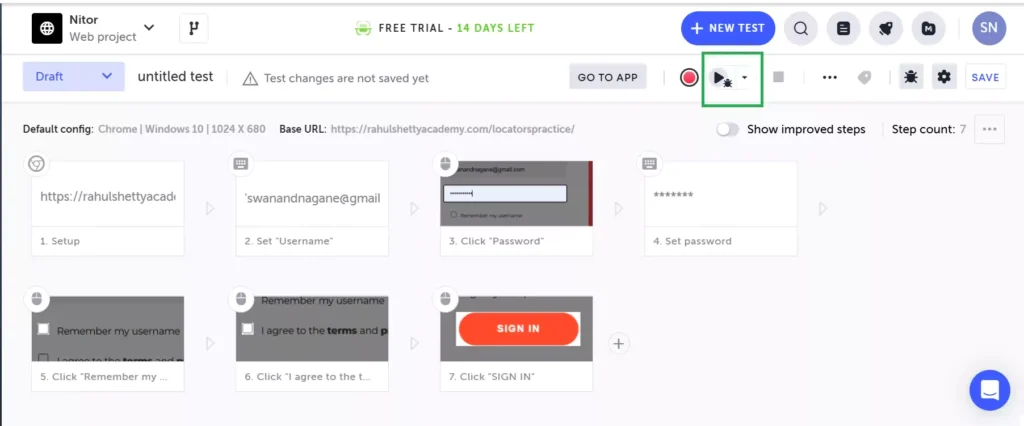
- Next, you need to click on “Create Automation Test”.
- Once clicked, a “Test Recording” window opens. From there, you can start the recording.
- Post recording, you can view all the recorded steps on the dashboard.
Here’s a snapshot of the available options you can select during the recording process:
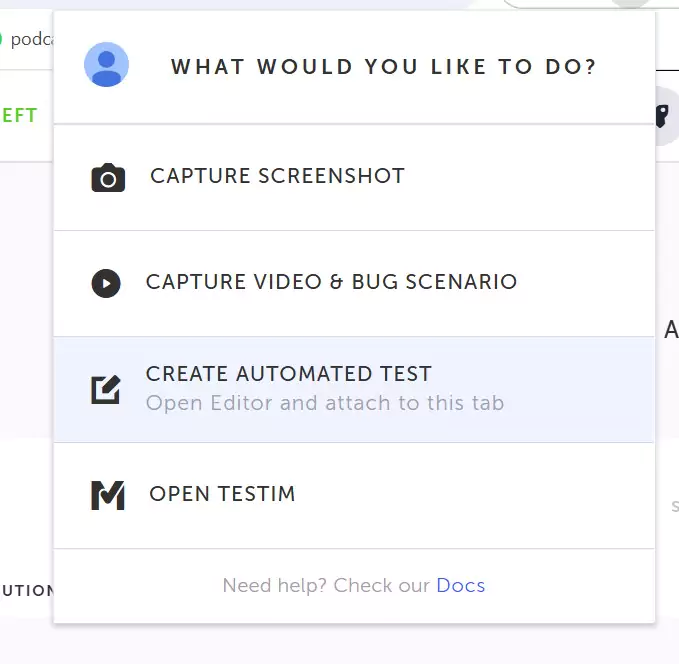
Screenshot: First Test Case Creation
Next, proceed to the validation phase to ensure your test steps are functioning as expected.
Here are the key steps that you need to follow now:
1. Ensure that each test step has been executed successfully without any errors.
2. Validations can be added after the test has been recorded to enhance accuracy and reliability.
3. Click on the Step Context Menu to add the appropriate validations to specific test steps.
Make sure to take note of the various validation types available:
- Element, Pixel
- File, Email, Network, REST API
- Checkbox, Radio Button
- Custom (Javascript), CLI (NodeJS)
These options allow you to tailor validations based on the specific needs of your test scenarios.
Here’s a snapshot of the list of validations:
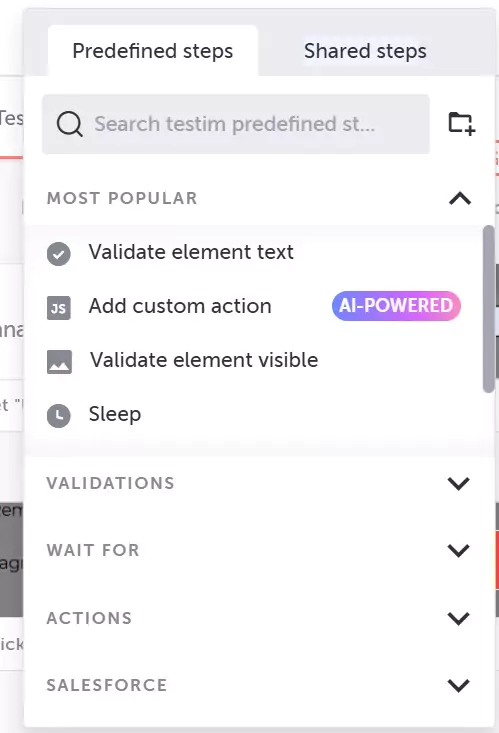
Screenshot: Validations
After completing the validations, the final step is to execute the test to ensure everything runs as expected.
Here are the steps that you need to follow to execute the test:
- Click on the Play symbol to execute the Test locally.
- Ensure that the test and text validation step get executed successfully.
- You can use “Validate element visible” or “Validate element not visible” to confirm whether the login was successful or unsuccessful.
Here’s a snapshot for your reference:
Screenshot: Execute Test
And that’s it! By following the steps above, you’ll be all set to execute your first test case with ease.
Watch this video to learn how I created my first test case:
Before wrapping up, I’d like you to read a short bonus section!
How Can Software Testers Embrace AI?
AI has proven itself with the ability to function with more collective intelligence, speed, and scale than even the best-funded app teams of today. With continuous development accelerating at an unprecedented pace—and added pressure from AI-driven automation, intelligent bots, and chat interfaces—software testers are being pushed to evolve rapidly.
Finally, it is important to ensure the security, privacy and ethical aspects of any software while working with AI. These factors not only safeguard user trust but also play a vital role in enhancing the overall testability and reliability of modern applications.
That’s the reason why you must start leveraging the power of tools like Testim from today.
The combination of intelligent automation, seamless integrations, and powerful AI-driven features positions Testim as a game-changer in test automation. By leveraging its advanced features, teams can streamline their testing processes, heighten accuracy, and ultimately accelerate their release cycles.
So, the future of software testing is here, and with Testim, you’re ready to lead the way!
Interested in exploring software product engineering services and ultra-modern technologies? Connect with us at Nitor Infotech to learn more.


