To publish NuGet packages using Visual Studio, follow these steps:
- Step 1. Create Class Library
- Step 2. Create Feed to Publish the NuGet to a Private Repository
- Step 3. Publish a NuGet Package
Sounds easy? Well, yes, if you read the full context given below!
If you’ve ever found yourself copying the same code into multiple .NET projects, you’re not alone. It might seem like a quick fix, but over time, it leads to code duplication, inconsistencies, and bloated repositories. Every bug fix or enhancement must be manually updated in each project. This increases the risk of errors and wasted effort. As the number of projects grows, maintaining shared logic becomes time-consuming and difficult to track. That’s where NuGet packages come in!
In this blog, I’ll help you understand about NuGet package and its advantages. Apart from that, I’ll guide you through the simple steps to create your own NuGet package in .NET, so you can start availing of these benefits in your own projects.
In case you’re new to the concept of a NuGet package, let’s start with a basic definition.
What Is a NuGet Package?
A NuGet package is a compiled, reusable piece of code for .NET projects—essentially a zip file with a .nupkg extension that contains DLLs, metadata, and other files needed to use the code in other applications. They’re managed through the NuGet package manager. It allows developers to install, update, or remove packages from their .NET projects with simple commands or via Visual Studio’s UI.
Creating a NuGet package in .NET is a great way to bundle up your code so it can be easily shared and reused across different projects and teams. Think of it like putting your code into a neatly wrapped package that others can open and use in their projects. This saves everyone time because they don’t have to rewrite the same code from scratch.
For example: Suppose you have a set of Dapper-based data access methods and class models that are commonly used across multiple application services within your organization. Manually copying these components into each project can quickly become inefficient and error-prone.
By packaging them into a NuGet package, you not only simplify distribution but also ensure consistency, version control, and long-term maintainability. This makes your shared codebase more reliable and easier to manage.
Why is NuGet Package Important?
Here are some advantages of NuGet packages:
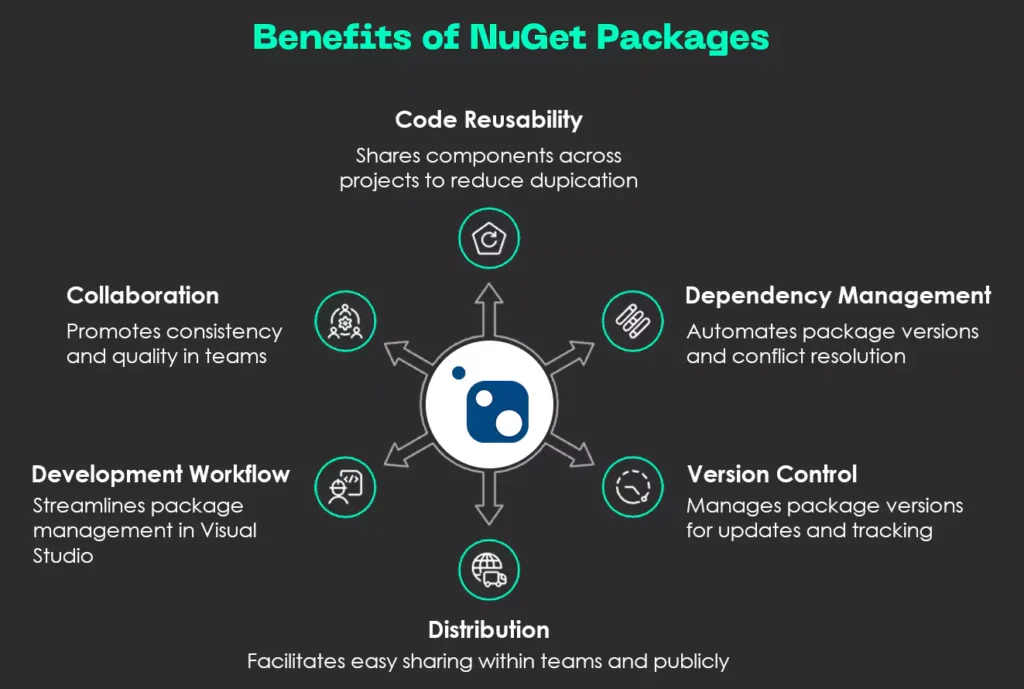
Fig: Benefits of NuGet Packages
1. Code Reusability: Instead of rewriting the same code for multiple applications, NuGet enables you to package reusable logic into a modular format. This minimizes duplication, reduces the chances of introducing bugs, and keeps your codebase clean. Plus, any updates made to the package can be reflected across all consuming projects through versioning.
2. Dependency Management: It automates the management of dependencies, making it easier to handle package versions and resolve conflicts effortlessly. It integrates seamlessly with build and CI/CD systems. Thus, it enables automated workflows for building, testing, and deploying packages. This reduces manual intervention, minimizes the risk of human error, and ensures a more stable and efficient development pipeline.
3. Version Control: It provides robust versioning capabilities, allowing you to manage different releases of your package with clarity and control. This ensures that developers across projects are aligned on which version to use, preventing compatibility issues and unexpected behavior. With a clear version history, rolling back or upgrading packages becomes straightforward and reliable.
4. Distribution: Whether you’re working within a closed organization or contributing to the open-source community, NuGet makes distribution effortless. You can host packages on private feeds for internal use or publish them publicly to nuget.org. This flexibility allows for scalable sharing, whether it’s within a small team or with thousands of developers globally.
5. Development Workflow: It integrates seamlessly with Visual Studio, allowing developers to add, update, or remove packages with just a few clicks or commands. This smooth integration reduces manual overhead and makes dependency management intuitive. It ultimately enhances developer productivity and accelerates the overall development lifecycle.
6. Collaboration: NuGet packages act as a single source of truth for shared code components, helping development teams stay aligned. By using standardized, version-controlled packages, teams avoid discrepancies caused by ad-hoc implementations. This not only ensures consistency across applications but also promotes better code quality and maintainability.
So, overall, using NuGet packages helps teams work more efficiently, focusing on new problems instead of resolving old ones.
With the fundamentals in place, it’s time to dive into creating your first NuGet package.
How Can You Create and Publish a NuGet Package?
Here are the steps to create a NuGet package:
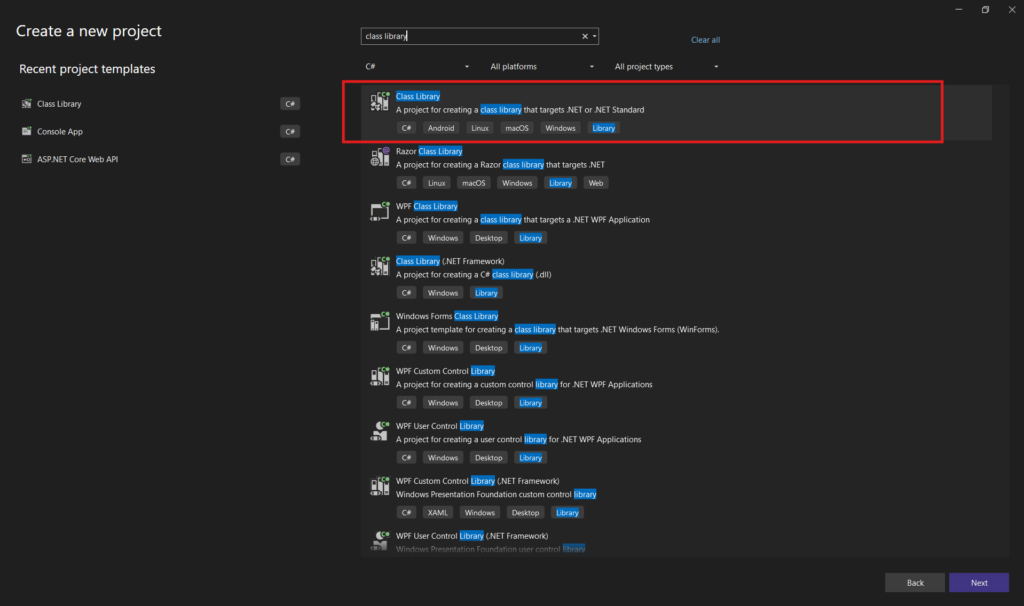
Step 1. Class Library Creation
1.1. To get started with creating a NuGet package in .NET, the first step is to create a class library. A class library is essentially a collection of reusable code that can be shared across different applications. It’s a great way to write code once and use it in multiple projects, ensuring consistency and saving development time.
1.2. You can create a class library by following the steps shown in the screenshot below:
Screenshot: Create class library
1.3. Next, define the classes within your class library that encapsulate the functionalities you want to reuse across multiple microservices or projects. These could be utility methods, business logic, or shared models. For the purpose of this blog, I’ve created a simple calculator class to demonstrate the concept in a straightforward and relatable way.
Refer to the following screenshot:
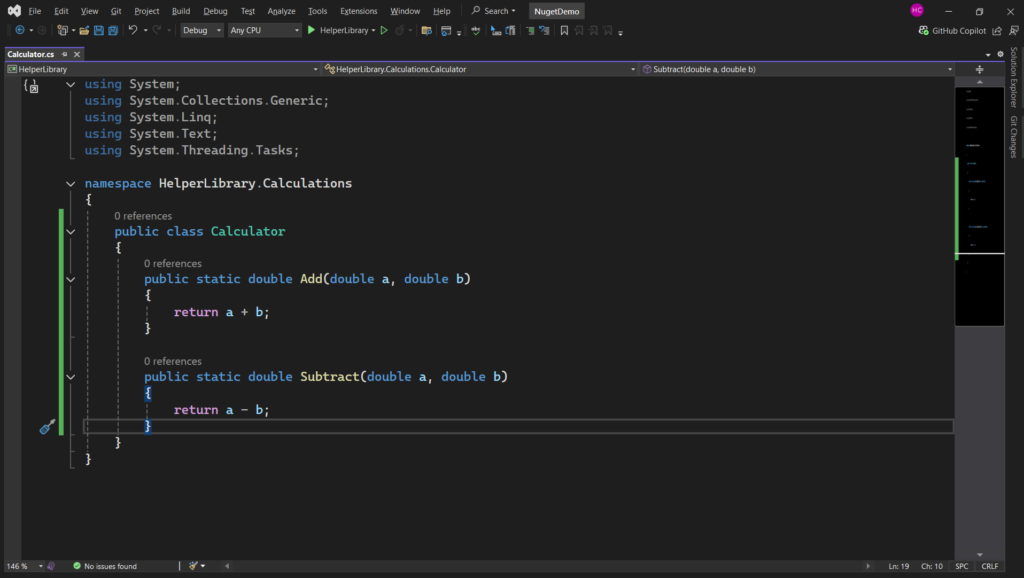
Screenshot: Class library class
Step 2. Feed Creation to Publish the NuGet to a Private Repository
2.1. When it comes to publishing your NuGet package, it’s important to select the right repository. Since nuget.org is a public library accessible to everyone, we’ll be publishing our package to a private repository instead. This ensures your internal components remain secure and accessible only to authorized teams within your organization.
2.2. To publish your NuGet package privately, the first step is to create a dedicated NuGet feed within your organization. This feed acts as a secure space to host your package. Once it’s created, you can upload the package directly to this feed. This action makes it easily accessible to internal projects without exposing it to the public.
2.3. To create a private NuGet feed, navigate to your Azure DevOps account. Inside your desired project, go to the Artifacts section. Here, you can create and manage feeds where your NuGet packages will be stored. This centralized feed allows you to organize and distribute your internal packages efficiently.

Experience the power of our 3-phase DevOps journey that boosted scalability and accelerated release cycles for a leading product company.
Please refer to the following screenshot for a clearer understanding:

Screenshot: Artifacts in project
2.4. Create a new NuGet feed to host and manage your internal packages. This feed will act as a centralized repository. It will allow your team to store, share, and consume packages securely within your development environment.
Here is a screenshot for your reference:

Screenshot: Creation of new feed
2.5. After creating the feed, the next step is to connect it to Visual Studio. Simply copy the feed URL shown below and add it to your Visual Studio package sources. This will ensure your projects can access the latest versions of your internal packages as soon as they are published.
Here is a screenshot for reference:

Screenshot: Connecting to feed NuGet pack
2.6. Head over to the NuGet Package Manager in Visual Studio and click on the gear icon to open the package sources settings. From there, add a new package source by providing a relevant name and pasting the URL you copied earlier as the source path. Once added, click Update, then OK to save and close the settings—your new feed should be ready to use.
Here is a screenshot for reference:

Screenshot: NuGet pack manager – add new source
Step 3. Publishing a NuGet Package (Automating through Release Pipeline)
3.1. Now, open the properties of your class library and check the option “Generate NuGet package on build”. This ensures a NuGet package is automatically created every time you build the project. You’ll also see the current version of your class library here, which you can update whenever changes are made. Additionally, this section allows you to configure other important package settings before publishing.
Here is a screenshot for reference:

Screenshot: Class library properties
3.2. There are two ways to publish the generated NuGet packages: you can either push them manually using CLI commands or automate the entire process through a build pipeline. Automating the push ensures consistency and saves time during deployments.
Here are the steps you can follow to set up and configure the push using a build pipeline:
3.3. If you have a pipeline, you can use the same pipeline and add a NuGet task to pack the class library. Otherwise, you need to create a new pipeline and add a NuGet task, save the pipeline, and create a new build, as shown below:

Screenshot: NuGet task add 1

Screenshot: NuGet task add 2
3.4. Once the build pipeline runs successfully, it will automatically generate the NuGet package. You can view and access the generated package under the “Published Artifacts” section of the build results. This will make it easy to verify that the package was created correctly and is ready for distribution.
Refer to these screenshots:

Screenshot: Published Artifacts of Build 1

Screenshot: Published Artifacts of Build 2
3.5. To publish the package, you’ll need to set up a release pipeline. If you already have an existing release pipeline, you can simply modify it instead of creating a new one. Navigate to the appropriate stage within the pipeline, then add a NuGet push task and configure it as shown below.
Make sure to select the same feed you created earlier during the Feed Creation step—this is where the package will be published. Additionally, ensure that the path points to the folder where the package was generated. This is so the release pipeline can locate and push it correctly.
Here is a screenshot for reference:

Screenshot: NuGet push release pipeline
3.6. Once you’ve configured everything, click “Save” and proceed to create a new release. This will trigger the release pipeline, and upon successful execution, your NuGet package will be published to the specified feed.
3.7. You can now navigate to the “Artifacts” section in Azure DevOps. Here, you’ll find your NuGet package successfully published. This will confirm that the release pipeline worked as intended and your package is now available for use across projects through your private feed.
Refer to this screenshot:

Screenshot: NuGet package in artifacts
3.8. You can now start using this NuGet package in any of your projects from the “Feed Creation to Publish the NuGet to Private Repository” section as mentioned in point 2.6. Simply go to the target project, open the NuGet Package Manager, and you’ll find the latest version of your package available. From there, you can install it and begin using its functionality right away.
Here is a screenshot for reference:

Screenshot: Use NuGet package from manager
By following these steps, you can create a NuGet package that encapsulates reusable components, streamlines development processes, and ensures high code quality across your project.
As the software development landscape continues to evolve, the role of NuGet packages is expected to become even more significant. Future developments may include enhanced automation features, making it easier for developers to create and publish packages with minimal manual intervention.
We might also see improved integration with cloud services and containerization technologies, facilitating seamless deployment across various environments. Additionally, the introduction of AI-driven tools could streamline the process of identifying and resolving package dependencies. This could further enhance developer productivity.
Moreover, as open-source collaboration becomes more prevalent, we can anticipate a richer ecosystem of shared NuGet packages, allowing developers to leverage community-driven solutions. Embracing these advancements will optimize development workflows. That’s not all – it will foster a culture of collaboration and innovation within the software development community.
Contact us at Nitor Infotech to learn more about the power of sophisticated software product development tools and technologies.


