
Effortless cloud management is the backbone of modern DevOps, especially when working with frameworks like Angular and .NET. Yet, navigating the complexities of traditional JSON templates often feels like untangling a knot—time-consuming and error-prone. Enter Azure Bicep—a game-changing Infrastructure as Code (IaC) tool that redefines how Azure resources are deployed. With its intuitive syntax and streamlined approach, Bicep eliminates the clutter. This way, it allows teams to focus on what matters: speed, precision, and scalability.
I’ve divided this blog into two segments. The first section introduces Azure Bicep and walks you through the essential configurations on the Azure Portal. The second section delves into deploying applications efficiently using Bicep. (Picture a seamless and practical learning experience.)
So, let’s get started!
What is Azure Bicep?
Azure Bicep is a domain-specific language (DSL) used for deploying and managing resources on Microsoft Azure. It is an Infrastructure as Code (IaC) tool designed to simplify the process of defining and deploying Azure resources. It provides a more concise, readable, and modular alternative to Azure Resource Manager (ARM) templates. These templates are written in JSON.
Here are the top three compelling reasons to choose Azure Bicep:
- Readability and maintainability: Bicep’s syntax is much cleaner and more understandable than JSON. This makes it easier to write, read, and maintain infrastructure code.
- Efficiency: By simplifying code and reducing complexity, it helps developers and infrastructure teams focus on solving business problems rather than wrestling with syntax.
- Faster development and deployment: With Bicep, teams can speed up the deployment process, reduce errors, and improve the overall efficiency of managing Azure resources.
Unlock the full potential of Azure Bicep – explore its key benefits!
Before creating your Bicep file, make sure to complete some initial configurations mentioned next in the Azure Portal. Once done, you’ll be ready to write and deploy your Bicep files seamlessly.

Learn to simplify and accelerate your Azure migration.
What Azure Portal configurations are needed to deploy apps with Azure Bicep?
To deploy apps using Azure Bicep, several essential configurations need to be set up in the Azure Portal. Let’s walk through these steps (refer to the attached screenshots for each step):
1. Set Up Prerequisites
Before you start, ensure you have the following:
- An Azure subscription
- Access to the Azure Portal
- Azure CLI installed (optional but recommended)
2. Create a Resource Group
A resource group acts as a container for all your related Azure resources. This is how you can create one:
- Log in to the Azure Portal.
- Navigate to Resource Groups > Create New.
- Enter the following details:
-
- Subscription: Select your subscription.
- Resource Group Name: For example: my-resource-group.
- Region: Choose the region closest to your users (for example: Central India).
- Click Review + Create, then Create.
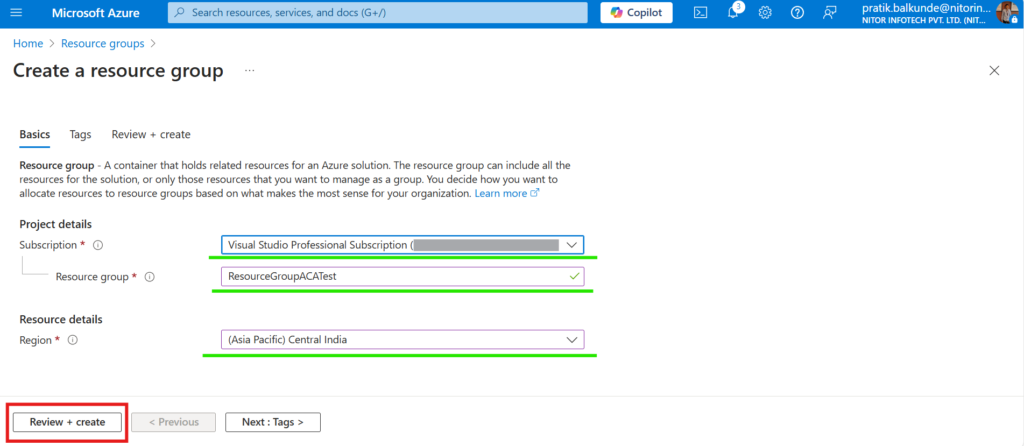
Fig: Create a resource group
3. Set Up Azure Container Registry (ACR)
ACR is essential for storing container images that will be deployed to Azure Container Apps (ACA). Here are the steps to create an ACR:
- Go to the Azure Portal and search for Container Registry.
- Click Create New and fill in the details:
-
- Subscription: Select your subscription.
- Resource Group: Select the one you created.
- Registry Name: For example: myacr.
- Location: Same as the resource group.
- Pricing plan: Choose basic for testing or standard/premium for production.
- Click Review + Create, then Create.
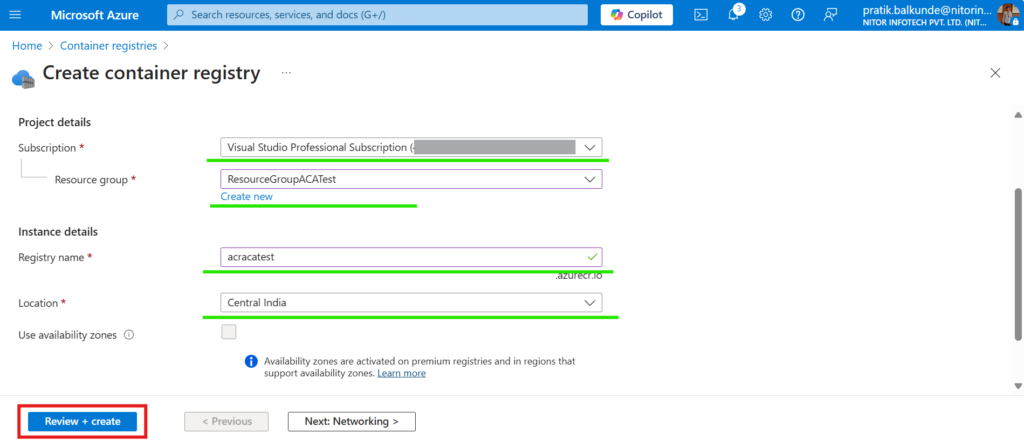
Fig: Set up Azure Container Registry
Extra read: Learn to synchronize data in real-time using Azure.
4. Create a Container App Environment
This cannot be created directly in the Azure Portal; you’ll need to use Azure Cloud Shell instead. Here are the steps to create it:
- Open the terminal in Azure portal.

Fig: Open the terminal in Azure Portal
- Run the following commands:
1. > Check subscriptions:
![]()
Fig: AZ account list
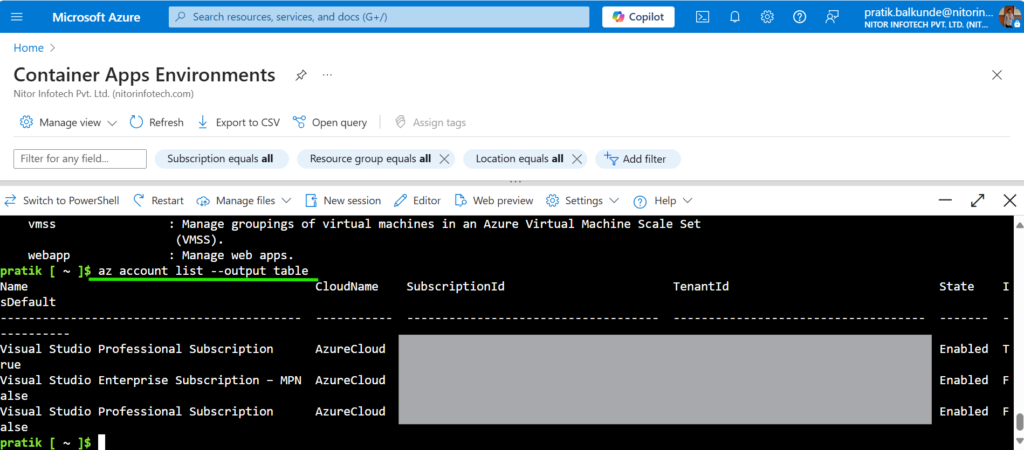
Fig: Check Subscription
2. > Set subscription:
![]()
Fig: AZ account set
![]()
Fig: Set subscription
3. > Create the Container App Environment by replacing the placeholders with your specific details:

Fig: Replacing placeholders
<yourContainerAppEnvironmentName> (Unique name)
<YourResourceGroup> (Previously created)
<YourLocationasPrevious> (Previously selected)
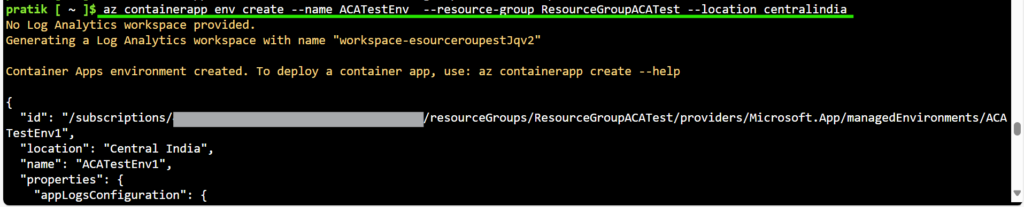
Fig: Create Container App Environment
5. Create Managed Identities
Follow these steps to create managed identities:
- Search for Managed Identities in the Azure Portal.
- Click Create and fill in the details:
-
- Subscription: Select your subscription.
- Resource Group: Use your existing resource group.
- Region: Same as the resource group.
- Name: Provide a unique name.
- Click Review + Create, then Create.
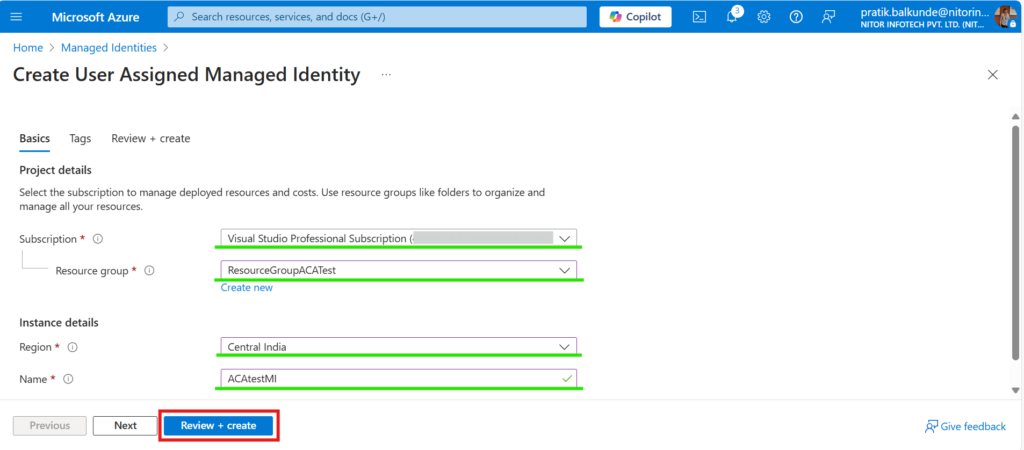
Fig: Create Managed Identities
6. Assign the User-Assigned Managed Identity to the Container Apps Environment
- Select your Container Apps Environment in the Azure Portal.
- Under the Settings section, select Identity.
- Enable User-assigned managed identity.
- Click Add and:
-
- Subscription: Select your subscription.
- Choose User-assigned managed identities.
- Add the previously created managed identity.
- Save the changes.
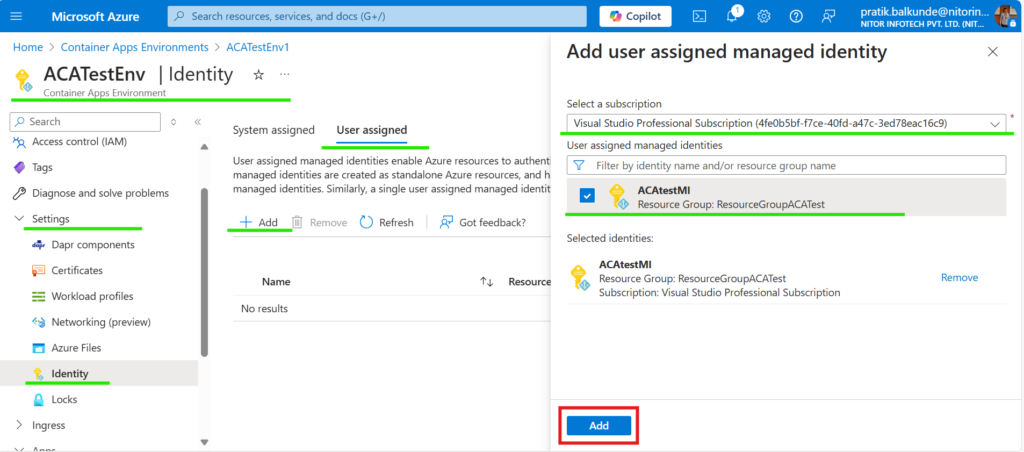
Fig: Assign User-Assigned Managed Identity to Container App Environment
7. Grant ACR Pull Permissions to the User-Assigned Managed Identity
- Go to your Azure Container Registry in the Azure Portal.
- Navigate to Access Control (IAM) and click + Add > Add role assignment.
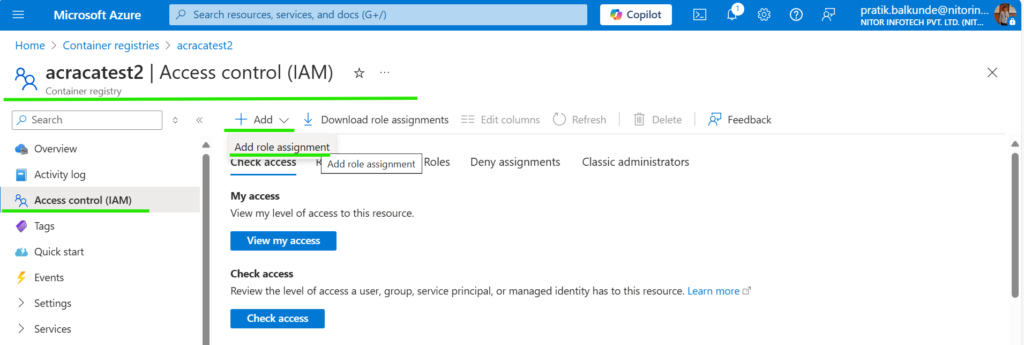
Fig: Grant ACR Pull Permissions to User Assigned Managed Identity 1
- Fill in the following details:
-
- Role: Select AcrPull.
- Assign access to: Managed identity.
- Click +Select Members and:
-
- Subscription: Select your subscription.
- Select Managed identity.
- Select the user-assigned managed identity you just created.
- Click Review + Assign.
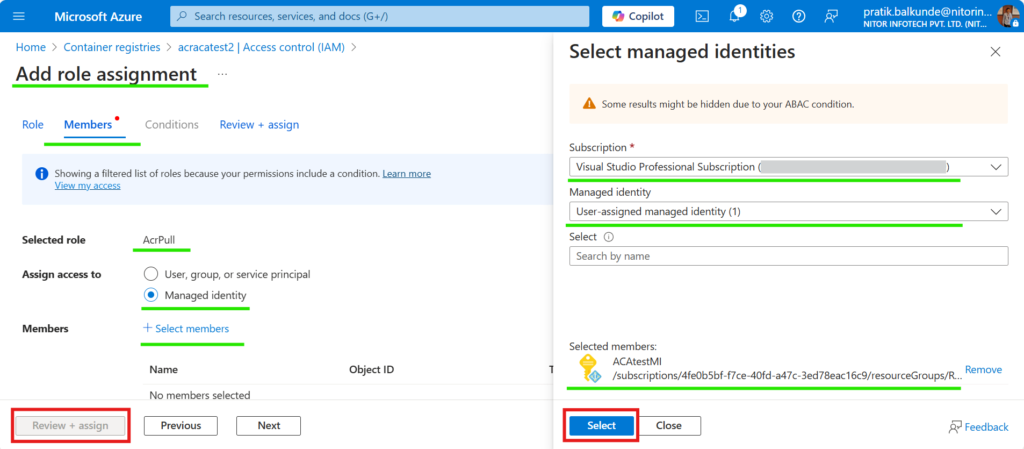
Fig: Grant ACR Pull Permissions to User Assigned Managed Identity 2
Once these configurations are complete, your Azure environment will be set for Bicep deployment. Now, let’s move on to the second part of this blog!
Learn how we helped our client modernize financial reporting with an Azure-powered solution.
How to Implement Automated Deployment with Bicep, YAML, and Azure DevOps?
First, to keep your project organized, you must adhere to the following file structure:
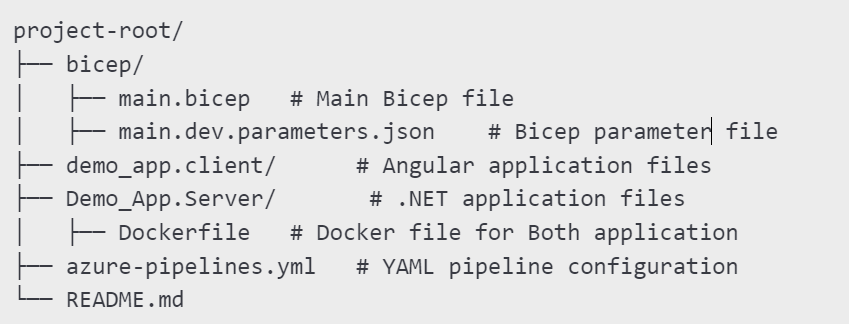
Fig: File Structure
After setting up the file structure, follow these steps to streamline automated deployment leveraging Bicep, YAML, and Azure DevOps (follow the screenshots for clarity):
Step 1. Create the Environment in Azure DevOps
- Navigate to your Azure DevOps project.
- Go to Pipelines > Environments.
- Click New environment.
- Enter DEV as the environment name (ensure it matches the name in your YAML file).
- Click Create.
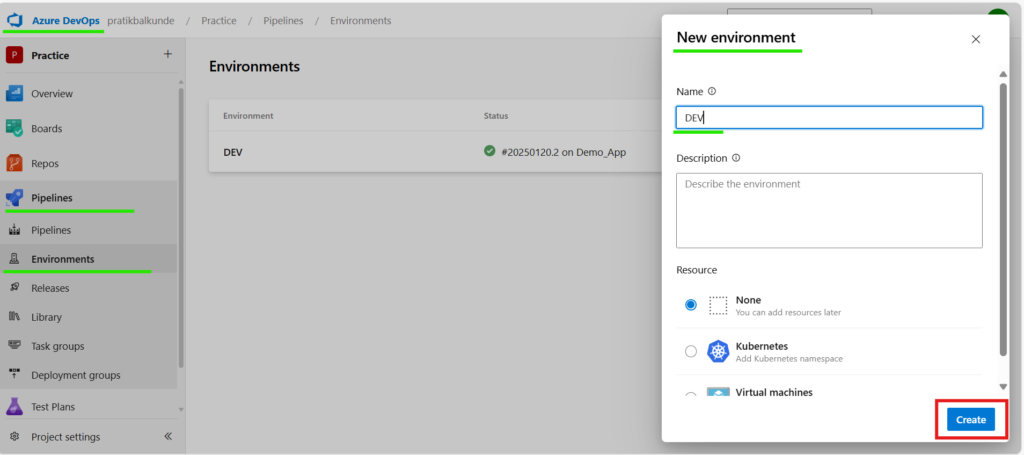
Fig: Create Environment in Azure DevOps
Step 2. Configure Service Connections in Azure DevOps
For Service Connection 1: Docker Registry, follow these steps:
- Go to Project Settings in Azure DevOps.
- Select Service Connections.
- Click New Service Connection and choose Docker Registry.
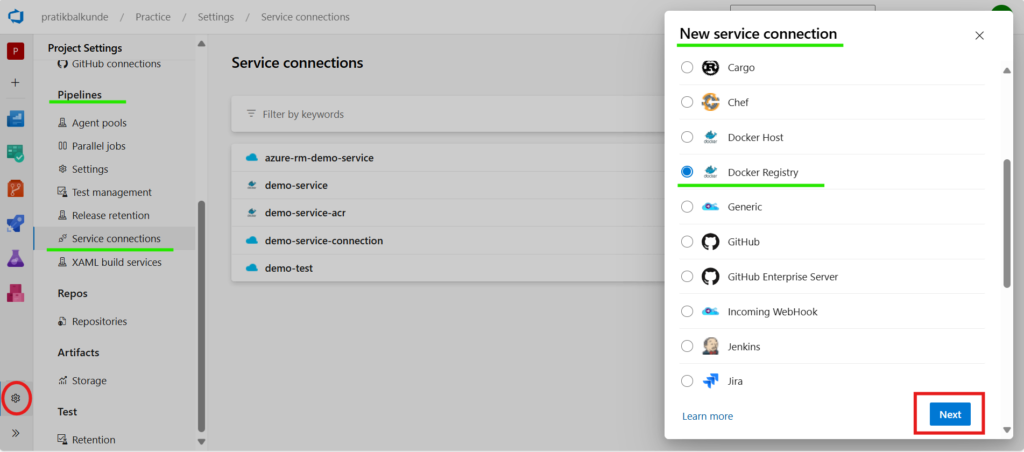
Fig: a. Configure Service Connections in Azure DevOps (Service Connection 1 Docker Registry)
- Click Next and fill in the details:
-
- Registry type: Other
- Docker Registry: https://acracatest2.azurecr.io (replace with your registry URL)
- Docker ID: acracatest2 (replace with your Docker ID)
- Docker Password: Retrieve it from Container Registry > acracatest2 > Settings > Access Keys. Ensure that admin access is enabled if it’s not already.
- Service Connection Name: demo-service-acr (or a name of your choice).
- Security: Enable.
- Save the configuration.
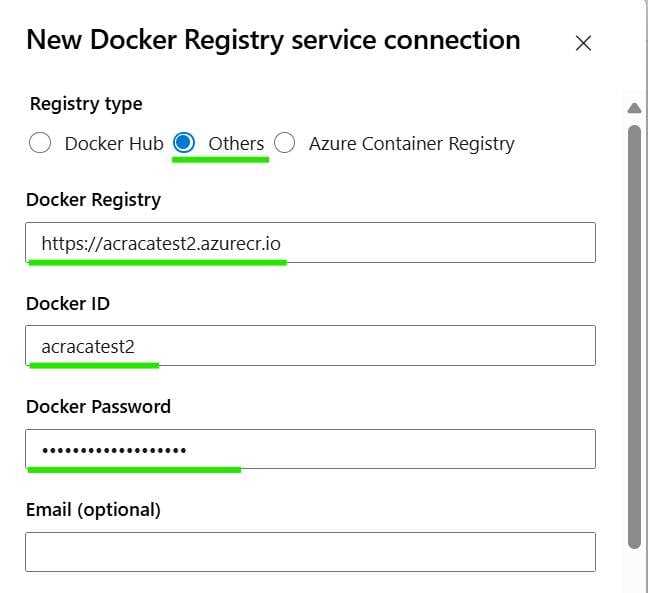
Fig: b. Configure Service Connections in Azure DevOps (Service Connection 1 Docker Registry)
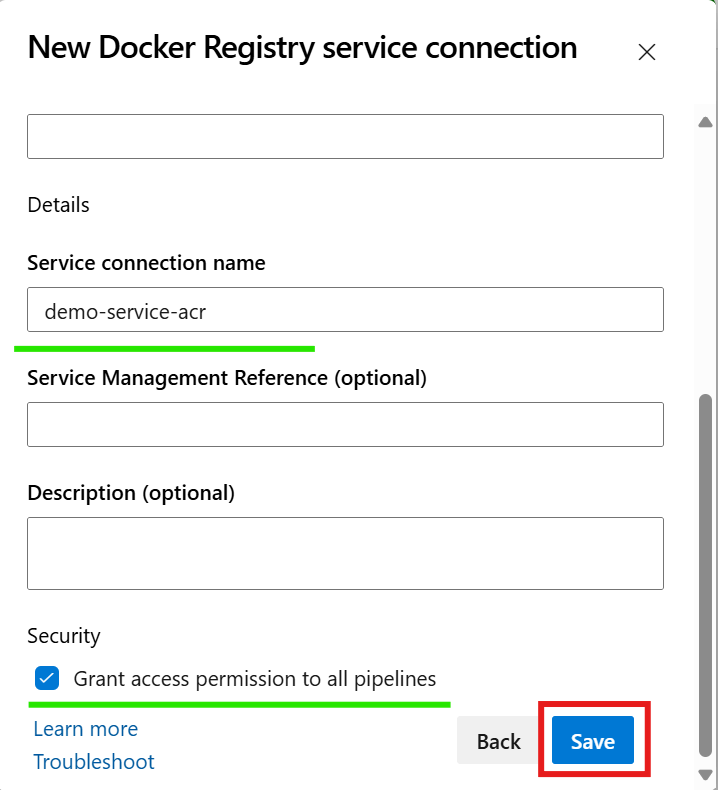
Fig: c. Configure Service Connections in Azure DevOps (Service Connection 1 Docker Registry)
For Service Connection 2: Azure Resource Manager, follow these steps:
- Click New Service Connection and choose Azure Resource Manager.

Fig: a. Configure Service Connections in Azure DevOps (Service Connection 2 Azure Resource Manager)
- Click Next and configure as follows:
- Identity Type: Automatic
- Credential: Workload Identity Federation
- Scope Level: Subscription
- Subscription: Select your subscription.
- Resource Group: Select your resource group.
- Service Connection Name: azure-rm-demo-service (or a name of your choice).
- Security: Enable.
- Save the configuration.

Fig: b. Configure Service Connections in Azure DevOps (Service Connection 2 Azure Resource Manager)
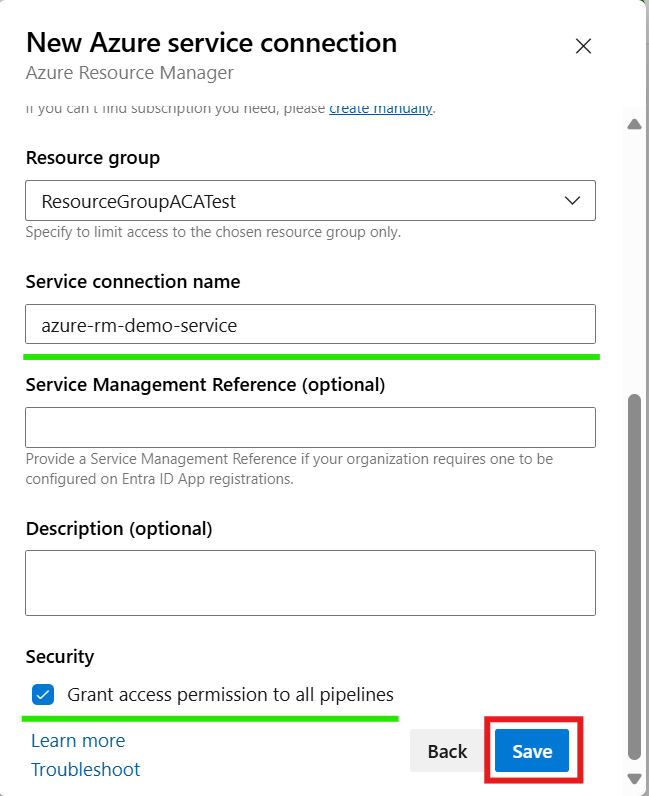
Fig: c. Configure Service Connections in Azure DevOps (Service Connection 2 Azure Resource Manager)
Step 3. Set Up and Use Bicep and YAML Files
Optional: Install Extensions
Enhance development in VS Code with these extensions:
- Bicep
- Azure Pipelines
- Azure Tools
- Azure Pipelines Tools
Then create the Dockerfile (if not already available)
Quick read: Dockerize .NET solutions and deploy via Azure DevOps CI/CD.
Here’s the Dockerfile located in the DotNetApp/ directory (make sure to test it locally by building and running the Dockerfile):
Dockerfile:
#See https://aka.ms/customizecontainer to learn how to customize your debug container and how Visual Studio uses this Dockerfile to build your images for faster debugging.

FROM mcr.microsoft.com/dotnet/aspnet:8.0 AS base

USER app

WORKDIR /app

EXPOSE 8080

EXPOSE 8081

FROM mcr.microsoft.com/dotnet/sdk:8.0 AS with-node

RUN apt-get update

RUN apt-get install curl

RUN curl -sL https://deb.nodesource.com/setup_20.x | bash

RUN apt-get -y install nodejs

RUN npm install -g @angular/cli

FROM with-node AS build

ARG BUILD_CONFIGURATION=Release

WORKDIR /src

COPY ["Demo_App.Server/Demo_App.Server.csproj", "Demo_App.Server/"]

COPY ["demo_app.client/demo_app.client.esproj", "demo_app.client/"]

RUN dotnet restore "./Demo_App.Server/Demo_App.Server.csproj"

COPY . .

WORKDIR "/src/Demo_App.Server"

RUN dotnet build "./Demo_App.Server.csproj" -c $BUILD_CONFIGURATION -o /app/build

FROM build AS publish

ARG BUILD_CONFIGURATION=Release

RUN dotnet publish "./Demo_App.Server.csproj" -c $BUILD_CONFIGURATION -o /app/publish /p:UseAppHost=false

FROM base AS final

WORKDIR /app

COPY --from=publish /app/publish .

ENTRYPOINT ["dotnet", "Demo_App.Server.dll"]
Further, create the Bicep File:
Refer to the provided main.bicep file for your deployment. Save it under the bicep/ directory.
main.bicep:
targetScope = 'resourceGroup'

@description('The location where the resources will be created.')

param location string = resourceGroup().location

@description('The name of the container app.')

param containerAppName string

@description('The container image to deploy.')

param containerAppImage string

@description('The port number for the container app.')

param containerAppPortNumber int

@description('The name of the container apps environment.')

param containerAppsEnvironmentName string

@description('The name of the container registry.')

param containerRegistryName string = 'acracatest2.azurecr.io'

@description('managed identity name for the container registry.')

param userAssignedIdentityName string

@description('Tags to be applied to the resource.')

param tags object = {}

@description('managed identity name for the container registry.')

resource containerRegistryUserAssignedIdentity 'Microsoft.ManagedIdentity/userAssignedIdentities@2023-01-31' existing = {

  name: userAssignedIdentityName

}

resource containerAppsEnvironment 'Microsoft.App/managedEnvironments@2022-03-01' existing = {

  name: containerAppsEnvironmentName

}

resource containerApp 'Microsoft.App/containerApps@2023-05-01' = {

  name: containerAppName

  location: location

  tags: tags

  identity: {

    type: 'UserAssigned'

    userAssignedIdentities: {

        '${containerRegistryUserAssignedIdentity.id}': {}

    }

  }

  properties: {

    managedEnvironmentId: containerAppsEnvironment.id

    configuration: {

      registries: !empty(containerRegistryName) ? [

        {

          server: containerRegistryName

          identity: containerRegistryUserAssignedIdentity.id

        }

      ] : []

      ingress: {

        external: true

        targetPort: containerAppPortNumber

      }

    }

    template: {

      containers: [

        {

          name: containerAppName

          image: containerAppImage

        }

      ]

    }

  }

}

output containerAppId string = containerApp.id
This Bicep template deploys a containerized application with a managed identity to Azure using Azure Container Apps. It defines all necessary resources, parameters, and properties.
Here’s a detailed breakdown of the key components mentioned above:

Fig: targetScope
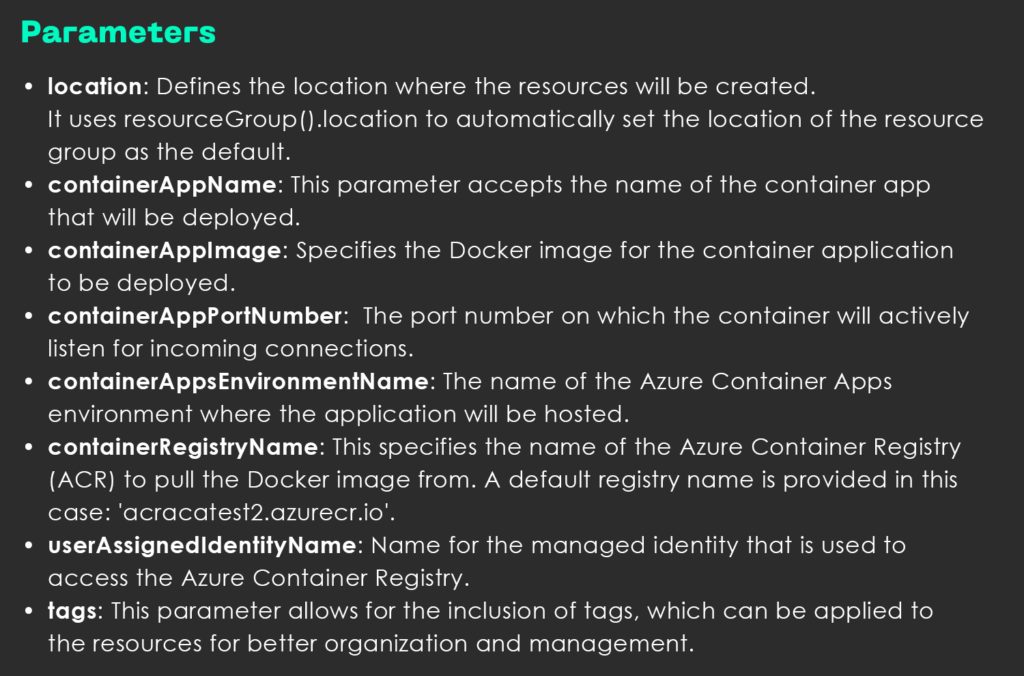
Fig: Parameters
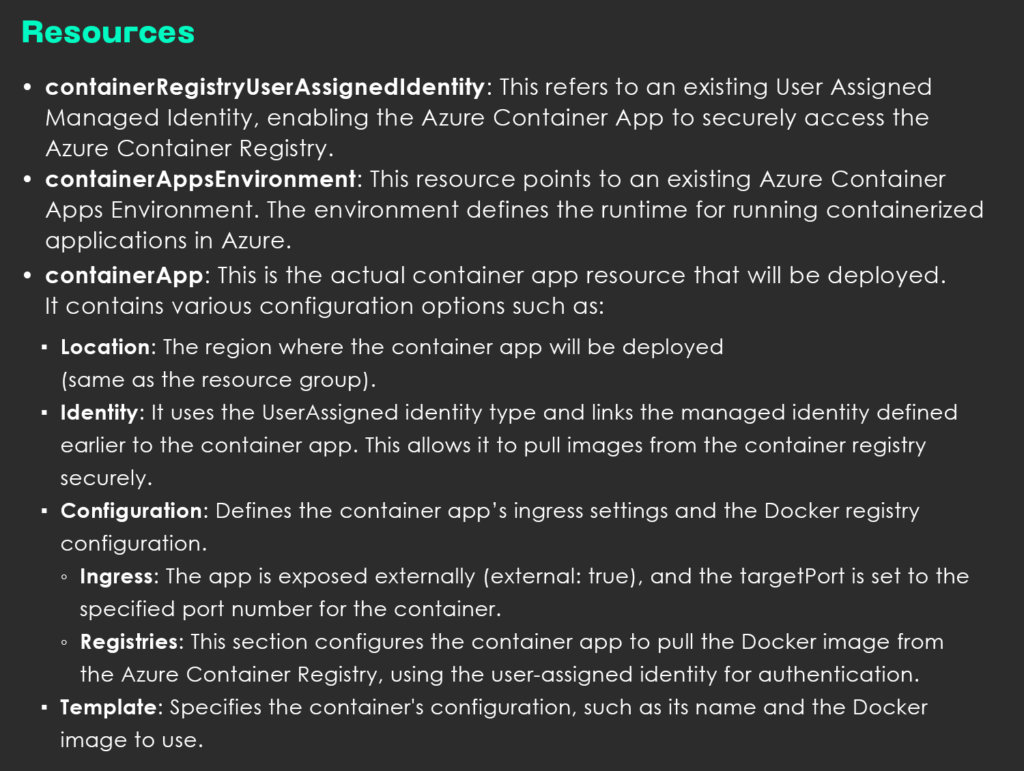
Fig: Resources
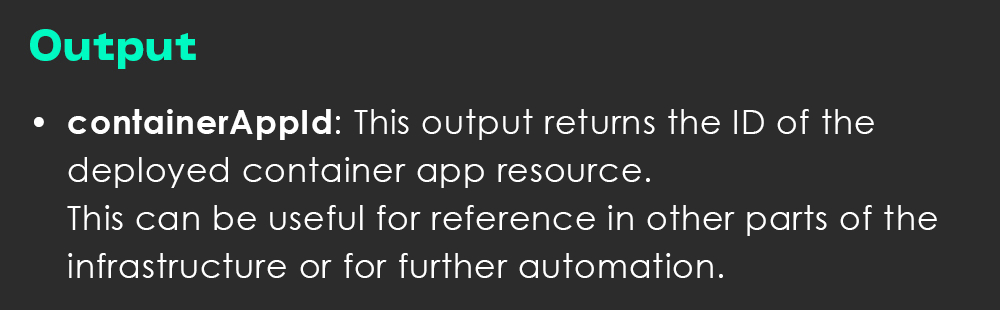
Fig: Output
Here’s the summary of the flow:
- Parameters let you customize location, app name, image, and more.
- Managed Identity and Environment ensure proper permissions and setup.
- The Container App is configured for ingress, image pulling, and environment use.
- The Container App ID is outputted for easy reference.
Quick Info: A parameter file keeps Bicep templates flexible and environment-agnostic. This allows dynamic value application during CI/CD for consistent deployments with environment-specific configurations.
In case you’re wondering how to generate a parameter file for Bicep, here’s the process:
- Right-click on the main.bicep file in VS Code.
- Select Generate Parameter File > JSON and Required Only.
- This will generate a .json file with placeholders for the required parameters.
Fill in the required values in the parameter file. Here’s an example of main.dev.parameters.json for configuring deployment in the development environment:
{

  "$schema": "https://schema.management.azure.com/schemas/2015-01-01/deploymentParameters.json#",

  "contentVersion": "1.0.0.0",

  "parameters": {

    "containerAppName": {

      "value": "demo-aca"

    },

    "containerAppImage": {

      "value": ""

    },

    "containerAppPortNumber": {

      "value": 8080

    },

    "containerAppsEnvironmentName": {

      "value": "ACATestEnv"

    },

    "userAssignedIdentityName": {

      "value": "ACAtestMI"

    }

  }

}
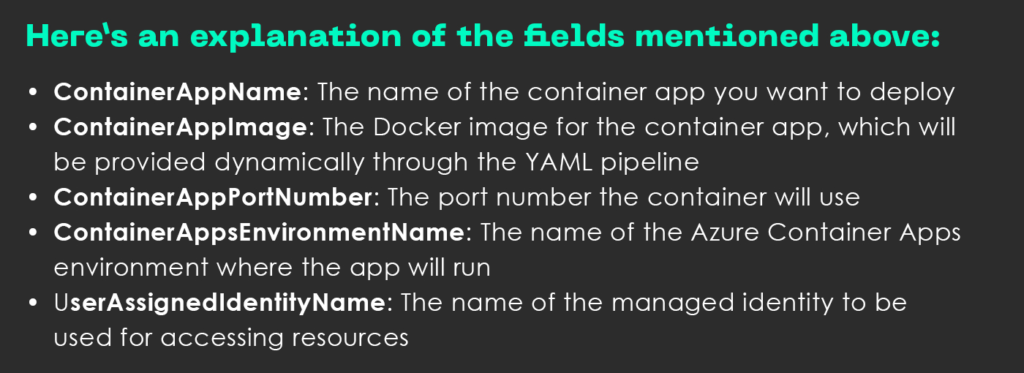
Fig: Requirement list for generating a parameter file for Bicep
Next, create the YAML File.
This pipeline performs the following tasks:
- Triggering: It triggers when changes are pushed to the main branch.
- Build Phase: It builds and pushes a Docker image for the application.
- Deployment Phase: It deploys the containerized application to the DEV environment using Bicep.
For the CI/CD configuration, refer to the azure-pipelines.yml file shown below:
trigger:

  branches:

    include:

      - main

pool:

  vmImage: ubuntu-latest

parameters:

  - name: SelectedEnvironment

    type: string

    default: DEV

    displayName: 'Select Environment'

    values:

      - DEV

variables:

  - name: acrName

    value: 'acracatest2'

  - name: azureServiceConnection

    value: 'azure-rm-demo-service'

  - name: acrServer

    value: acracatest2.azurecr.io

  - name: acrConnection

    value: 'demo-service-acr'

  - name: containerAppName

    value: 'demo-aca'

  - name: containerAppImage

    value: 'demo-app-image'

  - name: mainBicepFile

    value: bicep/main.bicep

  - ${{ if and(eq(parameters.SelectedEnvironment, 'DEV'), eq(variables['Build.SourceBranchName'], 'main')) }}:

    - name: resourceGroupName

      value: ResourceGroupACATest

    - name: csmParametersFile

      value: bicep/main.dev.parameters.json

    - name: tag

      value: $[format('{0}-{1}', '$(Build.BuildNumber)', 'dev')]

stages:

  - ${{ if and(eq(parameters.SelectedEnvironment, 'DEV'), eq(variables['Build.SourceBranchName'], 'main')) }}:

    - stage: BuildDockerDEV

      jobs:

        - job: BuildAndPushApiImage

          displayName: 'Build And Push Docker Image'

          steps:

            - task: Docker@2

              inputs:

                containerRegistry: $(acrConnection)

                repository: $(containerAppImage)

                command: 'buildandpush'

                buildContext: '$(Build.SourcesDirectory)'

                Dockerfile: '$(Build.SourcesDirectory)/Demo_App.Server/Dockerfile'

                tags: $(tag)

    - stage: DEV

      displayName: Deploy to DEV

      dependsOn: BuildDockerDEV

      condition: succeeded()

      jobs:

        - deployment: DeployInfrastructureToDEV

          environment: DEV

          displayName: 'Deploy to DEV Environment'

          strategy:

            runOnce:

              deploy:

                steps:

                  - checkout: self

                  - task: AzureResourceManagerTemplateDeployment@3

                    name: ValidateBicep

                    displayName: 'Validate Bicep'

                    inputs:

                      deploymentScope: 'Resource Group'

                      azureResourceManagerConnection: $(azureServiceConnection)

                      action: 'Create Or Update Resource Group'

                      resourceGroupName: $(resourceGroupName)

                      location: $(Location)

                      csmFile: $(mainBicepFile)

                      csmParametersFile: $(csmParametersFile)

                      overrideParameters: -containerAppImage "$(acrServer)/$(containerAppImage):$(tag)"

                      deploymentMode: 'Validation'

                  - task: AzureResourceManagerTemplateDeployment@3

                    name: DeployBicep

                    displayName: 'Deploy Infrastructure to DEV'

                    inputs:

                      deploymentScope: 'Resource Group'

                      azureResourceManagerConnection: $(azureServiceConnection)

                      action: 'Create Or Update Resource Group'

                      resourceGroupName: $(resourceGroupName)

                      location: $(Location)

                      csmFile: $(mainBicepFile)

                      csmParametersFile: $(csmParametersFile)

                      overrideParameters: -containerAppImage "$(acrServer)/$(containerAppImage):$(tag)"

                      deploymentMode: 'Incremental'

                      deploymentName: '$(containerAppName)-$(tag)'
Here’s a breakdown of the key sections above:
1. Trigger Section
This section specifies that the pipeline will be triggered whenever changes are pushed to the main branch. The pipeline will automatically run for commits in this branch.
2. Pool Section
The pool section defines the environment in which the pipeline will run. Here, it specifies the use of the ubuntu-latest virtual machine image for the build and deployment process.
3. Parameters Section
This section defines a parameter called SelectedEnvironment. This is used to specify the deployment environment (e.g., DEV). The default environment is set to DEV. However, this can be changed if needed for different environments (such as STAGING or PRODUCTION).
4. Variables Section
The variables section defines key values used throughout the pipeline, such as:
- Azure Container Registry (ACR) connection details (acrName, acrServer)
- The name of the container app and the image (containerAppName, containerAppImage)
- The path to the Bicep file (mainBicepFile) for infrastructure deployment
5. Conditional Variables
This block conditionally sets additional variables (like resourceGroupName and csmParametersFile) based on the selected environment (DEV) and the branch being built (main). This ensures that only the relevant parameters are used during the deployment to the desired environment.
6. Stages Section
The stages section is divided into two stages:
- BuildDockerDEV Stage: This stage builds the Docker image for the application and pushes it to the Azure Container Registry. It uses the Docker@2 task to build and push the image using a specified Dockerfile.
- DEV Stage: This stage deploys the infrastructure to the DEV environment using Bicep. It includes two tasks:
-
- ValidateBicep: This task validates the Bicep deployment to ensure everything is correct before applying changes.
- DeployBicep: This task deploys the resources to the DEV environment, updating them incrementally.
Each task uses the AzureResourceManagerTemplateDeployment@3 task, and the container image to be deployed is dynamically passed using parameters. This is to ensure it corresponds to the build and tag generated in the earlier stages.
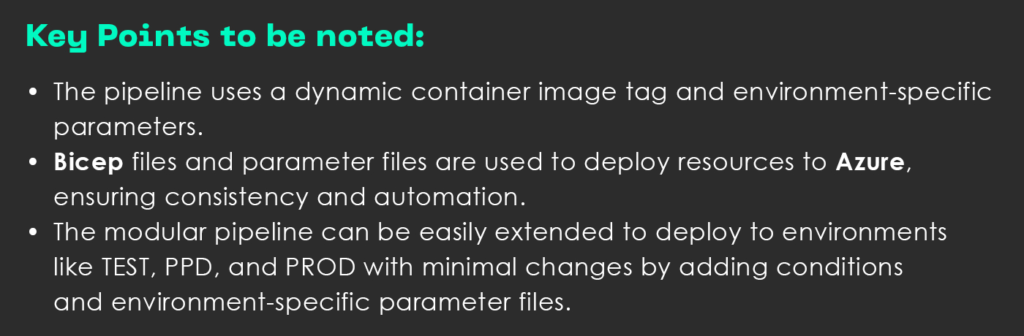
Fig: Key Points
Step 4. Set Up and Run the Pipeline
- Navigate to Pipelines in Azure DevOps.
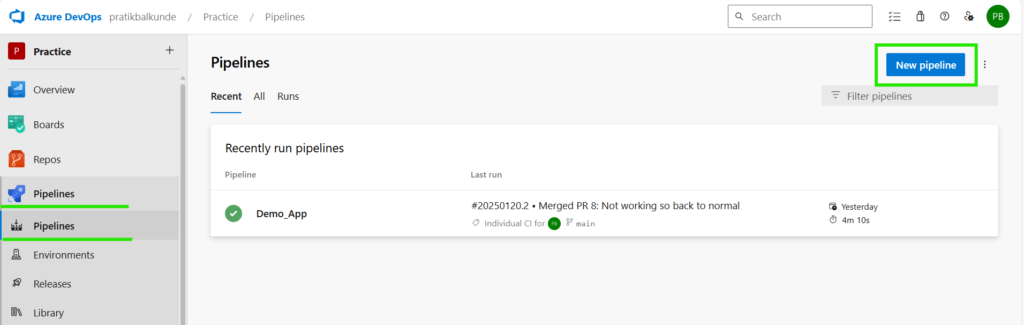
Fig: Set Up and Run the Pipeline 1
- Follow these steps to create a new pipeline:
-
- Select Azure Repos Git.
- Choose your repository.
- Select Existing Azure Pipeline YAML File.
- Specify the branch and file path.
- Save and run the pipeline to deploy your application.
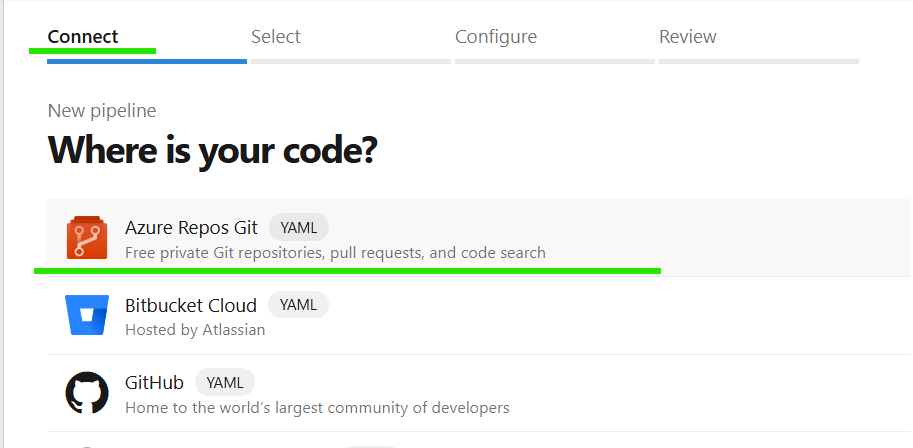
Fig: Where is your code
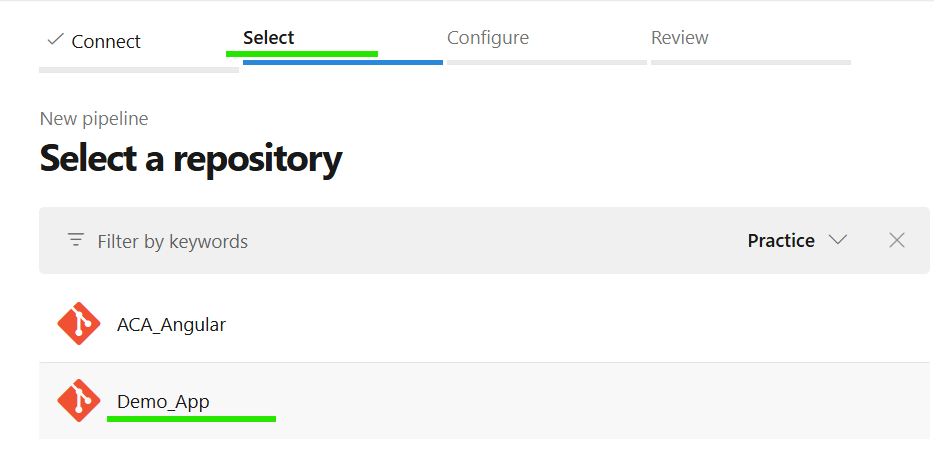
Fig: Select repository
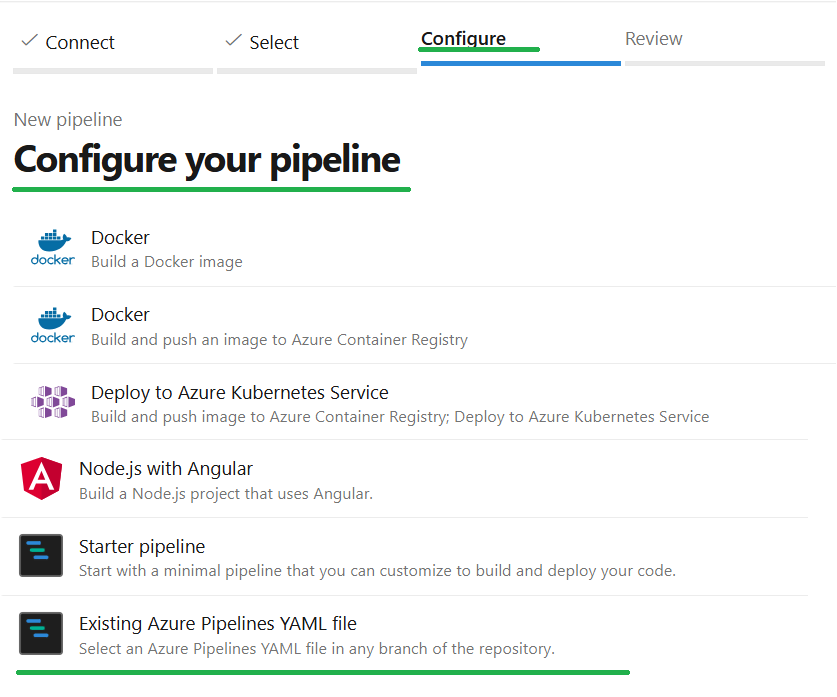
Fig: Configure pipeline
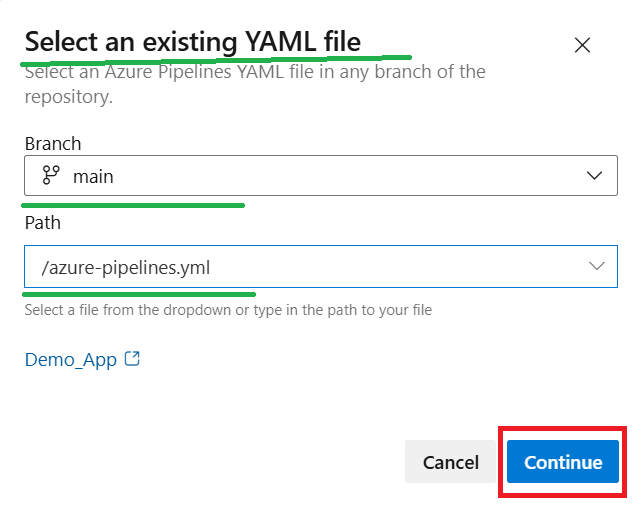
Fig: Select exisiting YAML file
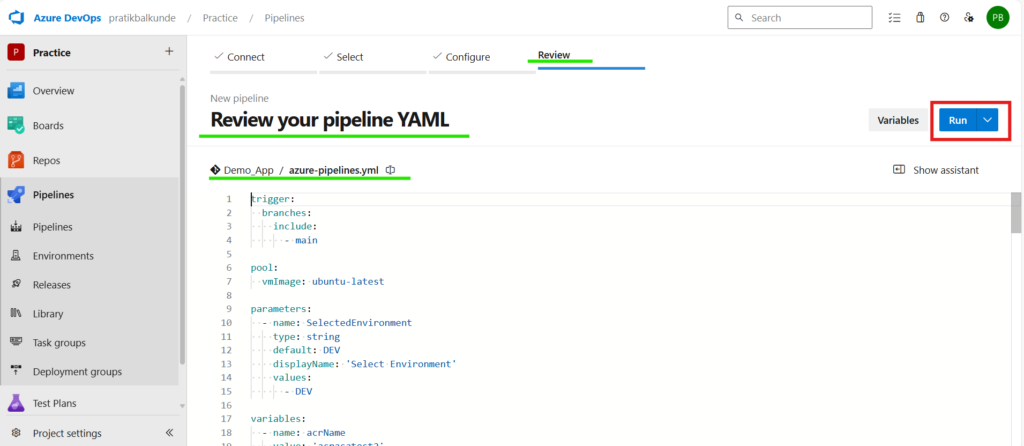
Fig: Review pipeline YAML
Step 5. Post-Pipeline Execution and Verification
Once the pipeline runs successfully, verify the deployment by checking the following:
- Pipeline Status: Here’s a screenshot confirming the successful pipeline run, with build and deployment completed without errors:
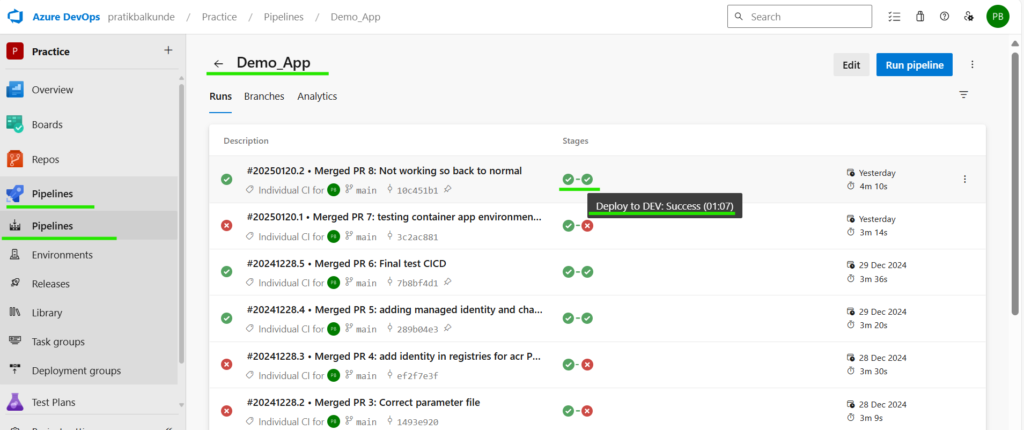
Fig: Pipeline Status
- Azure Container Apps (ACA) Deployment: Once the pipeline is completed, navigate to your Azure portal to verify that the Container App is successfully deployed. The screenshot below shows the Container App in the Azure portal. This indicates that the application is up and running.
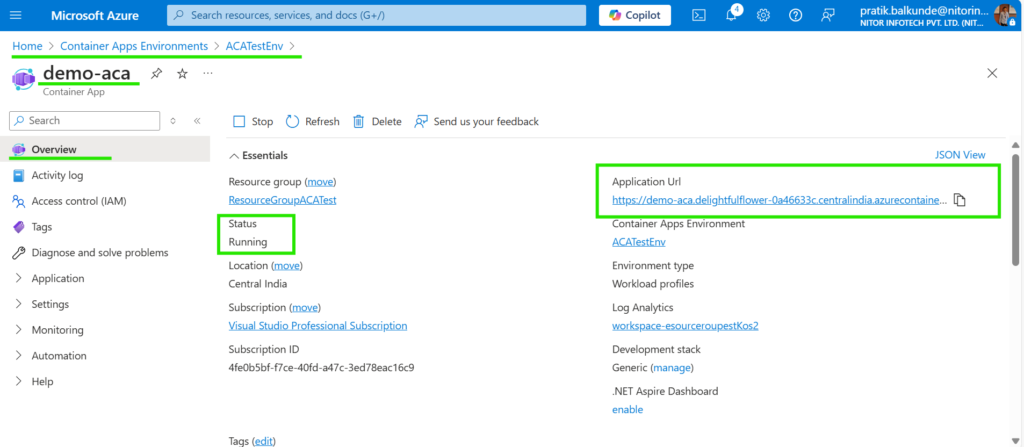
Fig: ACA Depolyment
- Application UI: Here’s a screenshot of the deployed application’s UI, showing the live app users can access after deployment:
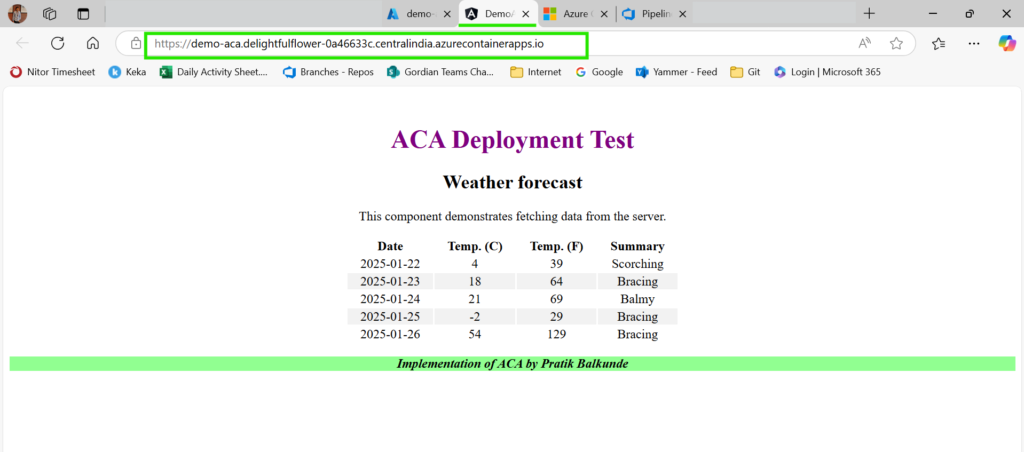
Fig: Application UI
All the visuals confirm the successful execution of the pipeline and the deployment of the application.
Suggestion: For a detailed overview of Azure Container Apps pricing, you can visit the official Azure pricing page.
So, just like your favorite shortcut, this blog helps you streamline CI/CD pipelines with Azure DevOps, making Angular and .NET deployments quick and hassle-free!
Loved this read? Reach us at Nitor Infotech and discover how AI-powered software product engineering can drive your growth in 2025 and beyond.
Deploying an Angular frontend and .NET backend on Azure using Bicep involves defining infrastructure as code (IaC) for seamless provisioning. You need to start by creating Bicep templates to deploy Azure resources like App Services, SQL Database, and Storage Accounts. Next, containerize both applications using Docker and push the images to Azure Container Registry (ACR).
Then use “az deployment group create” to deploy the infrastructure and configure CI/CD pipelines via Azure DevOps or GitHub Actions. Ensure security by setting environment variables, enabling authentication, and applying network policies. Finally, leverage Azure Monitor and Application Insights for performance tracking and autoscaling. This way, you can ensure a scalable and maintainable deployment.


