
Test automation has come a long way from the days of manually running repetitive checks. Over time, teams began relying on scripted test cases—executed across builds. They did this to ensure application stability. This shift brought speed and consistency, but not without trade-offs.Even with automation, challenges remain, such as minor UI updates breaking entire test suites and the need for ongoing maintenance of test scripts. As software becomes more complex—modular, distributed, and data-driven—the demand for smarter, more resilient testing increases. Automation tools must not only repeat steps but also adapt to changes and manage variability. This is where Playwright steps in.
Created by Microsoft, it is an open-source Node.js library built for end-to-end web testing across modern browsers. What sets it apart is its ability to work seamlessly with dynamic applications. It minimizes flaky tests and offers a consistent, flexible testing experience.
In this blog, you’ll learn how to effectively combine Playwright with the Cucumber-BDD (Behavior Driven Development) framework to create readable, maintainable tests written in plain English using Gherkin syntax. This is something that both technical and non-technical team members can understand.
Let’s begin by understanding why teams are increasingly choosing Playwright for test automation over other frameworks.
Why Choose Playwright Automation
Playwright offers a rich set of features that set it apart from other automation tools/frameworks. Here are some of its most notable capabilities:
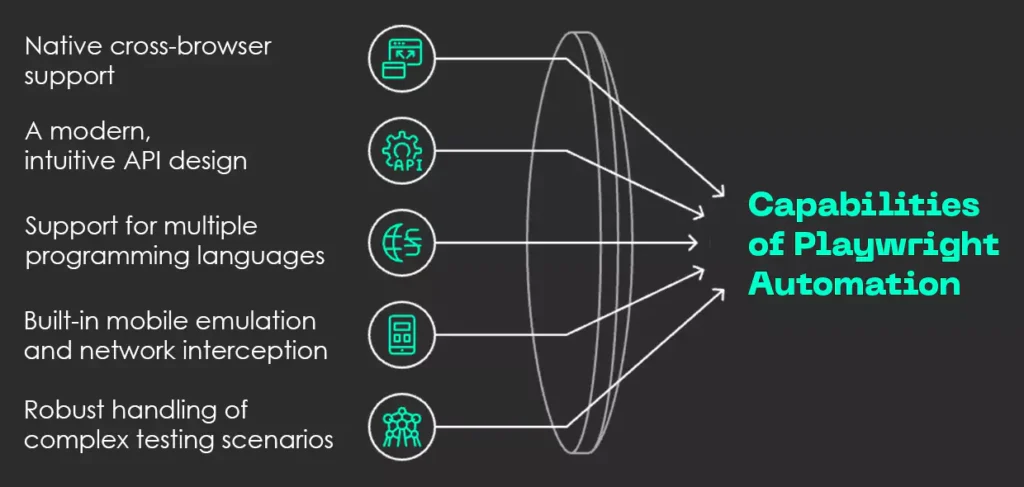
Fig: Capabilities of Playwright Automation
1. Native cross-browser support across Chromium, Firefox, and WebKit, allowing tests to run seamlessly on all major browsers without additional configuration.
2. A modern, intuitive API design that simplifies the process of writing and maintaining test scripts.
3. Support for multiple programming languages, including JavaScript, TypeScript, Python, Java, and C#, making it accessible to a broader range of development teams.
4. Built-in mobile emulation and network interception, enabling realistic testing of mobile behaviors and backend interactions.
5. Robust handling of complex testing scenarios, ensuring that interactions are not just triggered—but meaningfully validated.
For instance, before clicking on an element, Playwright ensures the following conditions are met:
- The element is attached to the DOM.
- The element is visible to the user.
- The element is enabled and not in a disabled state.
- The element is stable, meaning any animations or transitions have been completed.
These built-in checks reduce test flakiness and contribute to more reliable and accurate automation outcomes.
Here is a comparison table that highlights Playwright’s features versus other popular automation tools like Selenium and Cypress:
| Feature | Playwright | Selenium | Cypress |
|---|---|---|---|
| Cross-Browser Support | Yes | Yes | No |
| Easy Setup | Yes | No | Yes |
| Auto-Waits | Yes | No | Yes |
| Parallel Testing | Yes | Yes | No |
In a nutshell:
- Playwright is ideal for modern, cross-browser automation with extensive features, including mobile emulation and network interception.
- Selenium is best for legacy support and extensive language bindings, but can be more complex.
- Cypress offers an easy-to-use experience mainly for Chrome-based testing, with excellent developer tools.
Before moving onto the part where I highlight the steps to combine, Playwright with Cucumber-BDD framework, you need to be aware about two things – Cucumber-BDD and Gherkin.
Keep reading!
What is Cucumber-BDD?
Cucumber is a popular testing framework that supports Behavior Driven Development (BDD). With the help of this testing framework, developers can create tests in simple English.
Yes, you read it right!
It interprets test cases and behavior descriptions written in plain English to ensure the application behaves as expected. This facilitates communication between business stakeholders, developers, and testers.
Note: The goal of BDD is to bridge the communication gap between technical and non-technical teams. It allows stakeholders to define system behavior through clear and concise scenarios, ensuring that everyone shares a common understanding of how the software should function—even without needing to write or read actual code.
Onwards to know about Gherkin!
What is Gherkin?
Gherkin is a domain-specific language used in Behavior Driven Development (BDD) to define software behavior in plain, readable English. It allows you to write test scenarios that describe how a system should behave. This is without delving into the technical details of its implementation.
Gherkin follows a simple and structured syntax that makes it easy for both technical and non-technical team members to understand. It uses keywords such as:
Feature, Scenario, Given, When, and Then to create clear and consistent test cases.
- Feature: Defines the functionality being tested.
- Scenario: Represents a particular case or situation within the feature, such as executing a search with a specific keyword.
- Given: Establishes the initial context or setup.
- When: Details the action performed by the user
- Then: Describes the anticipated outcome.
Here’s a screenshot showcasing the same:

Fig: Feature file
This structured format not only improves collaboration but also ensures that everyone from developers to stakeholders has a shared understanding of application behavior.
Gherkin is an excellent framework for creating tests that are understandable by both technical teams and non-technical stakeholders. However, combining it with Playwright can be challenging, and this is where Cucumber helps to make integration easier.
The next section talks exactly about that – the integration part!
Why Integrate Playwright with Cucumber-BDD?
Combining Playwright with Cucumber improves both the effectiveness and clarity of your test automation setup. Playwright provides strong browser automation capabilities, compatible with modern frameworks like React, Angular, and VueJS. This facilitates complex and dependable test runs.
On the other hand, Cucumber makes test creation straightforward by allowing tests to be written in plain English (Gherkin). This is easily comprehensible by both technical and non-technical team members. This abstraction conceals the underlying complexity, making it simpler for manual testers to participate in automation efforts.
Together, these tools speed up the adoption of automation, empowering testers with limited coding skills to efficiently develop and run automated tests, while also fostering better collaboration across different teams.

Learn how we helped a global healthcare ISV cut white-labelling time by 77%.
Sounds interesting? Well, then move on to the practical part of setting up Playwright and Cucumber.
What Are the Steps to Configure Playwright with Cucumber-BDD?
To keep things clear, I’ve broken the configuration into two phases—first, setting up Playwright, and then moving on to Cucumber.
A. Set up for Playwright
To configure Playwright, simply follow these steps:
I. Initial Setup & Prerequisites
Install Node.js and provide its path in the environment variables.
II. Project Folder Creation
- Next, navigate to your desired location (for example, open the D drive).
- Then right-click within the folder or drive.
- Select New from the context menu.
- Click on Folder.
- Enter your desired folder name, for example: DEMO_PRACTICE_AUTOMATION.
- Press Enter to create the folder.
III. Setting Up Visual Studio Code
- Open Visual Studio Code.
Open the folder that you created. That is – DEMO_PRACTICE_AUTOMATION:
Click on File > Open Folder.
Navigate to the location where you created the folder.
Select the DEMO_PRACTICE_AUTOMATION folder and click Open. - In Visual Studio Code, open a new terminal by navigating to the menu bar and selecting Terminal > New Terminal.
IV. Playwright Installation & Configuration
Once done, install Playwright using the following command:
npm install playwright@latest
During the Playwright installation process, you’ll be prompted with a few configuration options:
- Choose the scripting language: Select either TypeScript or JavaScript (the default is TypeScript; for example, you may opt for JavaScript).
- Define the tests folder name: Specify a name for your test directory (the default is tests, or e2e if a tests folder already exists).
- CI workflow setup (optional): Choose whether to include a pre-configured GitHub Actions workflow to run tests in a CI environment.
- Install browsers: Decide whether to install Playwright’s browser binaries (default is Yes).
On following the configuration steps, a new Playwright project structure will be created. Here’s a screenshot showcasing the result of the installation process:
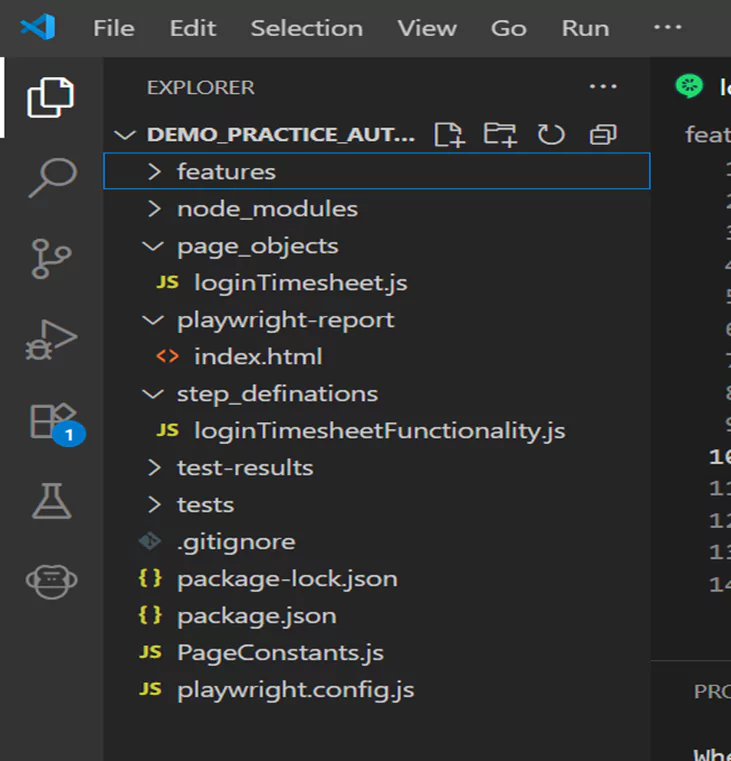
Fig: Project Folder Structure
B. Set up for Cucumber
To configure Cucumber, simply follow these steps:
I. Installation of Cucumber and Extensions
Start by installing Cucumber. Then install the Cucumber-Gherkin extension.
Next, go to VS Code and do these:
- Click on the Extensions icon (square icon) or press Ctrl + Shift + X.
- Search for Cucumber-Gherkin Full Support.
- Find and click Install.
II. Verification of Installation
- Locate and open the package.json file in your project.
- Next, scroll to the dependencies section.
- Then, verify that all installed plugins and packages are listed there.
Here’s a screenshot for the same:

Fig: Package.json file
Now that the setup is complete, let’s move on to the practical phase: writing tests using Playwright with Cucumber.
How to Write Automated Tests with Playwright and Cucumber
Here’s how you can automate tests using the Playwright and Cucumber framework:
Step 1: Feature File Creation
First, create a new folder named “features” under the created project. Then add a new file called “loginTimesheet.feature”, like this:
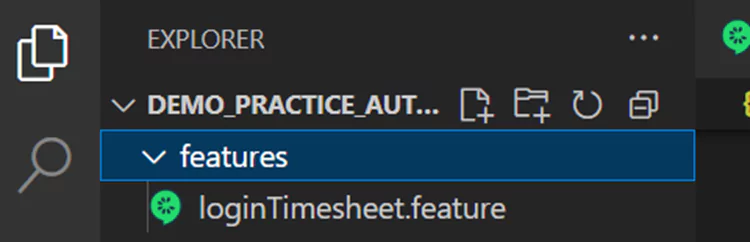
Fig: loginTimesheet.feature file
You then need to write a simple login feature file, like this:

Fig: Feature file
Step 2: Page Object Model
Next, create a separate folder within your project structure to store Page Objects. Inside this folder, add a file named loginTimesheet.js. In this example, I’ve created a dedicated JavaScript class for the login page. This class contains the locators and functions specific to that page, encapsulating all related interactions in one place.
You can look at this screenshot for the same:

Fig: Page Object Folder
Step 3: Defining Step Definitions
Once you’ve created the feature file, you can start writing the step definitions file ”loginTimesheetFunctionlity.js”.
Then create “step_definitions” folder under project and create ”loginTimesheetFunctionlity.js” file under the same.
Here are the screenshots for your reference:

Fig: Step Definition Folder
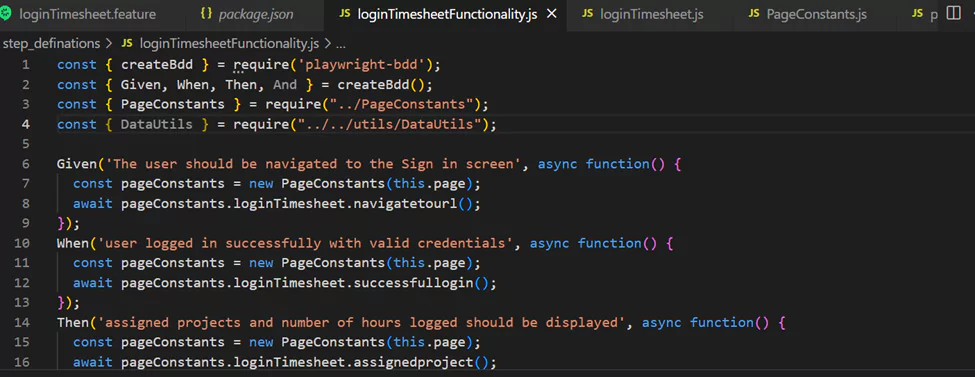
Fig: Step Definition File
Quick note: Step definitions are the pieces of code that interact with the browser and carry out the actions specified in the feature file. You can call created methods in the step definition file according to the feature file.
In Playwright, a page constant generally denotes a variable that stores an instance of the Page object, enabling interaction with a web page during testing or automation tasks.
Page constants here refer to a structured class (`PageConstants`) that manages instances of different page objects. It helps organize your automation code. This way, it makes it easier to access and manage different pages within your test suite.
Here’s a screenshot showcasing a Page Constants file:

Fig: Page Constants File
Step 4: Code Execution
Finally, use the command “npm run playwright-test loginTimesheet.feature” to execute your code.
Here are the screenshots showcasing the command and result, respectively:

Fig: Test Execution Command

Fig: Test Execution Result
Once you’re done executing all the above steps, this is the kind of result that you’ll achieve:
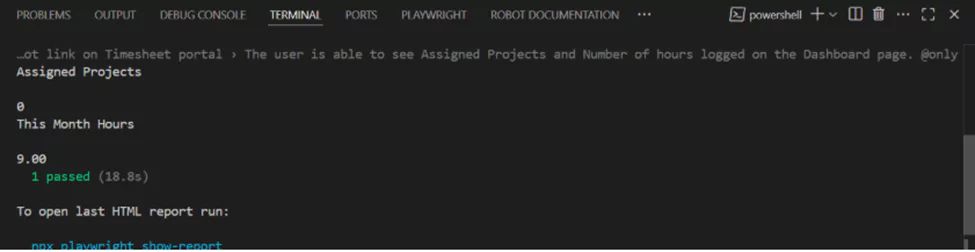
Fig: Test Result

Fig: Playwright Report Folder

Fig: Playwright Report Summary
Here’s a simplified summary to help you quickly understand the results:
The Playwright test was successfully, with all steps passing. The test scenario covered a successful user login, followed by validation of assigned projects and logged hours in the timesheet portal. As expected, the portal displayed 0 assigned projects and 9 hours logged for the current month.
The total execution time was approximately 18.8 seconds, and the test was completed without any errors. To view the detailed results, you can open the automatically generated HTML report.
To do this, navigate to the Playwright-Reports folder, right-click on the index.html file, select “Copy Path”, and paste it into your browser’s address bar. This will display a detailed view of the test execution and outcomes.
So, you’ve seen how seamlessly Playwright can be integrated into a real-world project, offering a fast, reliable, and scalable approach to test automation. By reducing maintenance effort, cutting down execution time, and streamlining workflows, Playwright not only drives cost savings but also significantly enhances overall productivity.
Therefore, teams looking to future-proof their test automation strategy should consider piloting Playwright in a small project or migrating a few critical test cases to evaluate its impact firsthand. With the right setup and process in place, it can become a central part of your quality assurance pipeline. It can fuel faster releases and higher confidence in every deployment.
Write to us at Nitor Infotech, an Ascendion company—where innovation meets execution. Let us help you bring your next software product to life using the latest tools, technologies, and the industry’s best practices.


