In a world where artificial intelligence (AI) and machine learning (ML) have become the go-to solutions for businesses, significant challenges may still arise. The challenges may range from complexities of building an ML infrastructure to the difficulties in managing and scaling models in production. These may lead to inefficiencies and slow innovation. Enters Amazon SageMaker that simplifies the entire machine learning workflow.
How? Well, let’s get to know everything about it and why you should opt for it. Additonally, I’ll also help you walk through the steps to deploy a pre-trained model with SageMaker.
Let’s get started!
Amazon SageMaker: Getting to Know
Amazon SageMaker is a popular managed service within the Amazon Web Services (AWS) cloud. It has been designed to simplify the process of building, training, and deploying machine learning models for predictive analytics.
It offers a comprehensive suite of tools, including notebooks, debuggers, profilers, pipelines, and MLOps capabilities, all within a unified integrated development environment (IDE). This makes it easier for businesses to deploy machine learning models at a large scale. Thus, streamlining the entire machine learning workflow.
Keep reading!
Why Choose AWS SageMaker?
AWS SageMaker stands out in the machine learning landscape for several reasons, such as:
1. Diverse ML Tools: SageMaker provides a rich set of tools and frameworks that cater to different machine learning needs, ensuring flexibility and adaptability for developers.
2. Managed Scalable Infrastructure: Do not worry about managing the complexities of hardware and servers as SageMaker can handle the infrastructure for you. This will allow you for easy development and ML model deployment.
3. Repeatable and Responsible ML Workflows: With built-in features for workflow management, it simplifies the process of creating reproducible and reliable ML workflows.
4. Human-in-the-Loop: This feature allows for the integration of human input into the machine learning process, enhancing model accuracy and decision-making.
5. Secure and Compliant: It offers robust security features, including network isolation, encryption, and compliance certifications, Thus, ensuring your data and models are protected.
Fascinated by its perks? Great!

Explore the Future of AI and soar with a competitive edge in 2024 with our experts.
It’s now time to delve into some practicality where you will learn to deploy a pre-trained model with SageMaker. So, grab a cup of coffee and read on for the next five minutes!
Deploying a Pre-trained Model with SageMaker
In this section, you’ll get to know about deploying a machine learning model using AWS SageMaker. This involves several steps such as:
- Setting up a Jupyter Notebook instance
- Preparing your data
- Setting Up Model Hosting
- Deploying with the Python SDK
- Creating and Validating the Endpoint
- Accessing the Model via API Gateway
This will provide us with the familiar coding environment to access and manage our models. Before diving into the details of each of the above steps, you can refer to the image given below to get a basic understanding of how everything happens:
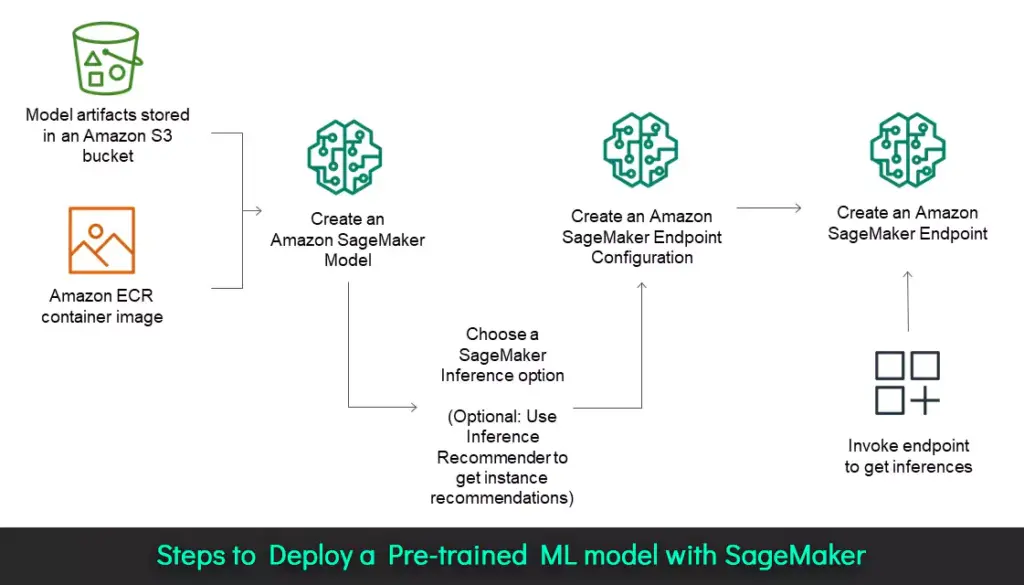
Fig: Steps to Deploy a Pre-trained ML model with SageMaker
Navigate through the above steps in detail:
Step 1: Setting Up a Jupyter Notebook Instance
Begin by creating a Jupyter Notebook instance on SageMaker. This familiar environment will allow you to code, test, and manage your ML models efficiently.

Fig: Setting up Jupyter Notebook Instance
Step 2: Preparing Your Data
Once your notebook instance is ready, prepare your data for inference. For this, here we’ll use a pre-trained model. Here’s what you need to do:
- Compress the Model: Package your model file into a GZIP tar archive (for example – model.tar.gz).
- Upload to S3: Upload the compressed model to an S3 bucket, which SageMaker will use for model hosting.

Fig: Preparing Your Data
Step 3: Setting Up Model Hosting
Now, you’ll have to create a SageMaker model from the uploaded file. To do so, follow these simple steps:-
- Inference Script: Write a script (main.py) that loads your model and handles prediction requests. This script is essential for the model server to serve your predictions.
- Dependencies: If your model requires additional Python libraries, include a requirements.txt file to ensure they are installed in the container.

Fig: Setting Up Model Hosting
Step 4: Deploying with the Python SDK
Use the SageMaker Python SDK to create and deploy your model from the S3 artifacts. This step involves defining your endpoint configuration and initiating the deployment process.
Step 5: Creating and Validating the Endpoint
Next, create an endpoint to serve your model following these steps:
- Set Up the Endpoint: Define the endpoint name and configure the necessary settings.
Note – Deployment typically takes 5-10 minutes. - Validate: Test the endpoint using the SageMaker SDK or boto3 to ensure it returns accurate predictions.

Fig: Creating and Validating the Endpoint
Step 6: Connecting to the Model through API Gateway
By default, SageMaker endpoints are not publicly accessible. To expose your model, you can set up API Gateway and AWS Lambda, like this:
- Create a Lambda Function: Use AWS Lambda to invoke the SageMaker endpoint.
- Set Up API Gateway: Configure API Gateway to handle HTTP requests and trigger the Lambda function.
- Test with Postman: Verify the setup by sending requests through Postman and checking the responses.

Fig: Accessing the Model via API Gateway
That’s it! By following the above steps, you would have successfully deployed a pre-trained model via SageMaker.
Next, I’d like to educate you about some of the optimal practices while performing the deployment process. So, get this part right!
Constraints and Best Practices
When deploying models on SageMaker, it is essential to consider constraints related to model size, memory, network security, and data accessibility. Here are some of the best practices that will help you:
- Instance Selection: Choose instances that align with the model’s computational requirements. Configure autoscaling properly to handle variable traffic loads without degrading performance
- IAM Role Configuration: Properly configure IAM roles and permissions to allow SageMaker to access S3 buckets, logs, and other AWS services required for training and inference.
- Cost Management: Monitor usage patterns and leverage Spot Instances where feasible.
- High Availability: Design deployments with multiple availability zones to ensure reliability. Ensure your SageMaker instances are correctly configured within your VPC (Virtual Private Cloud) for secure and efficient communication.
- Latency and Throughput:
a. Endpoint Configuration: Properly configure endpoints to handle the expected load, ensuring low latency and high throughput.
b. Multi-Model Endpoints: If hosting multiple models on a single endpoint, manage resource allocation and model loading/unloading effectively.
- Monitoring and Logging:
a. CloudWatch: Use Amazon CloudWatch to monitor performance metrics and set up alarms for anomalies.
b. Logging: Ensure comprehensive logging of both access logs and error logs to facilitate debugging and performance tuning.
Onwards toward knowing about expenses of AWS SageMaker!
Cost Considerations
AWS SageMaker’s pricing model is designed to be flexible, allowing you to optimize costs based on your specific use cases and workloads. Here’s a brief about the cost considerations when using SageMaker:
- Notebook Instances:
a. On-Demand Pricing: Here, you can pay for the compute and storage resources used by your notebook instances on an hourly basis. This allows for flexible scaling as needed.
b. Instance Types: Selecting the right instance type based on your workload requirements (CPU vs. GPU) can help optimize costs. SageMaker offers a range of instance types to match various computational needs.
- Training and Inference: Here, charges are based on instance-hours, with real-time inference and batch transform options. Multi-model endpoint SageMaker allows hosting multiple models on a single endpoint, which can reduce costs by sharing the same compute resources across models.
- Data Processing and Storage: This involves costs associated with processing jobs and storage. Be aware of data transfer costs between AWS services and regions. Also, minimizing unnecessary data movement can help control expenses.
- Autopilot and Labeling: Charges apply for compute, storage, and labeling tasks.
- Other Considerations: Set up AWS Billing Alerts to monitor your usage and costs. This can help you stay within budget and make informed decisions about resource allocation. Apart from that, regularly review and optimize your resource usage to ensure that you’re not incurring costs for idle or underutilized resources.
In a nutshell, AWS SageMaker simplifies the process of deploying machine learning models, providing a comprehensive suite of tools for every stage of the ML lifecycle. So, whether you’re a data scientist or an ML engineer, using SageMaker will offer the flexibility and scalability needed to bring your models to production seamlessly.
Wish to learn more about such amazing tools and technologies to boost your business? Reach out to Nitor Infotech today!


