
Why use deep learning for data extraction?
Extracting information from images/pdfs is an age-old problem of the AI world. Although the latest achievements in the field of deep learning have seen tremendous success, text and data extraction from these invoices in the form of images or pdfs remains a challenge. Historically, we have relied on paper invoices to process payments or support accounts. However, this requires manual interference and remains a time-consuming process.
Typically, large organizations have several vendors, and manually processing an influx of invoices is a tedious process. This process is also prone to errors and consumes a lot of time and resources leading to outstanding payments and reworking on the erroneous invoices. To combat these issues, deep learning along with OCR is used for invoice data extraction to automate the business processes.

Learn how we used OCR technology to digitize vendor invoices for an automotive company.
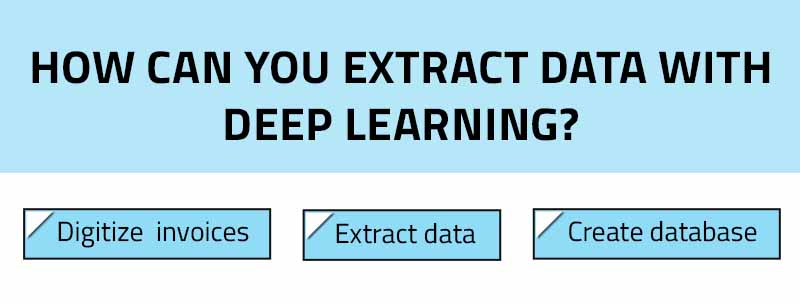
By leveraging advanced machine learning techniques, it is possible to extract data from invoices in a hassle-free manner. Here’s what the 3-step process looks like:
- Digitize invoices- Invoices are in the form of pdfs that need to be digitized. Depending on the quality of the input, we need to add an image preprocessing pipeline for the best results.
- Extract data- Data extraction is done using AI algorithms. We can process this extracted information using Optical Character Recognition. Here, it is important to identify which piece of text corresponds to which field.
- Create database- After the data has been extracted, we need to create a database based on a unique identifier.
Why opt for deep learning-based invoice data extraction?
Text extraction from these invoices can offer a lot of benefits, some of which are discussed below:
1. Automation
Automating a system for data extraction leaves less scope for manual intervention. With automation, every step- right from ingesting data to giving desired output in a required format, can be done automatically. Using advanced machine learning and OCR, we can ingest images and extract text from them. The only time we may have to intervene is to crosscheck whether the process is running as expected.
2. Accurate data extraction
Since there is no manual intervention, the number of errors is drastically reduced. Additionally, the deep learning model tends to get better with time, which facilitates document processing accurately in reduced time.
3. Cost Reduction
While extracting data from invoices using traditional methods, we need to develop rules-based engines and keep changing them as the data variability increases. This adds to implementation costs as well as other operational costs while processing the invoices. A deep learning data extraction process increases the efficiency of the system and reduces errors which helps in achieving significant returns in a short time.
4. Efficient Process Management
An automated data extraction system reduces the rework required as well as tracks overpayments, leakages or late payments. An efficiently managed system will improve the relationship with the vendors and help in becoming a result-driven and optimally functioning organization.
What is the concept behind invoice data extraction-object detection?
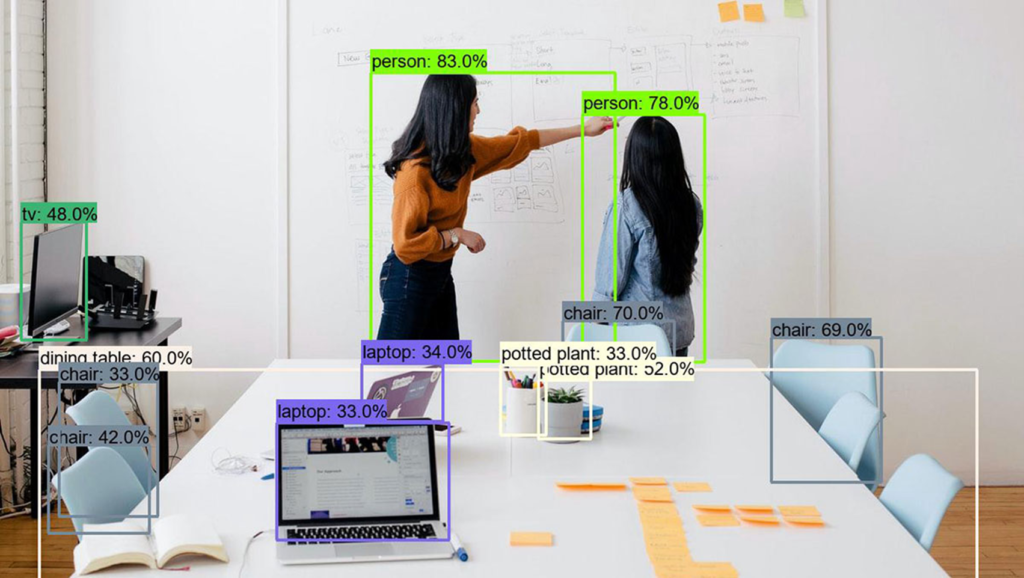
The image below illustrates how an object detection algorithm works. Each object in the image has been located and identified with a certain level of precision.
Object detection is breaking into a wide range of industries, with use cases ranging from personal security to productivity in the workplace. It is applied in many areas of computer vision, including,
- Image retrieval
- Security
- Surveillance
- Automated vehicle systems
- Machine inspection
Of course, the possibilities are endless when it comes to future use cases for object detection.
So, how does it work? Let’s take a look at some of its aspects.
- Object recognition: Simply put, object recognition software detects patterns. Similar to the chair or person in the image above, with invoices, we try to detect our area of interest such as invoice date, amount, etc. The primary objective of the algorithm is to understand what the object is and its location regardless of its position, and that is the beauty of these algorithms.
- Object detection: Object detection is used to locate an object for example, to show you where an object is in each image. Object recognition, on the other hand, is used to identify or classify an object.
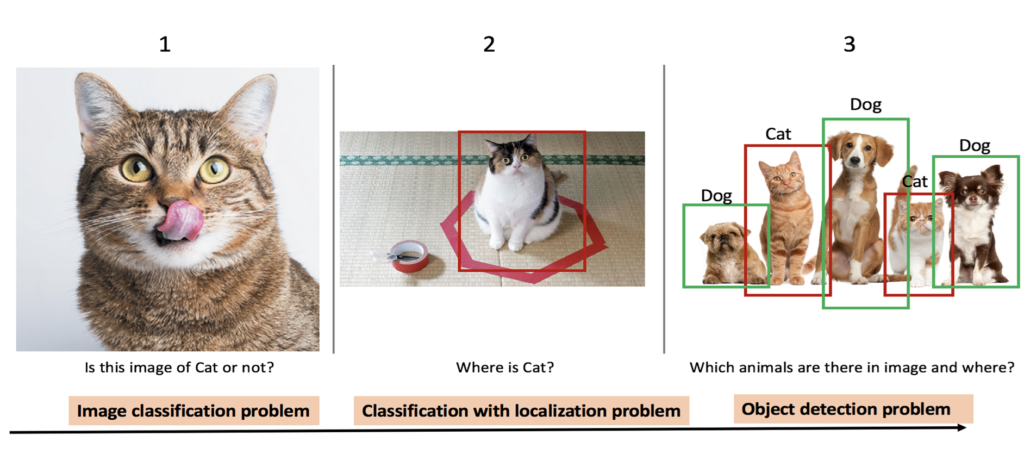
- Image classification: Image classification is the task of assigning an image from a fixed set of categories, essentially answering the question “What is in this picture?”.
- Object localization: Object localization allows us to locate our object in the image, so our question now changes to “What is it and where it is?”. Essentially, it sheds light on the task of “classification with localization”. This means given an image you classify the object that appears in it, and find its location in the image, usually using a bounding box.
- Object detection: Object detection entails detecting objects of a certain class within an image. It tries to find all the objects in an image and draws the so-called bounding boxes around them. The state-of-the-art methods in object detection can be categorized into two main types: one-stage methods and two stage-methods. One-stage methods prioritize inference speed, and include example models such as YOLO, SSD and RetinaNet. Two-stage methods prioritize detection accuracy, and include example models such as Faster R-CNN, Mask R-CNN and Cascade R-CNN.
Let’s discuss YOLO “You Only Look Once ”, one of the most popular algorithms in AI. It has always been the go-to for real-time object detection. Research shows that the unified architecture of YOLO is extremely fast. The base of YOLO model processes images in real-time at 45 frames per second, while the smaller version of the network, Fast YOLO processes at 155 frames per second while still achieving double the accuracy of other real-time detectors. This algorithm outperforms other detection methods, including Deformable part models and R-CNN family of models, while generalizing from natural images to other domains like artwork.
YOLO algorithm utilizes bounding box regression heads and classification methods. The YOLO architecture in simple terms consists of an S×S(typically s=19) grid cells of classifiers and regressors. Essentially, it tries to predict a class of an object and the bounding box specifying object location attached to every grid cell. Each bounding box can be described using four descriptors:
- bx,by center of a bounding box
- bw width
- bh height
- C as probability corresponding to a class of an object (cat,dog,person etc.).
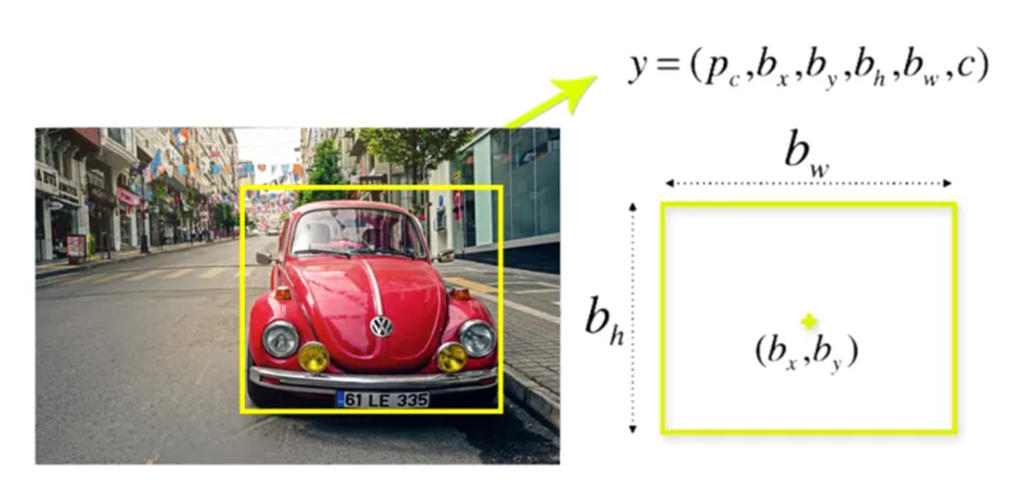
It also predicts a pc value, which is the probability that there is an object in the bounding box. For example- We can see that there is an object in the image. So, for a grid anywhere on the car pc will be equal to 1. bx, by, bh, bw will be calculated relative to the particular grid cell that we are dealing with. Let’s say the car is of second class, c2 = 1 & c1 and c3 = 0. So, for each of the 19 grids, we will have an eight-dimensional output vector. This output will have a shape of 19 X 19 X 8. So, now we have an input image and its corresponding target vector. Using the above example (input image – 224 X 224X 3, output – 3 X 3 X 8).
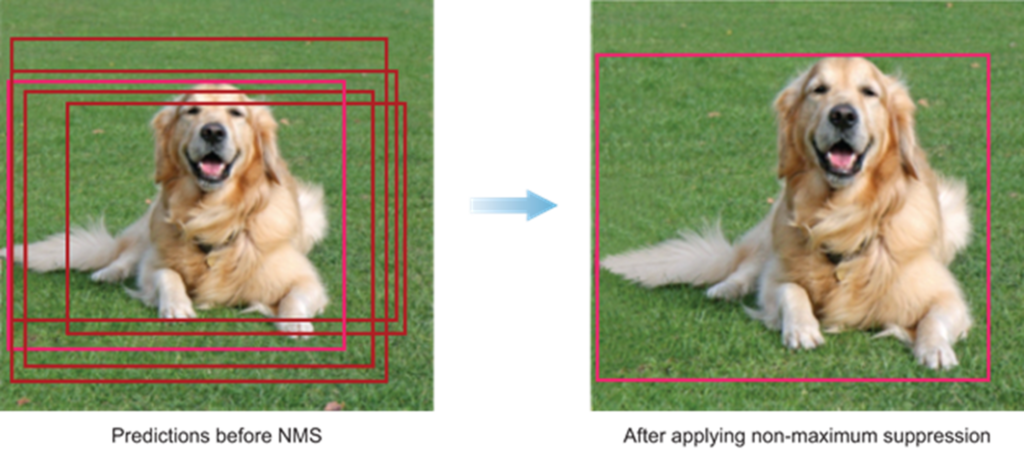
Most of these cells don’t contain the bounding boxes. Therefore, we predict the value pc, which helps us remove boxes with low object class probability. Pc also helps in removing overlapping boxes using a method called non-max suppression. In this, we take the boxes with maximum probability and suppress the close-by boxes with non-max probabilities.
Let’s see how we can code YOLO. Training a model from scratch consists of a few steps such as preparing a dataset, setting up the environment, configuring the files, training the model, and model inference.
We can get our dataset labelled by any object detection annotation tool. Some tools that we can use are LabelImg, LabelMe, Vgg image annotator, etc. After annotating, we can download them in YOLO format or Pascal VOC format. We must ensure that our annotations and images are kept in the same directory. After this, we generate train, test, and validate files. It’s a good practice to keep 70% data in the training set, 20% in the validation set, and 10 % in the testing set.
Next, we have to ensure that our dependencies are compatible with YOLO. The minimum requirements are PyTorch version ≥ 1.5, Python version 3.7, and CUDA version 10.2. The dependencies can easily be installed using pip or the requirement.txt file.
After installing the dependencies, we have to install the repository YOLOv5. We can clone from the official repo. and then modify the YAML file to describe our dataset parameters.
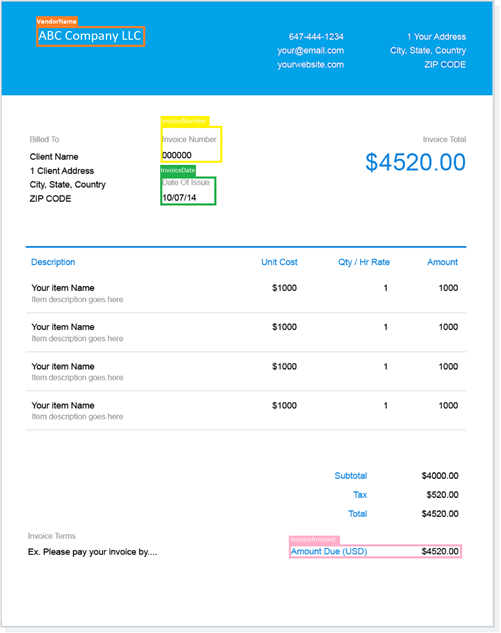
# here we specify the files train, test and validation txt
train: /self/dataset/inv_train1.txt
val: /self/dataset/inv_val1.txt
test: /self/dataset/inv_test1.txt

# number of classes in our dataset
nc: 4
# class names
names: [’InvoiceNumber’,’InvoiceDate’,’InvoiceAmount’,’VendorName’]
While training, we can pass the YAML file to select any of these models based on our requirements. Now that everything is configured we are all set to train our YOLO model.
!python train.py --img 512 --batch 4 --epochs 300 --data '/data/inv_files/data.yaml' --cfg ./models/custom_yolov5s.yaml --weights '' --name yolov5l_results --cache
- img: define input image size
- batch: determine batch size
- epochs: define the number of training epochs.
- data: set the path to our yaml file
- cfg: specify our model configuration
- weights: specify a custom path to weights
- name: result names
- nosave: only save the final checkpoint
- cache: cache images for faster training
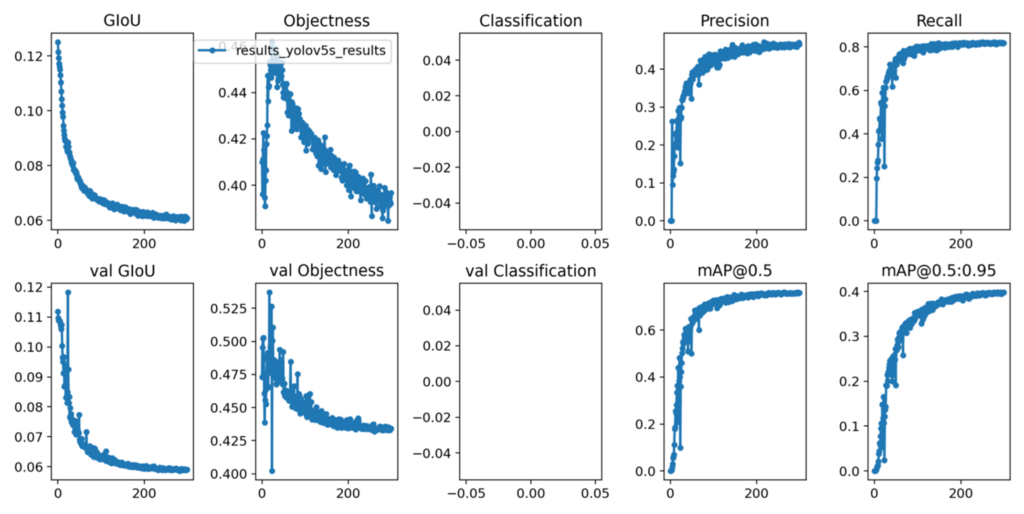
These are the parameters that we need to pass while training. Once that is completed, the model will be saved in your “weights” directory and the resulting matrix graph will be generated as follows.
Now that the model has been trained, let’s see how we can test the performance on future images. To run the model inference we use the following command.
!python detect.py --weights runs/train/yolov5s_results/weights/best.pt --img 512 --conf 0.4 --source ../data/inv_files/test/images
- source: input images directory or single image path or video path
- weights: trained model path
- conf: confidence threshold
And there you have it! This will process the input and store the output in your inference directory.
As you can see, the idea of automated invoice processing is not just limited to invoices. We can expand this idea to finance, banking or any other domain where we have plenty of paperwork. We can always automate a manual task and generalize a solution no matter how complicated it looks. By adding continuous learning within our core idea, we can always move towards perfection.
Reach out to us to learn more about our AI and cognitive engineering capabilities and take a look at my previous blog to dust off on the basics of improving OCR accuracy.


