
Think about how frustrating it would be if every app you used had a different way to log in. One app asks for a password, another wants a code, and a third makes you set up security questions all over again. Now imagine you’re the developer behind those apps. You’re building and managing separate login systems for each one. It’s messy, time-consuming, and risky.
This kind of chaos is exactly what many organizations used to face. Without a centralized way to manage user identities and access, security gets patchy, user experiences become inconsistent, and developers spend too much time solving the same problems in different places.
That’s where Keycloak makes a difference. It’s not just another login tool. Keycloak is a smart, all-in-one solution for managing who gets access to what.
In this blog, we’ll dive deep into everything you need to know about Keycloak—its core features, how to configure and integrate it into your applications, and how to tailor it to meet your specific needs.
What is Keycloak and What Makes It Stand Out?
In simple words, Keycloak isn’t just an authentication server. It’s a full-fledged, open-source Identity and Access Management (IAM) solution designed to simplify and secure how users log in and access digital services.
At its core, Keycloak helps organizations eliminate the need to manually build and maintain custom login systems for every application. It supports industry-standard protocols like OpenID Connect, OAuth 2.0, and SAML 2.0. This makes it highly compatible with modern applications and services.
It offers the flexibility and scalability needed to support both small projects and enterprise-grade deployments.
Here are some standout features that make Keycloak a powerful and unique IAM solution:
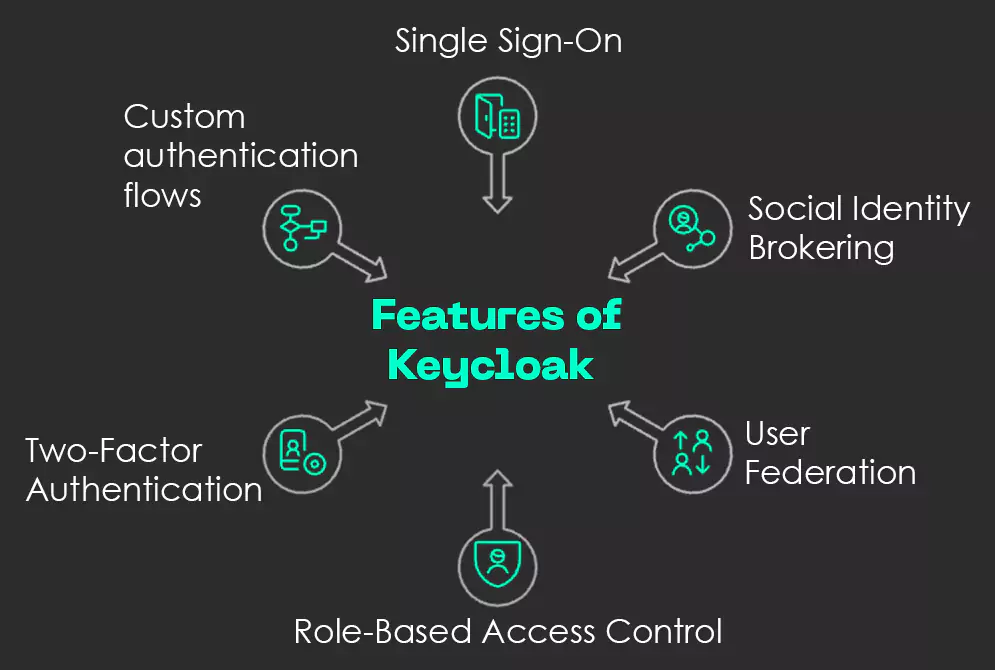
Fig: Features of Keycloak
- Single Sign-On (SSO): Enables users to log in once and access multiple applications without having to authenticate repeatedly. This not only enhances user experience but also reduces the overhead of managing multiple login credentials across systems.
- Social Identity Brokering: Allows easy integration with third-party identity providers such as Google, Facebook, GitHub, and others. This simplifies user onboarding and allows end users to log in using accounts they already trust and use.
- User Federation: Connects to existing user directories like LDAP or Microsoft Active Directory to synchronize and manage user identities. This ensures seamless integration with legacy systems and centralized user management.
- Role-Based Access Control (RBAC): Defines and manages fine-grained access permissions using roles and groups tailored to organizational needs. RBAC ensures that users only see and interact with resources relevant to their roles.
- Two-Factor Authentication (2FA): Enhances account security by requiring users to verify their identity using time-based one-time passwords (TOTP/HOTP) or external authenticators. This added layer protects against unauthorized access even if credentials are compromised.
- Custom authentication flows: Offers a flexible framework to design and implement customized login, registration, and credential recovery flows. You can add conditions, steps, or triggers to match specific business or security requirements.
Note: Seamless integration lies at the core of Keycloak’s value. By connecting it with existing enterprise systems, organizations can unify authentication and authorization processes across their entire application landscape. This can ensure consistency, security, and simplicity.
With the foundation in place, let’s dive into the step-by-step process of installing and configuring Keycloak.
How To Install and Configure Keycloak
To install and configure Keycloak, you need to follow these steps:

Fig: Installing & Configuring Keycloak
Step 1: Install Keycloak Distribution
- What to Do: Acquire the needed Keycloak software package and install its foundation files into your target server environment.
- How to Do: Proceed to the official Keycloak website and download the distribution (for example, standalone server) for your operating system. Take note of Keycloak’s official documentation and the step-by-step guide to installation included therein and install the software correctly.
Step 2: Initialize Keycloak and Access Administration Console
- What to Do: Start the Keycloak server and its web-based admin console for setup.
- How to Do: Start Keycloak from platform-specific directions. When started, open your browser and go to http://localhost:8080/auth/admin (or your hostname/IP with port 8080) to enter the rich-featured admin console.
Step 3: Create Your Realm
- What to Do: Create a separate, central security realm in Keycloak to isolate your users, credentials, roles, and groups. A realm is an isolated container for your identity information.
- How to Do: Within the admin console of Keycloak, locate the “Add Realm” link. Define a name for your realm (e.g., “MyCompanyRealm”, “ProductionApps”) and establish its first configuration based on your security policies and organizational needs.
Step 4: Create Applications Clients
- What to Do: Enroll your applications in Keycloak, and they will be able to utilize Keycloak to authenticate and authorize users.
- How to Do: Navigate to the “Clients” page of your new realm. Click on “Create” to create each of your applications. Configure basic client settings such as their client ID, redirect URIs, and access type (e.g., confidential, public). This is so you can have a secure connection.
Step 5: Implement User Roles and Session Management
- What to Do: Add fine-grained permissions to your applications and define what is done with user sessions upon successful authentication.
- How to Do: In your configuration, go to “Roles” to configure suitable user roles (e.g., “admin”, “user”, “editor”). Session timeouts, actions needed, and token expirations for all clients are all adjustable. The wide range of options available in the admin portal is truly valuable for fine-tuning and customizing the experience.
Step 6: Enable Single Sign-On (SSO) for Easy Access
- What to Do: Activate the core SSO function on your domain so that users can log in once and use multiple integrated applications without logging in every time.
- How to Do: Login into your “Realm Settings” in the Keycloak admin console and locate the SSO settings. Turn on SSO and set up items such as cookie settings and session management, so there is an uninterrupted, secure experience across all of the linked applications.
Step 7: Bring Applications into the SSO Domain
- What to Do: Set up your own apps to communicate with Keycloak, passing authentication requests on to your set-up SSO realm.
- How to Do It: On each app, utilize the correct Keycloak adapter or client library (for example, for Java, Node.js, Spring Boot). Have your application’s security setup point to your Keycloak realm endpoint, so users authenticate once through Keycloak and can use all participating apps easily.
Note: Beyond setup and configuration, it’s important to understand what happens behind the scenes on the backend—as well as the changes that affect the frontend—during Keycloak integration.

Need help picking between Node.js, Java, and .NET? Well, choosing the right tech stack just got easier.
Keep reading to learn about it!
What Are the Backend Responsibilities During Keycloak Integration?
Here is a summary of the backend responsibilities that you need to follow while Keycloak integration:
| Task | Description |
|---|---|
| Realm & Client Setup | Define realms and register frontend/backend applications as Keycloak clients. |
| Role Management | Create realm-level and client-level roles for fine-grained access control. |
| User Lifecycle Management | Automate user creation, group assignments, deactivation, and password resets. |
| Theme Customization Deployment | Deploy custom login and registration themes to Keycloak’s server file system. |
| Secure Token Verification | Verify JWT tokens in backend APIs using Keycloak’s public keys and claims. |
| Admin API Automation | Use Keycloak REST API or Admin CLI to script administrative tasks. |
| Monitoring & Logging | Enable Keycloak logs and integrate with monitoring tools for auditing. |
| Integration with External IDPs | Connect Keycloak with LDAP, Google, or SAML providers if needed. |
That’s all… or is it? Wondering about the next obvious step? I hear you.
Let’s now explore how to integrate a React frontend application with Keycloak.
How Can You Secure a React Frontend Using Keycloak?
When it comes to integrating Keycloak with a React application, a clean and modern approach is to use the oidc-client-ts library—an open-source, standards-compliant OIDC client available via Npm. It streamlines the entire authentication process. This makes it easier to manage user sessions, tokens, and role-based access control on the frontend.
Here’s a breakdown of the key steps involved, along with code snippets:
1. OIDC Client Configuration:
import { UserManager } from 'oidc-client-ts';

const userManager = new UserManager({

authority: 'https://auth.example.com/realms/my-realm',

client_id: 'my-client-id',

redirect_uri: window.location.origin + '/callback',

response_type: 'code',

scope: 'openid profile email',

post_logout_redirect_uri: window.location.origin,

});
2. Login and Logout Handling:
- To login, use this: userManager.signinRedirect()
- To logout, use this: userManager.signoutRedirect()
- To remove user from the session, use this: userManager.removeUser()
3. Token and Session Management:
The library automatically manages access_token, refresh_token, and their renewal process.
It stores session information securely in local or session storage.
You can also hook into built-in events like userManager.events.addUserLoaded(…) to respond when a user is loaded.
Key events such as isTokenExpiring(…) and isTokenExpired(…) help you handle token refreshes before or after they expire.
4. App Integration:
We wrap the application in an authentication provider using React Context to manage user state globally.
Protected routes then check for a valid user session or token before granting access, ensuring secure navigation throughout the app.
5. UI Logic:
Use the user.profile object to access user roles or claims and conditionally render components based on permissions.
The integration follows an OIDC-compliant flow with support for PKCE, aligning with modern security best practices.
Now that’s it!
Let’s head onwards to learn about Keycloak customization.
How Can You Build a Fully Custom Keycloak Experience?
In order to completely overhaul the default Keycloak theme with your own theme and design and customize components like forms with textfields, buttons, logos, and error pages, you can use the keycloakify library, along with Storybook.
You’re free to use any major component library of your choice—such as Material UI or Ant Design—for styling and layout.
Using Keycloakify, you’ll need to eject each Keycloak page and replace the default route element with your custom component.
In the KcPage.tsx file, implement logic within the return statement to conditionally render your custom component and pass the necessary props accordingly.
For instance, it would look like this:
export default function KcPage(props: { kcContext: KcContext }) {

const { kcContext } = props;

const { i18n } = useI18n({ kcContext });

return (

<Suspense>

{(() => {

switch (kcContext.pageId) {

case "login.ftl":

return (

<Login Template={Template} kcContext={kcContext} i18n={i18n} />)

);

default:

return (

<DefaultPage

kcContext={kcContext}

i18n={i18n}

classes={classes}

Template={Template}

doUseDefaultCss={true}

UserProfileFormFields={UserProfileFormFields}

doMakeUserConfirmPassword={doMakeUserConfirmPassword}
/>
);
}
})()}
</Suspense>
);
}
In this setup, login.ftl—Keycloak’s default login page with predefined username and password fields, is replaced with your custom component. It is styled to match your design system.
To make this work, you’ll also need to adjust the kcContext to align with your component’s needs. This context will provide all the necessary props, including realm and user information.
Using Storybook alongside Keycloakify will allow you to preview and refine components in real time with hot reloads. This makes the customization process more efficient and developer-friendly.
For more details, feel free to explore the official Keycloakify documentation on their website.
So, integrating Keycloak into enterprise applications offers a powerful and centralized solution for identity and access management. With support for modern authentication standards like OIDC, seamless integration via libraries like oidc-client-ts, and robust backend APIs for automation and control, it simplifies securing both frontend and backend systems.
Its customizable user interface, admin portal, and ability to integrate with external identity providers make it highly adaptable to enterprise needs. By offloading authentication concerns to Keycloak, organizations can focus more on business logic while ensuring strong security and scalability for user management.
As digital ecosystems grow more complex, solutions like Keycloak are no longer optional—they’re strategic. The next step? Start experimenting with real-world integration and see just how much time and effort Keycloak can save you.
Curious to explore cutting-edge tools and technologies to power your next big product idea? Get in touch with Nitor Infotech — our experts are here to help you turn your vision into reality.


