Angular
Angular is an open-source, JavaScript framework created in TypeScript. Its primary ‘why’ is to craft single-page applications. Angular has distinct advantages as a framework, and it also offers a standard structure for developers to work with.
In today’s blog, I’m going to help you get started with Angular. First, you need to install Angular and get acquainted with Angular CLI. Let’s begin…
What is the Angular CLI?
The Angular Command Line Interface (CLI) is basically used to develop, scaffold, or manage the Angular application.
It can be used to create projects, generate application and library code, and carry out multiple development tasks.

Learn how our Angular UI test automation saved 90% on manual testing for a customer.
Now let’s dive into the basics of Angular.
Basics of Angular
Components
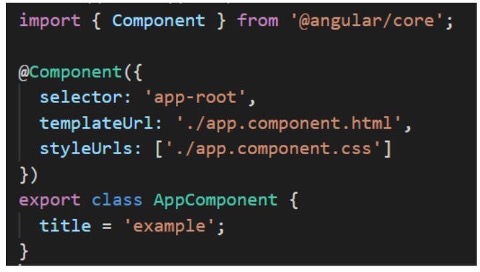
These are basic building blocks of the Angular application. A component is a typescript class which has a HTML (template file) and CSS (style files) attached to it. Inside the component decorator we attach these files as shown below:
Let’s understand what a module in Angular is.
App.module.ts
What is a module in Angular?
A module in Angular is a place where the components, directives, pipes, and services, which are related to the application can be grouped.
Each Angular application has minimum one NgModule class, the root module, which is normally named AppModule and stays in a file named app.module.ts. You can launch the application by bootstrapping the root NgModule.
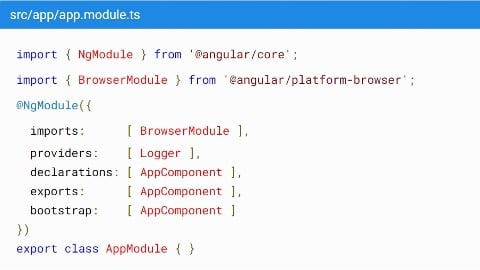
- declarations: It contains all components, directives, and pipes of this module.
- exports: The declarations which will be visible to other modules.
- imports: Here we add modules which will be required.
- providers: Services we basically add in this array, we can add them in component as well
- bootstrap: The application launches by bootstrapping the root AppModule , which is also referred to as an entryComponent . Among other things, the bootstrapping process forms the component(s) listed in the bootstrap array and inserts each into the browser DOM.
It’s time to turn to data binding.
Data Binding
This is a mechanism by which we can create changing contents in our application.
Types:
Interpolation binding
In this type of binding, we basically get the data from component to HTML.
Interpolation makes use of the double curly brackets {{ and }} as delimiters.
In a component, we can create a variable like this.

In HTML file we can use that as shown below.

Property binding
We can give the dynamic value to a property of HTML tag by using property binding.
For binding a property we use [] brackets

Event binding
With this, we can listen to events (keystrokes, mouse movements, clicks, and touches) and perform some actions.

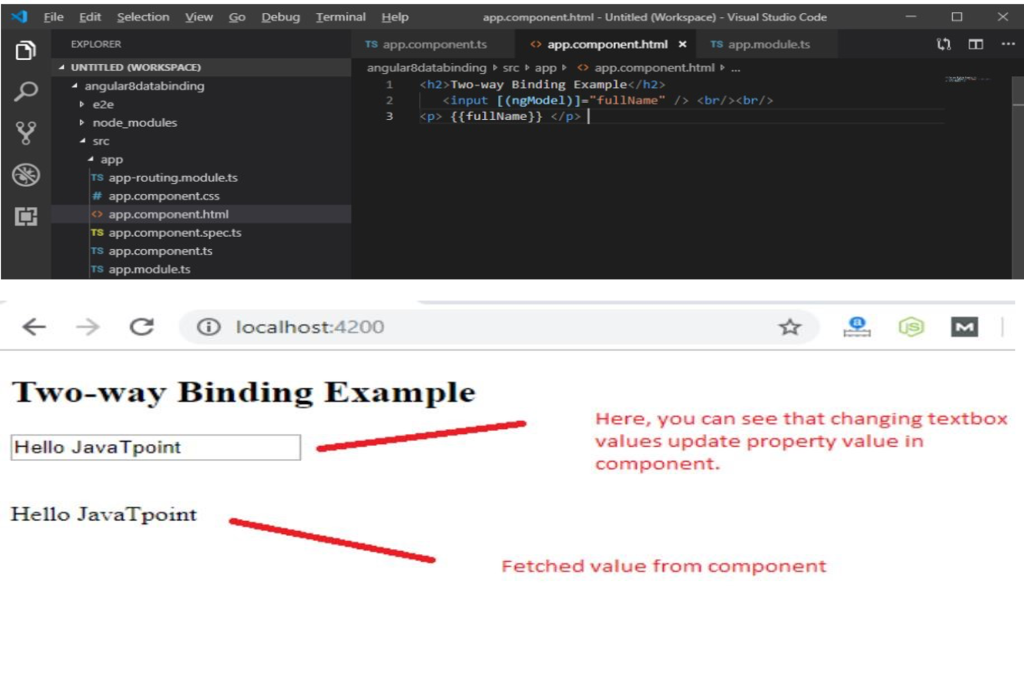
Two-way data binding
Values which we can pass from component to HTML and vice versa.
Syntax
![]()
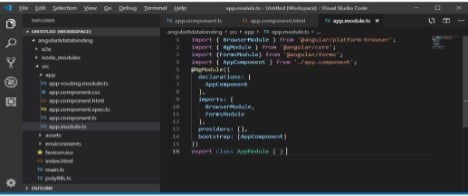
Note: For two-way data binding, we must enable the ngModel directive. It relies upon FormsModule in angular/forms package, so we must add FormsModule in imports[] array in the AppModule. It is shown below.
Example: –
In this example, we can change the value of text in the input field the changed value is send from HTML to .ts file and then the changed value is retrieved in the HTML file from .ts file to show in the paragraph tag. app.component.ts
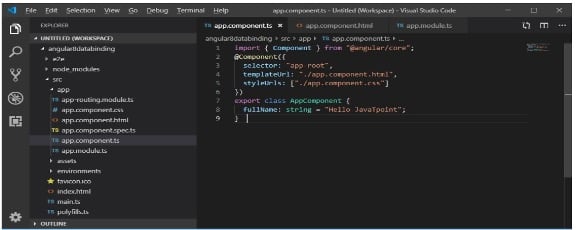
app.component.html
Now it’s time to understand directives in Angular.
Directives
Directives can add new behavior to pages or change the existing view.
Directives are categorized in the following types:
- Component Directives: Components we create in Angular are called component directives.
- Structural Directives: A type of directives which changes the structure of HTML eg: *ngIf, *ngFor
*ngIf is like if else, *ngFor is like for loop, these we use in HTML files. - Attribute Directives: It changes the appearance of the view by using ngStyle and ngClass.
- Custom Directives: We can create custom directives in Angular.
It’s time to turn to NgStyle.
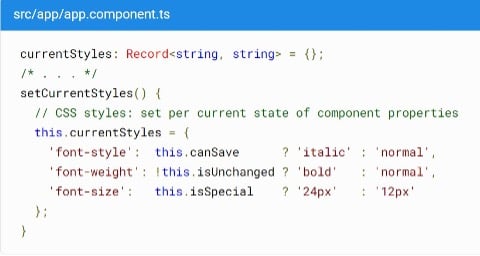
NgStyle
It can add and remove a set of HTML styles.
Here in typescript file we have created an object of currentStyles where we are deciding the styles.
Here we have used the currentStyles object in an HTML file.

It’s time to turn to NgClass.
NgClass
If we want to add or remove multiple CSS classes on a single tag, then we can use NgClass.
Various ways to use ngClass
• If we want to apply a single class when a particular condition gets satisfied.
o my_class will be applied when the condition will be true. Two ways:
![]()
![]()
• If we want to apply multiple CSS classes on the basis of condition then we can use these syntax o my_class , my_class2 will be applied when the condition are true.
Two ways:
![]()
![]()
Now let’s turn to pipes!
Pipes
Pipes are used to transform the HTML before showing it in a browser.
We have DataPipe, UpperCasePipe, LowerCasePipe, CurrencyPipe, DecimalPipe, PercentagePipe.
We use ‘|’ operator to apply.
We can also create custom pipes in angular
Pipes are also of two types: pure and impure pipes.

Now let’s understand forms.
Forms
Template driven forms
These forms are created using directives in a template.
Step 1: Add FormsModule in app.module.ts file.
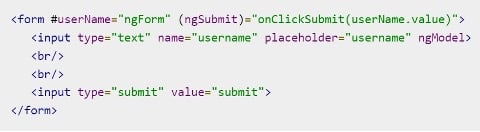
Step 2: Create a form in test.component.html file.
Template variable #userName and assign ngForm and bind the submit by (ngSubmit)
, ngModel for binding value from template to typescript file we and use two-way binding.
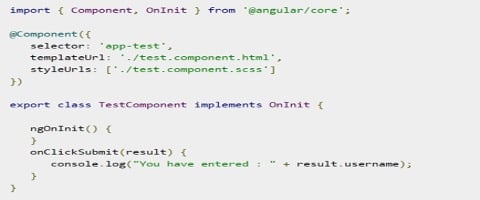
Step 3: Create a onClickSubmit() function in test.component.ts file
Reactive Forms
Step 1: Configure ReactiveFormsModule in app.module.ts
Step 2: Here are a few terms to know.
- FormControl − It is a unit in FormGroup referring to input fields in a form.
- FormGroup − It is a collection of FormControls.
- FormArray − We can use this to create an array with FormControls.
- ControlValueAccessor − It operates as an interface between Forms API to HTML DOM elements.
Step 3: We must import FormGroup and FormControl in component.ts file.
Created an instance of formGroup and with the name formdata.
Created an instance of FormControl and set it as one of the entries in formdata.
Created a onClickSubmit() method, which sets the local variable, userName with its argument.

A new form is created and set its formGroup property to formdata. New input text field is created, and set is formControlName to username.
ngSubmit event property is used in the form and set onClickSubmit() method as its value. onClickSubmit() method gets formdata values as its arguments.
Now let’s dive into child parent communication.
Child Parent Communication
We can send data from child to parent and vice versa.
Parent to Child
• Parent and child component
• @input decorator
Created a child component called item-detail.component.ts
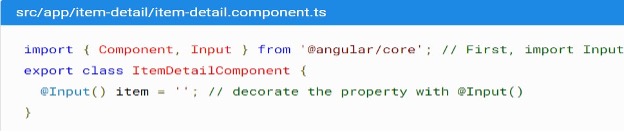
Item-detail.component.html
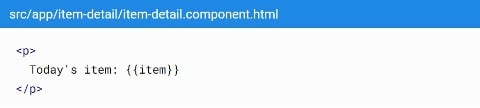
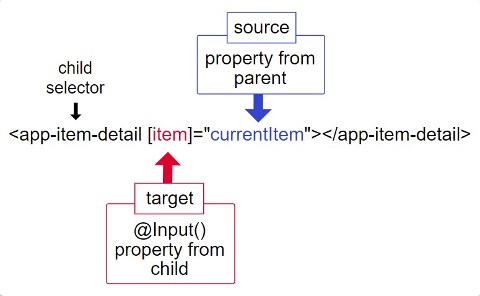
From app.component.html we are invoking the child component and passing the value of item.

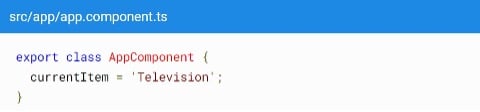
The typescript file of this component where we are giving value to currentItem.
The whole structure of Parent Child communication looks like this.
Child to Parent Communication
• Parent Child Component
• @Output decorator
Step 1: Import Output and Eventemitter
![]()
Step 2:
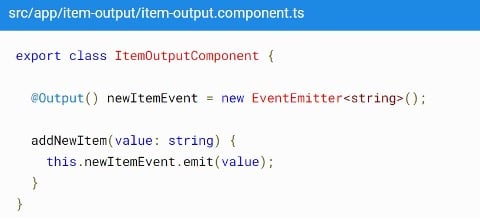
Create a property with Output decorator and initialize it as EventEmitter object in typescript file.
The following image shows Item-output.component.ts we have created.

Step 3:
Create a method to emit the event in the same component.
Step 4:
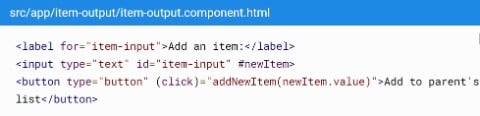
Calling of the method from HTML file
In this image we are calling addNewItem() and we are passing the variable.
Step 5:
Configuring the parent component
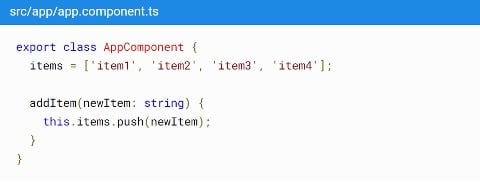
Created a component which has an array and one method which will push the item to this array. This method will be called from HTML.
Step 6:
Modify HTML file for this component which has name app.component.html
Here we have app-item-output as a selector by which we invoke the child component.
When we emit the value from the child component, we have binded a method so addItem() will be called.

There you have it! In this blog, I have covered a few important topics to help you start your journey with Angular. I will cover topics like services, lifecycle hooks, routing, route guards, observable, and subjects in Part 2 of this series. Watch this space for it. Mail us with your feedback about today’s blog and visit us at Nitor Infotech to learn more about our software engineering expertise.


