
Businesses are amassing and analyzing an ever-increasing volume of data. Consequently, the importance of tools that aid in discovering, cataloging, tracking, and managing data sharing is also on the rise with Azure Purview, Microsoft has launched a new data governance service into public preview that combines these capabilities in a fresh data catalog including discovery and data governance features.
Azure Purview is a unified data governance solution that lets you manage as well as govern your on-premises, multi-cloud, and software-as-a-service (SaaS) data. It creates a detailed and proper map of your data and performs the classification of end-to-end lineage of your data. It enables data consumers to find trustworthy data and is created on Apache Atlas which is an open-source project for metadata management and governance for data assets.
In my blog, I will shed some light on the key features and functionality of this solution and take you through the process of setting it up.
For starters, look at some characteristics of Azure Purview I have outlined below:
- Data discovery, finding lineage of that data, and classification of that data.
- Glossary containing business and technical search terms to support data discovery
- Tracking of movement of sensitive data across your entire data estate
- Azure Purview can connect to on-premises, multi-cloud and a Software-as-a-service (Saas) platform and can govern their data
Now that you are acquainted with the nature of this solution, let’s dive into its major components!
Functionality of Azure Purview
Here are the three components that describe the functionality of Azure Purview:
1. Data Map:
The Azure Purview Data Map provides you with the facility to register your data source which you want to scan under the Root collection you selected. It makes your data informative by mapping your data assets and their relationships across your data estate. Data map automatically scan your data, classifies your data and lineage your data.
2. Data Catalog:
The Data Catalog is a search bar of your purview account in which you can search assets of your registered sources and get detailed information about your searched asset. You can also view a business glossary, lineage visualization, catalog insights as well as sensitive data identification insights.
3. Data Insights:
With the help of Data Insights, you can watch the data briefly, understand what data is actively scanned, where sensitive data is, and how it moves.
Before I reveal the problem statement and solution approach that I have focused my blog on, I’d like to give you an idea about certain concepts related to Azure Purview.
Concepts related to Azure Purview:
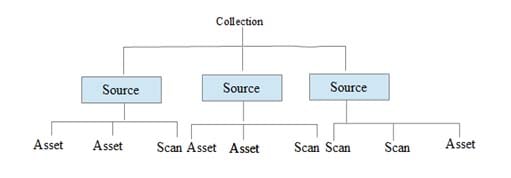
A. Collection:
A collection is a group of related data sources. It is a root of the structural hierarchy of Azure Purview. A collection can have zero or more sources. Ex. A company name can be a collection and the department of that company like IT, HR can be its sources.
Sources:
A source is the next object in the hierarchy of Azure Purview data mapping. Basically, the source means from where your data is coming. (Ex. Azure Data Lake Storage, Azure SQL Database, Storage account etc.)
A Source can have:
- Collections between zero to one
- Assets between zero to many
- Scans between zero to many
B. Asset:
An asset is an instance of an asset type. It can be found in the Azure Purview window by using the Azure Purview search bar after the metadata has been indexed. Ex. If a source of Azure SQL Database has three tables, then generally there are three assets.
An asset has one source and can have:
- Terms between zero to many
- Classifications between zero to many
C. Scan:
Scanning is a process wherein the catalog links directly to a data source on a schedule defined by the user. Azure Purview scans your data based on three levels – Basic, Schema and Classification. On the basic level, it scans file name, file size, fully qualified name, etc. and on the schema level, it scans database tables and structured file types, etc. In classification, a scan is based on classification rules.
A scan has:
- one source
- one credential
- one scan rule set
Problem Statement:
The purpose of this blog is to maintain the data catalog, lineage and data governance of the data platform which has various components such as Sources, ETL process, data warehouse and Reporting layers.
Solution approach:
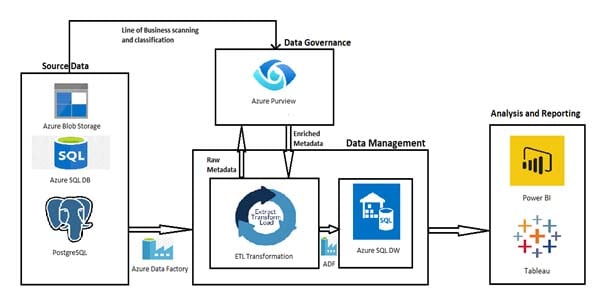
- In the solution, firstly we are scanning and classifying our line-of-business sources metadata.
- Then we are giving source data to ETL transformation unit through Data Factory, passing this metadata to Purview and taking scanned and classified data and loading it into the Data warehouse.
- Finally, we are performing analysis operations on it by using analysis tools.
Now, read on to discover the process of setting up Azure Purview.
Steps to set up Azure Purview
Step 1: Open a window and register the source
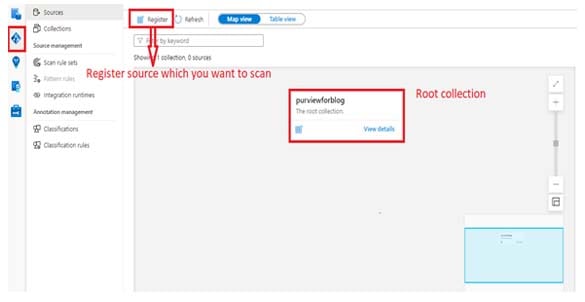
This is the first window when we open the account and go to the root collection window.
In this window, we must register our source which we want to scan. For that, follow these steps:
- Click the ‘Register’ option and you will see the list of sources on the right side of your screen. (Shown in the second step)
Step 2: Click the Register icon to register the source

Here, select the source which you want to scan. Enter your source details and then it will add your source under the root collection. (Shown in the next step)
Step 3: It will add under Root collection

- Now you have added your source and if you want to view its details or want to edit or delete it, there is an option under the source icon.
- Check properly whether the source has been added correctly or not by clicking on the ‘View details’ option under the source icon.
Step 4: Create a scan for your source
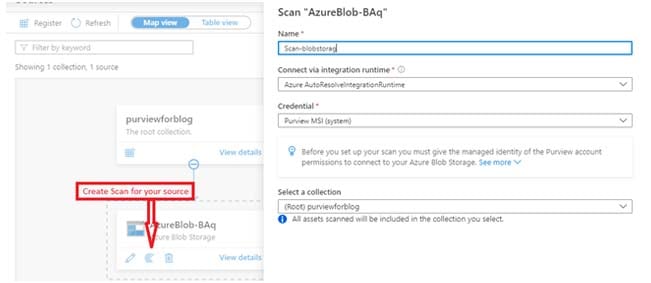
Now create a scan for your source to scan it and get various kinds of details about your source assets like its schema, its lineage, classifications of your columns, etc.
- After clicking on the ‘Scan’ option as shown in the above figure, enter your scan name and select a credential (security option).
- Then select the scan rule set. You can select a standard scan rule provided by Microsoft or create your own scan rule set for scanning of your source assets.
- After that, select the periodicity of scanning (Recurring or Once) as per your functionality and click on the ‘Save and Run’ option (shown in the next step).
Step 5: Review your scan
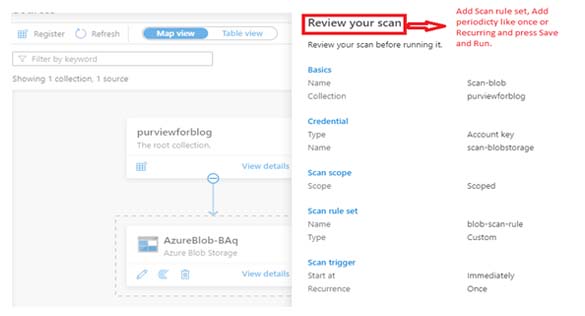
Now just review your scan and check all the information in the ‘Review your Scan’ window. Then click on the ‘Save and Run’ option and the scanning of your source will start.
Step 6: Add your Data factories or other things to get Lineage view

Now select your data engineering service which you used to transform your data (I used Data Factory) from the management icon on the bottom left side and select the ‘Data Factory’ option under Lineage connection.
- Click on ‘New icon’ and select your subscription name from the dropdown list.
- After that, select your Data Factory name from the dropdown list and click on the ‘Create’ option.
- After successful connection setup to your Data Factory, it shows the connected status.
Step 7: See your scanning details
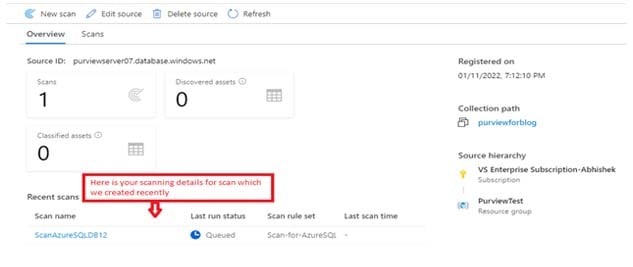
To check the status of your scanning (whether it is completed or in progress), follow these steps:
- Go to the ‘Data map’ section and select the ‘View details’ option.
- View the details of your scan.
Step 8: Search for your Assets using a Data Catalog

The ‘Data Catalog’ is a search bar of your Purview account in which you can search for the assets of your registered sources and get detailed information about your searched asset.
It also contains three important sections:
1. Browse Assets: Here you can browse your assets based on your source type or collection.
2. Manage Glossary: You can manage your glossaries in this section. You can create or add glossaries as well.
3. Knowledge Center: The knowledge center helps you with learning materials and tutorials.
Step 9: Set a connection to Power BI from Azure Purview by creating a security group in the Azure Active Directory
If you want to register Power BI under the root collection and scan it, then follow these steps:
- Register your source under the root collection.
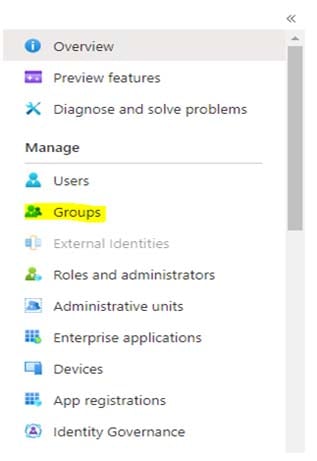
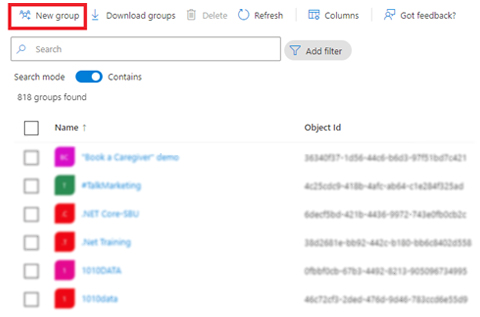
- Then go to your Azure Active directory, select a group option and add a new security group.
Step 10: Power BI setting for Azure Purview
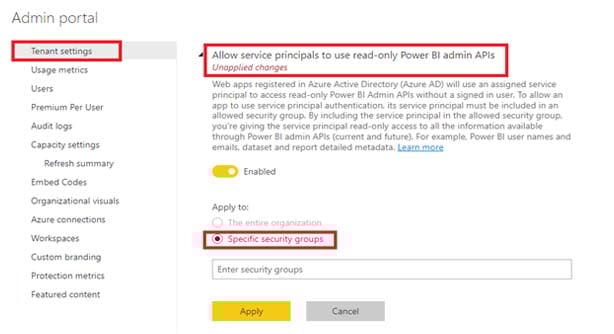
- Now go to your Power BI portal, login for Power BI and navigate to the Admin Portal section.
- After that, in the tenant setting, select ‘Allow service principle to use read-only power BI admin API’s.’
- Then Enable it, select ‘Specific security group’ and enter your security group name which you created in Azure active directory.
- Finally click the ‘Apply’ button, go to Purview and scan your Power BI source which you registered under your root collection.
Step 11: See lineage of your data

- This is the lineage of data, and it shows how data is moving from one end to another end.
- As shown in the above figure, the data from two sources gets copied into only one target destination by using Azure Data Factory with the help of copy activity.
- The lineage shows the changes in the column names from source to target. For instance, in the above figure, EmployeeName from source changes into Emp_Name in the target.
And there you have it! This is how Azure Purview helps you to get the fundamental structural metadata and lineage of the registered sources. With its help, you can get a great bird’s eye view of your data flow and data transformation from source end to destination end!
Feel free to write to us at Nitor Infotech with any comments and suggestions you may have. Also, while navigating the Azure universe, you will find this blog useful if you would like to learn how you can deploy an existing Azure Data Factory branch on a new ADF environment via Git configuration.


