
When an application connected to a primary server grows over time, making relevant scaling a necessity since the primary node no longer remains viable. Also, if the node has any issues such as hardware malfunctioning, restoring data from the backup becomes a hassle. Ensuring high availability and automated failover is the best way to overcome this challenge.
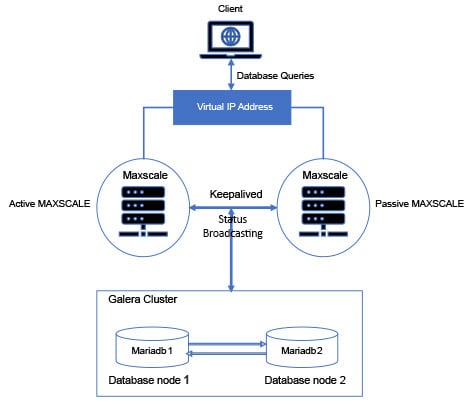
With that in mind, I have penned down a blog that illustrates the procedure for setting up High Availability (HA) & automated failover using Galera cluster & MaxScale load balancer for MariaDB wherein I will cover everything there is to it in a step-wise manner- right from downloading and installing to configuring MariaDB on REHL 7.5 Linux Virtual Machines (VMs). Keepalived & Virtual IP to make the Maxscale load balancer VMs highly available.
But before I do that, take a look at the high level architecture so visualizing what I say from now on will get a tad bit easier.
Now, you may be curious about Galera Cluster. What is it and how does it help you? Here’s how-
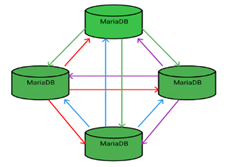
MariaDB Galera Cluster is a virtually synchronous multi-master cluster for MariaDB available on Linux and only supports the XtraDB/InnoDB storage engines.
- Virtually synchronous replication
- Active-active multi-master topology
- Read and write to any cluster node
- Automatic membership control, failed nodes drop from the cluster
- Automatic node joining
- True parallel replication, on row level
- Direct client connections, native MariaDB look & feel
These features yield several benefits for a DBMS clustering solution, including:
- No slave lags
- No lost transactions
- Read scalability
- Smaller client latencies
Now, moving on to MaxScale. MariaDB MaxScale is an advanced database proxy for MariaDB Enterprise Server- a core component of MariaDB Platform providing high availability, scalability, security, and integration services.
It sits between a database layer and the clients of that database such that its high-availability solution allows your application to be 100 percent operational without a single point of failure.
Now that we’ve established the what’s and whys of MariaDB, let me take you through the steps to install & configure MariaDB server, Galera cluster, and MaxScale –
We will build a MariaDB Galera Cluster with two nodes and two nodes for MaxScale. In this case, the cluster is built on two separate virtual machines and the IP addresses of all the machines in this set up are-
| IP address | Node use |
| 10.4.0.11 | MariaDB MaxScale node 1 |
| 10.4.0.12 | MariaDB MaxScale node 2 |
| 10.4.0.8 | MariaDB Galera Cluster node 1 |
| 10.4.0.9 | MariaDB Galera Cluster node 2 |
Then, you follow the steps for Galera cluster Installation & configuration –
Before we install the software, we need to set up the MariaDB repository on all four servers:
$ curl -sS https://downloads.mariadb.com/MariaDB/mariadb_repo_setup | sudo bashHaving run this on the four servers, let’s now go move on to installing MariaDB Galera server on the two nodes where this is appropriate. In the case here, we are looking at nodes 10.4.0.8, 10.4.0.9. On these two nodes, run this:
$ sudo yum -y install MariaDB-serverWhen this is completed, we should have MariaDB Server installed. The next thing to do, then, is to install MariaDB MaxScale on the 10.4.0.11 and 10.4.0.12 box:
$ sudo yum -y install maxscaleThe next step is to configure a MariaDB Galera Cluster.
Before we start up MariaDB, we need to configure the cluster. Note that what we are setting up here is the bare minimum required to get started. In real life, there are several parameters you would want to set up.
We have to edit the file /etc/my.cnf.d/server.cnf and adjust the Galera-specific settings as well as MariaDB related basic settings on the nodes 10.4.0.8, 10.4.0.9. Edit the [galera] section to make it look like this on two nodes:
[mysqld] user=mysql datadir=/data/mysql-data/mysql socket=/data/mysql-data/mysql/mysql.sock basedir=/usr tmpdir=/tmp[galera] # Mandatory settings wsrep_on=ON wsrep_provider=/usr/lib64/galera/libgalera_smm.so wsrep_cluster_address=gcomm:// 10.4.0.8, 10.4.0.9 binlog_format=row default_storage_engine=InnoDB innodb_autoinc_lock_mode=2
wsrep_on: This is a session-level flag to indicate that the operations we are performing will be replicated, much like how the sql_log_bin setting controls whether statements are written to the binlog when using MariaDB Replication. The default of this is ON, but we set it anyway, to be safe.
wsrep_provider: This points to the location of the Galera library. Although MariaDB is set up to use Galera from scratch, you still have to point to the Galera library. This is installed as part of the MariaDB-Server installation mentioned above.
wsrep_cluster_address: This is where we define the nodes in the cluster. Generally, you don’t need to list all nodes and new nodes can be added later to a running cluster. But in this case, we know what the cluster looks like, so we set it up here.
binlog_format: Although the binlog, in terms of the actual binlog files, isn’t used by Galera, the binlog facility is. And for Galera to work, you have to run with row format in the binlog.
default_storage_engine: Again, this is the default value, but just to be safe, let’s set up MariaDB Server to explicitly use the InnoDB Storage Engine, which is the only engine supported by Galera.
innodb_autoinc_lock_mode: This setting defines how the InnoDB Storage Engine generates values for autoincrement columns. Using mode 2 here is very important for Galera to work properly. In short, mode 2 cause much less locking during autoincrement generation and hence doesn’t interfere with another locking. Values other than 2 can cause deadlocking and other issues with Galera.
We start a Cluster from scratch works by running a process called a bootstrap, and the reason it’s a bit different from the usual MariaDB start up is that for HA reasons, a node in a cluster attaches to one or more nodes in the cluster, but for the first node, this is not possible.
In this case, on 10.4.0.8, run:
$ sudo galera_new_clusterBefore we continue, let’s also look at the status of the cluster from the command line:
$ mysql -u root
Welcome to the MariaDB monitor.  Commands end with ; or \g.
Your MariaDB connection id is 10
Server version: 10.2.7-MariaDB MariaDB Server
Copyright (c) 2000, 2017, Oracle, MariaDB Corporation Ab and others.
Type 'help;' or '\h' for help. Type '\c' to clear the current input statement.
MariaDB [(none)]> show global status like 'wsrep_cluster_size';
+--------------------+-------+
| Variable_name      | Value |
This shows that we have a running cluster (if not, the value of wsrep_cluster_size would have been 0), but there is just one node. Now, let’s start another node and note that although we are starting a cluster from scratch, only the first node needs bootstrapping. So here, on 10.4.0.9, we start MariaDB in the usual fashion:
$ sudo systemctl start mariadb.serviceWe should now have two nodes running in the cluster. Let’s check it out from the MariaDB command line on 10.4.0.8:
MariaDB [(none)]> show global status like 'wsrep_cluster_size';
+--------------------+-------+
| Variable_name      | Value |
+--------------------+-------+
| wsrep_cluster_size | 2     |
+--------------------+-------+
1 row in set (0.00 sec)
With that, we have 2 nodes running in the Galera cluster.
Now for setting up MariaDB for MariaDB MaxScale:
MariaDB MaxScale will, in this scenario, act as a router to the cluster, ensuring that traffic is directed to the appropriate server.
First, we need to set up a user that MariaDB MaxScale uses to attach to the cluster for authentication data. On 10.4.0.8, using the MariaDB command line as the database root user:
$ mysql -u root
Welcome to the MariaDB monitor. Commands end with ; or \g.
Your MariaDB connection id is 11
Server version: 10.2.7-MariaDB MariaDB Server
Copyright (c) 2000, 2017, Oracle, MariaDB Corporation Ab and others.
Type 'help;' or '\h' for help. Type '\c' to clear the current input statement.
MariaDB [(none)]> create user 'maxscaleuser'@'10.4.0.11' identified by 'maxscaleuser12';
Query OK, 0 rows affected (0.01 sec)
MariaDB [(none)]> grant all on *.* to 'maxscaleuser'@'10.4.0.11';
Query OK, 0 rows affected (0.01 sec)
Configuring MariaDB MaxScale
The configuration for MariaDB MaxScale is in the file /etc/maxscale.cnf and in this case, we will create a new configuration from scratch instead of amending the existing one on both the maxscale servers 10.4.0.11 & 10.4.0.12.
# Globals
[maxscale]
threads=1
# Servers
[server1]
type=server
address=10.4.0.8
port=3306
protocol=MySQLBackend
[server2]
type=server
address=10.4.0.9
port=3306
protocol=MySQLBackend
# Monitoring for the servers
[Galera Monitor]
type=monitor
module=galeramon
servers=server1, server2
user= maxscaleuser
passwd= maxscaleuser12
monitor_interval=1000
# Galera router service
[Galera Service]
type=service
router=readwritesplit
servers=server1, server2
user= maxscaleuser
passwd= maxscaleuser12
# Galera cluster listener
[Galera Listener]
type=listener
service=Galera Service
protocol=MySQLClient
port=3306
That’s done. Let’s look at how you can start and test MariaDB MaxScale:
With the configuration in place, we can start MaxScale on 10.4.0.11 & 10.4.0.12 by running:
$ sudo systemctl start maxscale.serviceLet’s connect to the cluster through MariaDB MaxScale:
$ mysql -h 10.4.0.11 -u maxscaleuser -p maxscaleuser12
Welcome to the MariaDB monitor. Commands end with ; or \g.
Your MySQL connection id is 4668
Server version: 10.0.0 2.1.5-maxscale MariaDB Server
Copyright (c) 2000, 2017, Oracle, MariaDB Corporation Ab and others.
Type 'help;' or '\h' for help. Type '\c' to clear the current input statement.
MySQL [(none)]>
We are connected to MariaDB MaxScale now, but which server in the MariaDB Galera Cluster? Let’s check.
MariaDB [(none)]> show variables like 'hostname';
+---------------+-----------------+
| Variable_name | Value |
+---------------+-----------------+
| hostname | vmmariadb02-uat |
+---------------+-----------------+
1 row in set (0.002 sec)
Moving on to Keepalived setup & configuration.
High availability & failover using Galera cluster & MaxScale load balancer, Virtual IP with is achieved with Keepalived for MariaDB database. On production the setup will be done on the data centre and Keepalived is used instead of Azure load balancer for efficient routing.
This step is additional for production setup as keepalived will be used instead on Azure load balancer.
Keepalived is a routing software for load balancing and high availability. The goal is to set up a simple IP failover between two machines running MaxScale. If the main server fails the backup machine takes over, receiving any new connections.
Install Keepalived on both Maxscale VMs:
yum install keepalived -yConfigure Keepalived on Master
vim /etc/keepalived/keepalived.conf
! Configuration File for keepalived
vrrp_instance VI_1 {
state MASTER
interface eth0
virtual_router_id 51
priority 100
advert_int 1
authentication {
auth_type PASS
auth_pass 1111
}
virtual_ipaddress {
10.4.0.100/24
}
}
Configure Keepalived on Slave
vrrp_instance VI_1 {
state BACKUP
interface eth0
virtual_router_id 51
priority 99
advert_int 1
authentication {
auth_type PASS
auth_pass 1111
}
virtual_ipaddress {
10.4.0.100/24
}
}
Start Keepalived on both Master and Slave
systemctl start keepalivedVerifying Keepalived is Running on both Master & Slave maxscale vm
systemctl status keepalivedTest if it is working as expected.
Initiate Ping to Floating IP
ping 10.4.0.100Stop MAXSCAL on Master
systemctl stop maxscaleFollowing that, ping the output and we should get the response as Slave will start serving the requests.
And there you have it! I hope you have a clear idea of how you can facilitate high availability and automated failover for MariaDB. Reach out to us to know more about why you need to have a replication of the database and seamlessly maintain HA & disaster recovery of the data management system, and visit Nitor Infotech to learn more about how we harnessed the power of data to derive valuable insights for a leading retail chain.


