In today’s digital age, understanding how users behave is like having a superpower for online success. Imagine you’re running a café, and you notice people prefer comfy chairs near the window or love a certain type of coffee. That knowledge helps you make your café more appealing, right? Well, in the online world, it’s the same!
Knowing how users click, scroll, and interact is like having a magic wand. Data analytics tools, like PostHog, can help developers and product managers decode these digital behaviors for smarter decisions.

Discover the effects of our data-driven transformation for a manufacturing unit, extracting key insights for their success.
Coming to this blog, I’ll guide you through the benefits of choosing PostHog and walk you through some straightforward steps to implement PostHog with Angular, ensuring optimal outcomes seamlessly.
First, let’s get straight into knowing about PostHog!
What is PostHog and what makes it a significant choice?
PostHog stands as an open-source product analytics platform, empowering businesses to meticulously track and analyze user behavior within their applications. Boasting a wealth of features, this platform equips teams with the tools necessary for making informed, data-driven decisions.
It generally comes in two flavors: a free software or open-source version and a paid, cloud-hosted version with extra perks.
Note: If you go for the open-source one, you can host it on your server, and it has all the essential analytics features. Alternatively, the cloud-hosted version offers a hassle-free, managed solution by PostHog, possibly featuring additional capabilities and support services.
You might be wondering why you should go with PostHog.
Well, choosing PostHog over other analytics tools depends on your specific needs. In the market, you’ll find competitors such as Google Analytics, Mixpanel, Segment, and Heap. However, PostHog uniquely distinguishes itself. The following table provides a clearer understanding:
| Feature | PostHog | Other Analytical Tools |
|---|---|---|
| Analytics Focus | Prioritizes real-time analytics | May focus on historical analysis of data |
| User Tracking | Emphasizes individual user tracking | Tracking approaches may vary |
| Customization | Offers extensive customization options | Customization features may vary |
| Data Control | Grants users greater control over data | Control over data may be limited or vary |
| Self-Hosting | Supports self-hosting for privacy | May rely on external servers or cloud-based solutions |
| Integration Ease | May require more effort to integrate | Some tools may offer easier integration processes |
| Community Support | Has an active and growing community | Levels of community support may vary, depending on the tool used |
| Innovation and Collaboration | Encourages collaboration and innovation | May or may not foster a similar level of collaboration and community engagement |
Next, allow me to guide you through the integration of PostHog with Angular.
How to integrate PostHog with Angular?
PostHog offers versatility by seamlessly integrating with a variety of technologies. Common platforms that easily integrate with PostHog include Angular, React, Python, Django, and Ruby on Rails.
To integrate PostHog with Angular, you need to follow these 3 easy steps:
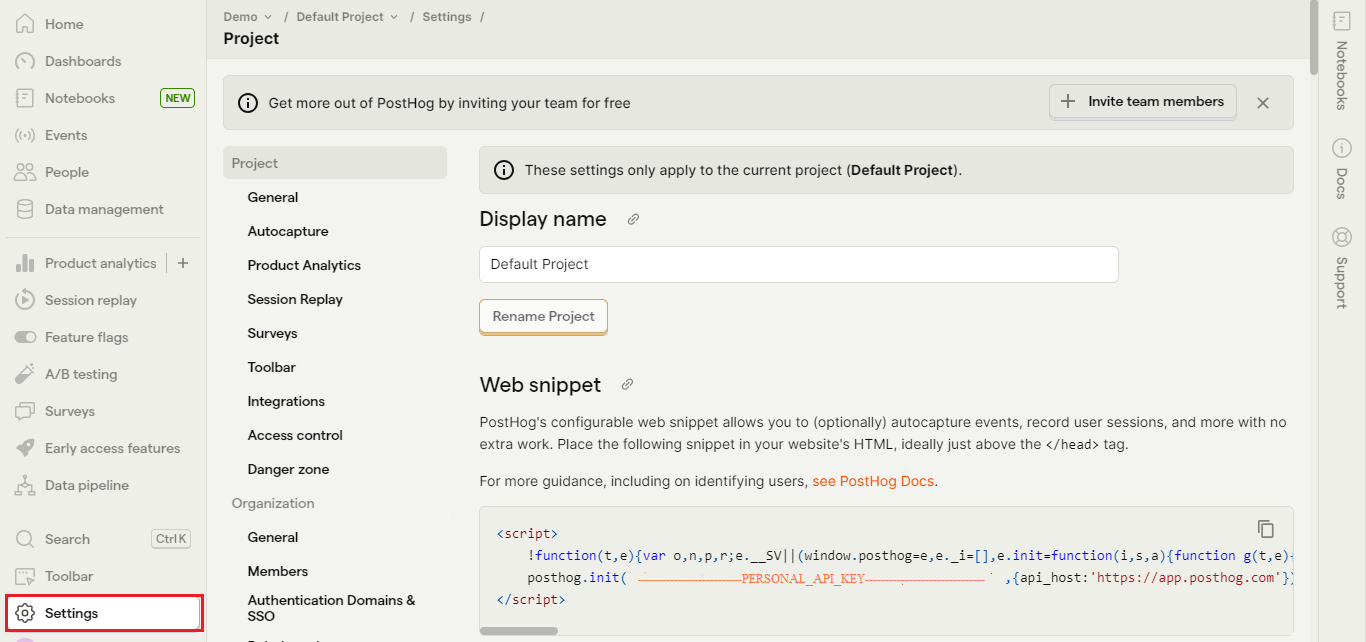
Step 1: Sign Up and Set Up Your PostHog Account
Navigate through these steps to sign up and set up your PostHog Account:
Step 1.1: Start the process by signing up for a PostHog account. Choose between the convenience of cloud hosting or configuring your self-hosted setup.
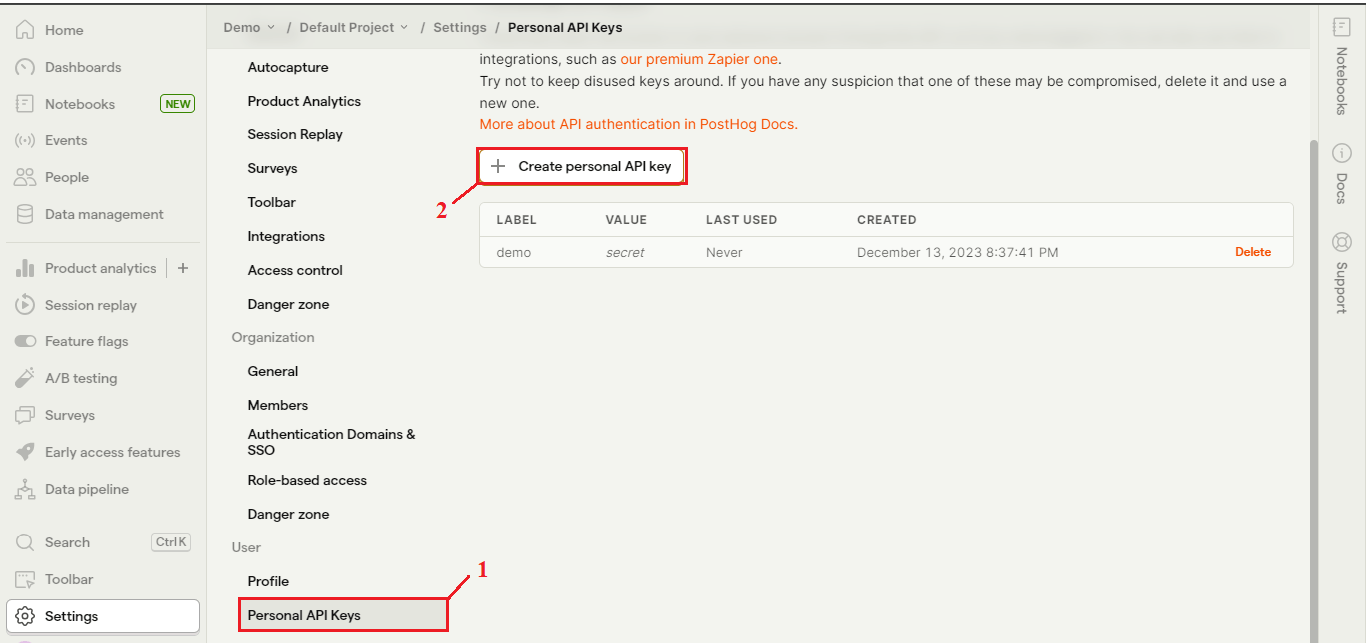
Step 1.2: Upon successful registration, you’ll need to create a crucial API key, necessary for transmitting events to PostHog, like this:
User -> Personal API keys -> Create personal API key
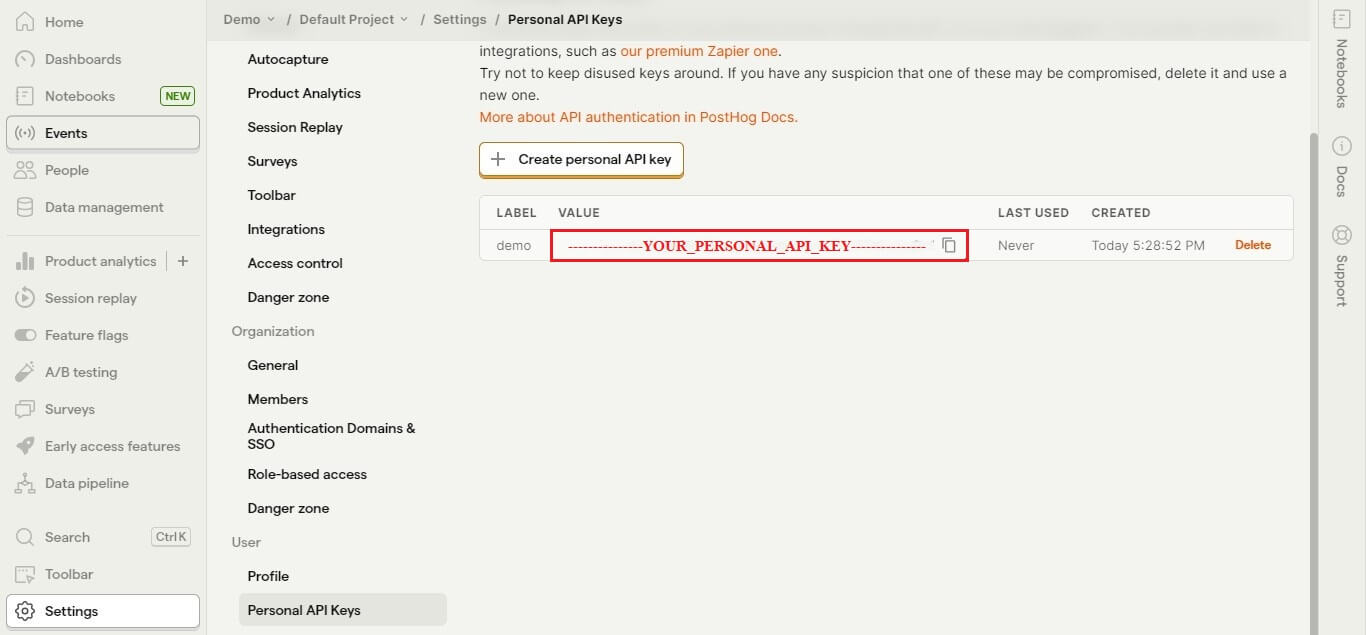
Step 1.3: You can then have your personal API key.
Note: The API key is visible only during the generation process; afterward, it will be hidden. Be sure to copy the key at the time of generation.
Step 2: Install the PostHog JavaScript Library
Install the PostHog JavaScript library into your Angular project effortlessly using npm or yarn. Execute the following command to initiate the installation:
npm install posthog-js or yarn add posthog-js
Step 3: Initialize PostHog in Your Angular Application
Now, in your Angular application, initiate PostHog with your API key. This is commonly performed in either the app.component.ts file or a central service initialized during your application’s startup.
For posthog.service.ts:
import ( Injectable } from '@angular/core';

import posthog from 'posthog-js';

@Injectable({

providedIn:' root'

})

export class PosthogService {

private _posthog: any;

constructor () {

this-_posthog - posthog-init ('YOUR_POSTHOG _API_KEY', {

api_host: "https://app-posthog.com,

});

trackSignupEvent (userId: string){

this-_posthog. identify(userId); // Identify the user this.

posthog-capture('user_signed_up'); // Track the event

}
}
For app.component.ts:
import { Component } from '@angular/core';

import { PosthogService } from '•/posthog service';

@Component({

selector: 'app-root',

templateUrl: './app.component.html',

styleUrls: ['./app. component.css'],

})

export class AppComponent {

constructor(private _posthogService: PosthogService) {}

ngOnInit() {

this._posthogService.trackSignupEvent('2');

}

}
Done with the 3 major steps? Great!
Up next, you’ll witness the outcomes resulting from the implementation of these 3 steps.
Output: Unveiling PostHog’s Capabilities
Here are the diverse range of outputs you can get:
A. Event Tracking: Highlights specific events that are crucial for your application, like user logins, registrations, or feature activations.
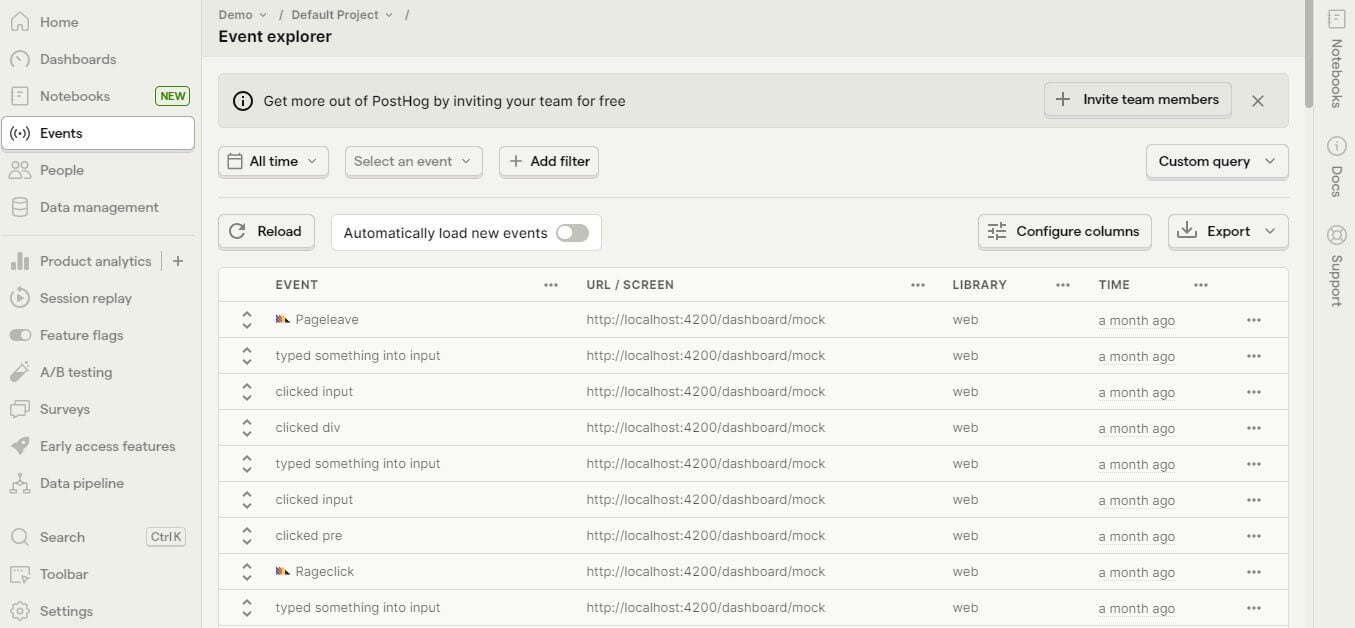
Fig A: Event Explorer
B. Product Analytics: This involves leveraging data and insights to analyze user behavior, measure feature adoption, and optimize the overall user experience within a digital product or service.
Below mentioned are the things you’ll be able to check:
1. Page View: You can monitor the total number of page views within your Angular application.
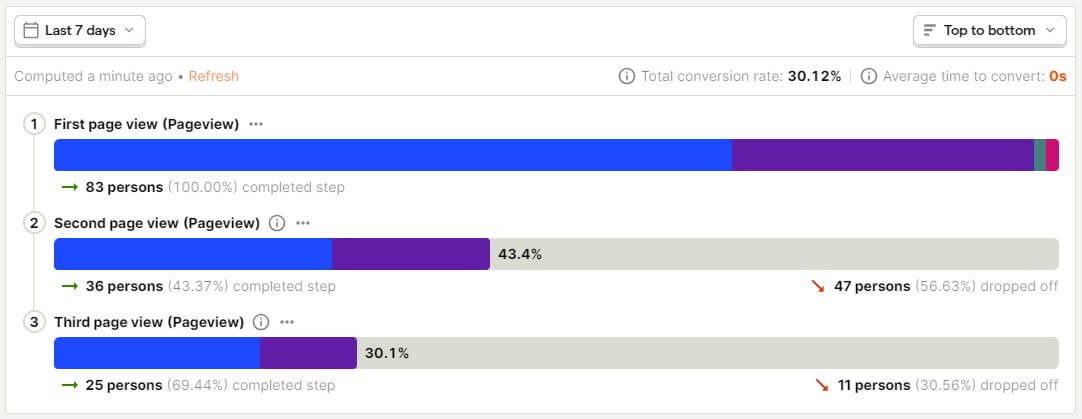
Fig. B. 1.1: No. of users who achieved 3 page views, broken down by browser
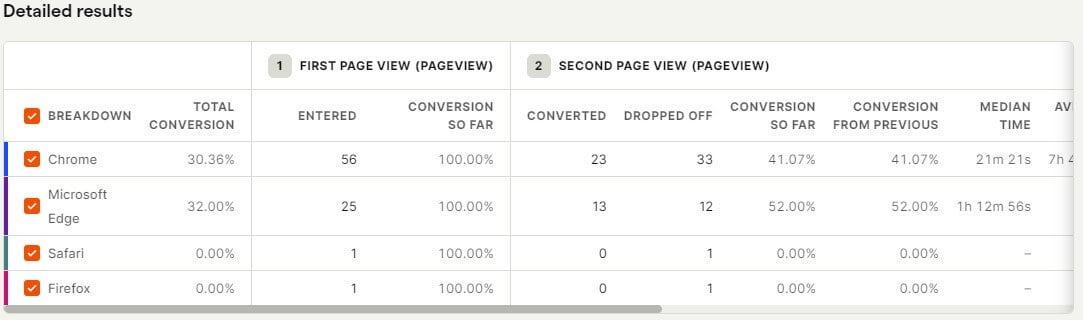
Fig. B.1.2: Page View Detailed Results
2. Growth Accounting: This involves quantifying and analyzing data/user-driven metrics, enabling businesses to measure and optimize key performance indicators for sustainable growth.

Fig. B.2.1: No. of new, returning, resurrecting, or dormant users each week
3. Retention: Measures the percentage of users who continue to engage with a product or service over time, providing insights into user loyalty and long-term value.

Fig. B.3.1: Weekly retention of users
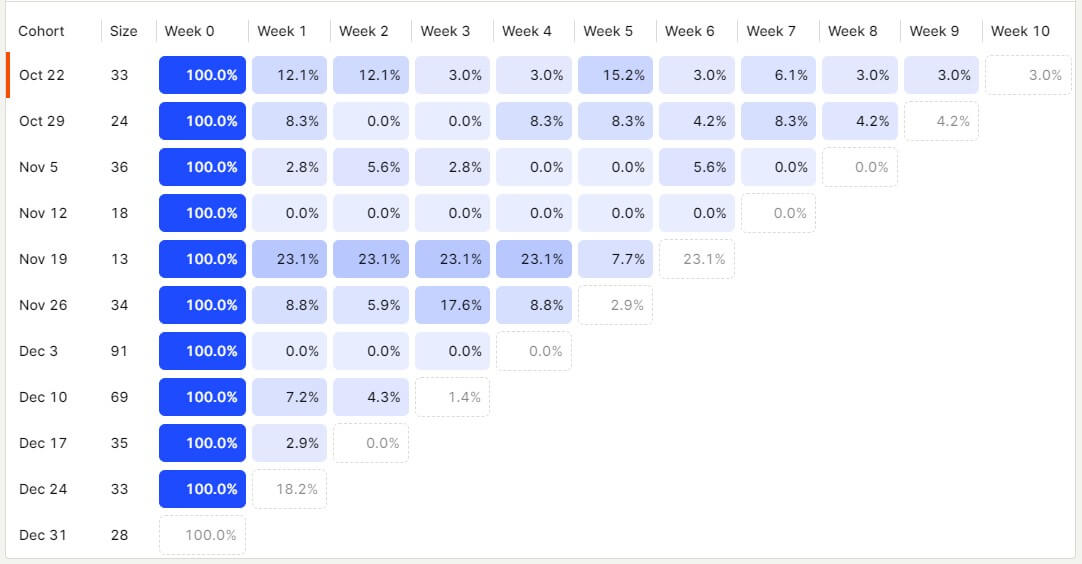
Fig. B.3.2: Weekly retention of users
4. Weekly active users (WAUs): This represents the number of unique users who interact with a product or service within a given week, offering a snapshot of weekly user engagement.
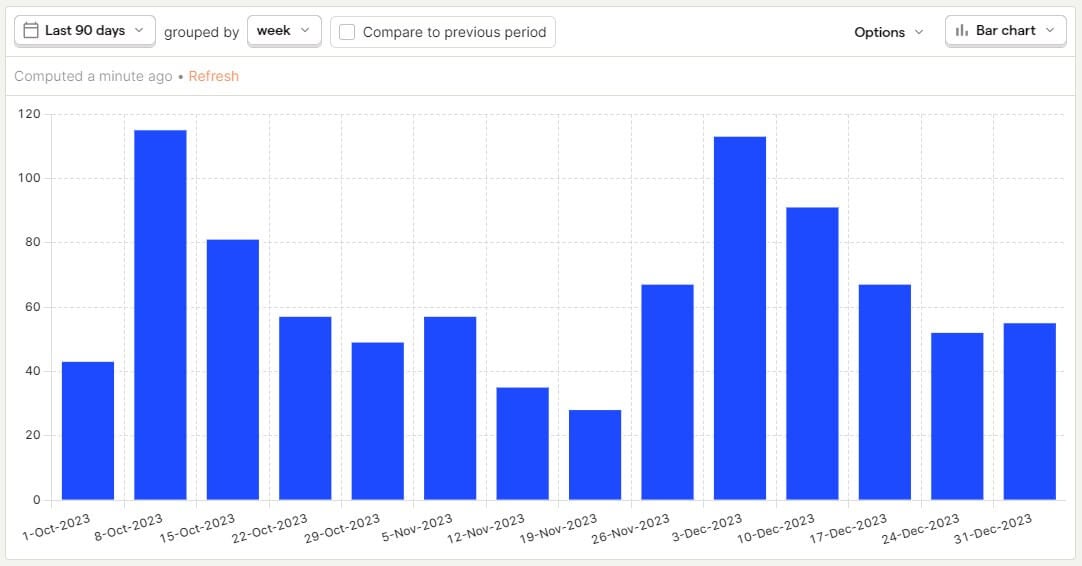
Fig. B.4.1: No. of unique users that use the app every week
5. Daily active users (DAUs): Indicates the count of unique users engaging with a product or service daily, providing a measure of daily user activity.

Fig. B.5.1: No. of unique users that use the app every day
C. Session Replay: This allows you to visually replay user sessions, enabling a detailed examination of individual interactions within your product for better understanding and optimization.

Fig. C: Recordings of users’ activities
So, for businesses striving to achieve a comprehensive, flexible, and innovative approach to product analytics, choosing PostHog is not just an option but a strategic imperative.
Its capacity for real-time insights, customization, and open collaboration not only enhances understanding but also empowers businesses to stay agile, responsive, and ahead of the curve in meeting user needs.
For a deeper understanding and effective utilization of data to achieve impact-driven results, don’t hesitate to contact us at Nitor Infotech.


