What is MLOps and how is it different than conventional DevOps? That is the first question that arises in everyone’s mind. According to TechJury, we have generated 10 times more data in 2020 in comparison with 2019. That is great news from the data scientist’s perspective. But questions arise as to how to utilize the data to experiment with different models and techniques. To speed up the process of consuming the data and experimenting on the models using different algorithms and techniques requires automation, which brings MLOps into the picture. In simple terms, MLOps is an amalgamation of DevOps, Data engineering and Machine learning. It is similar to DevOps, but the execution is different. MLOps applies to the entire ML life cycle. The key phases of MLOps are:
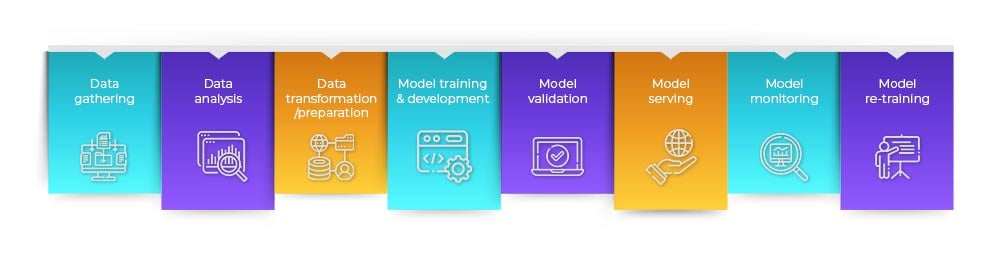
Figure: Key phases of MLOps
MLOps Pipelines
There are multiple useful tools available for automating the ML pipelines. A few of them are as follows:
- Kubeflow pipelines
- Airflow
- Kedro
- MLflow
- Amazon SageMaker
- Sigopt
- DVC
In this blog, we will focus on Airflow, for the ML pipeline and the deployment pipeline. We have utilized Titanic dataset for training the model.
Why MLOPS
Many data scientists don’t have a concrete way of knowing that the models will work perfectly in production. Even if they write test cases and continually test their work like QA or Unit Testers do in traditional software development, the data that may be encountered in production could be very different than the data that was used to train these models. Therefore, checking how well the model performed against real-world data and then using that data to improve the model and rapidly redeploy it is extremely important. However, the lack of a streamlined Continuous Integration/Continuous Delivery (CI/CD) process to get the new model into production is a major hindrance to realizing the value of machine learning.
Data scientists predominantly focus on developing complex algorithms, neural network architectures and transformation of data. MLOps paves the way for multiple disciplines with diverse expertise to collaborate and incorporate machine learning into applications and services.
Airflow
Airflow is a robust platform that allows the monitoring, scheduling, and management of your workflows utilizing the web application. We can utilize Airflow to build different pipelines of ML lifecycle. It is easy to use, and we can monitor each stage of the pipeline. There are two ways to install Airflow:
- Using the installation file (applicable for Linux environment)
- Using the docker image of Airflow
For a Windows environment, we can set up a Linux subsystem and install Airflow there or use the Airflow docker image.
Airflow installation using a Docker image
To set up Airflow using the docker image, we need to set up a few things like files and folders. For this, a Docker-compose.yml file will be needed.
Once we download it, we can create 3 folders – DAGs, log, plugin – at the location you have Docker-compose.yml. First, we need to run the command in cmd “docker-compose up airflow-init”, which will run database migrations and create the first user account. Once this command is successfully completed, we need to run the command “docker-compose up”, which will bring the airflow application up and we can access it at “http://localhost:8080/”.
Building a model pipeline
Airflow orchestrate the training process using DAGs. DAGs are directed acyclic graphs. DAG is the core concept of Airflow, collecting Tasks together, organized with dependencies and relationships to say how they should run. Each node in a dag is a task and these tasks are arranged in a sequential order of execution. To create a DAG, Python is utilized. Here is an example of a DAG, where a, b, c, d are the nodes representing tasks.

Figure: Example of DAG
Creating a node for pre-processing
The first thing that needs to be done to create DAGs is to install Airflow Python library. We can install it using the command “pip install airflow”. This will install the library and it can be utilized in the Python file for DAG. We need to create the python file inside the DAG folder as Airflow looks for the Python file inside the DAG folder. We need to import all the necessary libraries.

For creating DAG, a context manager is required and it adds the DAG to anything inside it implicitly. The first input string is the ID/name for the DAG. “Schedule_interval” specifies the recurrent run condition for the DAG, “start_date” is to specify the start date for the DAG and catchup specify whether we need to run the DAG for the difference in start date and current date if they are not same. After this, all the nodes for different tasks will be coded inside this block.

The first step in creating a node for pre-processing is to choose which Operator we need to use. There are multiple Operators provided by Airflow, which can be used to execute different sections of the operation. For example, Airflow provides a bash operator to execute bash operation, and it provides python operator to execute python code. In this scenario, we have pre-processing code in a Python function and we will use a Python operator to execute that section. Please refer to the image shown below.

We are utilizing a Python operator with ID “functprocess” to call a Python function process, which calls the Python function for pre-processing. From the pre-process function, we get output, which is split into 4 parts for training and testing purposes. In Airflow, each node is independent of each other, and data cannot be passed directly from one node to another. To facilitate communication from one node to another, we should either store the output data or make use of Xcom, which is an internal database accessed by all the nodes in a DAG.

Creating a node for training
We need to follow the same process to create a node for training the model. We will use the Python operator to call function for training. The Python operator makes a call to the function model_train, which triggers the training process for the model.

The following function trains two different models and according to the accuracy, the best model is saved at the given location. At that location, we already have API code available which makes predictions based on the model saved after training. If we want hyper parameter tuning, we can pass those parameters as the input to the function.

Creating a node for deployment
We are deploying model API to AWS Lambda using a Serverless framework. We have all the files related to model API at one location and the trained model was saved at that location during the last node execution. To deploy API code to lambda, we require two things: the code itself plus the dependent library files used in the code. Lambda is stateless, so we can’t install these library files there. We need to create the package along with the library files. Serverless helps us with that. We can install Serverless using the following command:
“npm install -g serverless”
Once Serverless is installed, we can proceed with the deployment process. We will be using Serverless CLI for this job. The first task is to create serverless.yml. We need to create it manually the first time; for subsequent deployment, the same file will be used.
To automate this process, we have created a Bash file, which will execute the commands for AWS login, creating the package and deployment. It will be controlled by Airflow node.
For creating the Airflow deployment node, we will follow the same steps we followed in the previous nodes.

We have used the Bash operator to execute the deploy.sh; we have commands for the deployment.
The last statement in the screenshot sets the direction and sequencing of the nodes in DAG.
Executing the model pipeline
After logging in to the web application of Airflow, we will land on the page where there is a list of DAGs. Choose the DAG and you will see the screen shown below in graph view. This shows the sequence of execution, which we set in the code. We can schedule the execution or run it manually. We can monitor the execution here, and in case of failure, we can troubleshoot it.

Figure: Sequence of execution
To execute the DAG, we need to click the play button in the top right corner and choose the option. Once the DAG completes the execution, we will see all the nodes in green. In case of a node’s failure, it will turn red, and we can check the error by clicking on that node.

Figure: Status of nodes
Weaknesses of Airflow
So far, we’ve looked at the benefits of Airflow. Now here is a list of some of its drawbacks:
- No versioning of your data pipelines
- Not intuitive for new users
- Configuration overload right from the start + difficult to use locally
- Setting up Airflow architecture for production is NOT easy
- Lack of data sharing between tasks encourages not-atomic tasks
Comparison of MLOps with the traditional approach
In the traditional approach, we perform all the operations separately and each step is dependent on the output of the previous step, which means this work cannot happen in parallel. In case different teams handle different tasks, then knowledge transfer is required to understand previous tasks. This process is very time-consuming. Even updating the model would require the teams to rewrite the scripts for training and deployment. Continuous integration is a big task in the traditional approach.
However, in MLOps, re-use of an existing pipeline is possible. Different teams can work in parallel to create different scripts and those scripts can be integrated in the workflow (DAG in case of airflow). MLOps is time-effective when comes to the overall lifecycle of the ML. In the case of model updation, the same workflow can be utilized, which saves time in redeployment of the model and the most important benefit is that the project manager can have the complete visibility of the whole lifecycle of the project and a complete view of the failure and success of the model performance and deployment.
It is now perfectly evident that MLOps has numerous benefits. It could help the clients in streamlining the ML pipelines. The above implementation includes data gathering, training, testing, API build and deployment of the model. This means that the organization will have complete control of the process, and they can schedule monthly maintenance for the model. They can also add new data for re-training and run the workflow, which will automatically update the model in the production.
In addition to what we’ve seen so far, MLOps also offers benefits such as open communication, repeatable workflows and reduction in bias.
What next?
MLOps being a vast topic, it is very difficult to complete discussing it within one blog. In this blog, I talked about building ML training and a deployment pipeline. In my upcoming blogs, I will try to cover topics such as monitoring of models after deployment, model deviation, updating of training set and other MLOps tools, in detail.
Meanwhile, feel free to write to us and learn more about Nitor’s cognitive engineering services that can add value to your business through personalization of user experiences, predictive modelling, and more.


