
Running an online store while selling various products to customers worldwide is not an easy task. Each item, order, and customer detail needs to be tracked efficiently. Here’s where MySQL comes in.
It acts like a super-organized store manager, keeping your product listings, order history, and customer information neatly sorted.
Well, you can take this a step to the next level, to explore MySQL replication that can truly revolutionize your data management capabilities.
That is – in the above scenario, the replication process can further streamline the online store operations with a real-time data change without much hassle.
To give you some context –
Replication is like making a real-time copy of data from one server to another. It’s handy for ensuring data is always available and recovering it if something goes wrong. With MySQL replication, you don’t have to worry about doing regular backups because the Slave node automatically gets copies of all databases from the Master.
Does it seem like a lot to take in?
Don’t worry as I’ve broken down the wonders of MySQL replication, touched upon its advantages, and configured the MySQL master-slave replication process for you in this blog.
Let’s start!
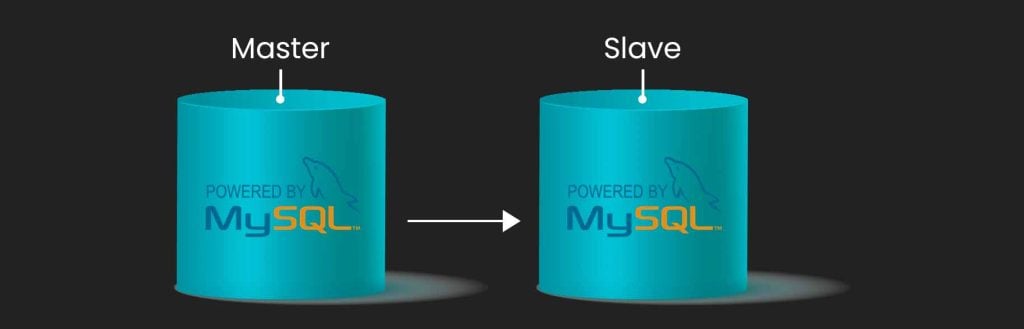
What is MySQL Replication?
MySQL replication is a dynamic process, where modifications made to the primary database are automatically mirrored on the designated slave MySQL node.
One server takes on the role of the MySQL Master, while others serve as MySQL slave servers.
Master Server – records all transaction details in a binary log file. The master server isn’t concerned with what updates the slave has or lacks. It simply responds to the slave’s requests, contingent on the slave server possessing the necessary access credentials.
Slave Server – actively seeks updates from the master and keeps track of its last update point from the master and intelligently requests only the subsequent transactions from the master’s binary log file. Here, the received transactional updates from the master are logged in a relay log—essentially numbered files brimming with transaction details fetched from the master.
Note: Don’t confuse replication with backup. In MySQL replication, if a DELETE operation occurs on the master server, that same operation is replicated on the slave server. MySQL replication is a sophisticated dance of synchronization, ensuring your database remains coherent and responsive to the demands of your dynamic applications.
Now that you are quite familiar with MySQL replication, let’s talk about its importance or how it can help you in the upcoming section.
Advantages of MySQL Master-Slave Replication
Here are some of the key advantages of replicating MySQL Master-Slave:
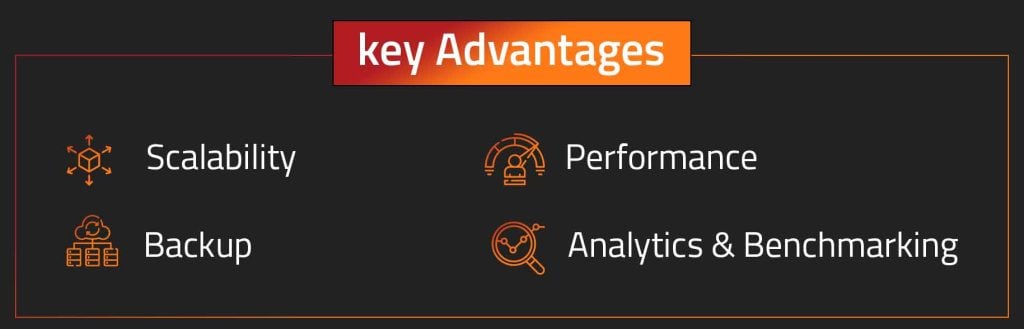
- Scalability: Distributing queries across multiple servers reduces server load. This is especially advantageous for web applications focused on read operations, optimizing information retrieval speed.
- Performance: Sending data updates to the main hub and spreading out data retrieval across several sources improves how fast websites work. This is super important when lots of people are trying to get information for a smooth user experience.
- Backup: Copying the latest database snapshot to another location makes backups fast and lowers the chance of data issues. The main server runs reliably without interruptions, keeping things up and running smoothly even during heavy reading or writing tasks.
- Analytics and Benchmarking: The replication system lets analysts run tests and experiments on separate servers without messing with the main one. This separation allows detailed examination and experimentation without disrupting important operations.
By now, I’m pretty sure that you would like to know how to replicate MySQL master-slave. Without any further ado, let’s get to know the steps!
Steps to Configure MySQL Master-Slave Replication
The configuration process has been divided into 2 major steps:
Step 1: Configuring MySQL Master Server
a. The initial step involves modifying the my.ini file on the MySQL Master Server with the necessary parameters:
server-id = 1
binlog-do-db = "testdb"
log-bin = "mysql-bin"
sync_binlog = 1
Quick Read –
- server-id: Employed on both the master and slave, this option ensures unique identification, facilitating seamless communication between the two.
- binlog-do-db: This indicates that the specific database chosen for replication. Operations within this database are systematically documented in a binary log file on the master server. For replication of multiple databases, the binlog-do-db parameter can be iteratively included. In the absence of this specification, the default operation entails recording all database activities in the binary log file.
For comprehensive synchronization across all databases to the slave server, the optimal approach involves the utilization of another option known as “binlog-ignore-db” in the my.ini file. By implementing this option, replication occurs for all databases except those explicitly excluded:
binlog-ignore-db = “testdatabase1”,”testdatabase2”
- log-bin: Clearly indicated by the configuration above, this parameter precisely designates the location of the log file.
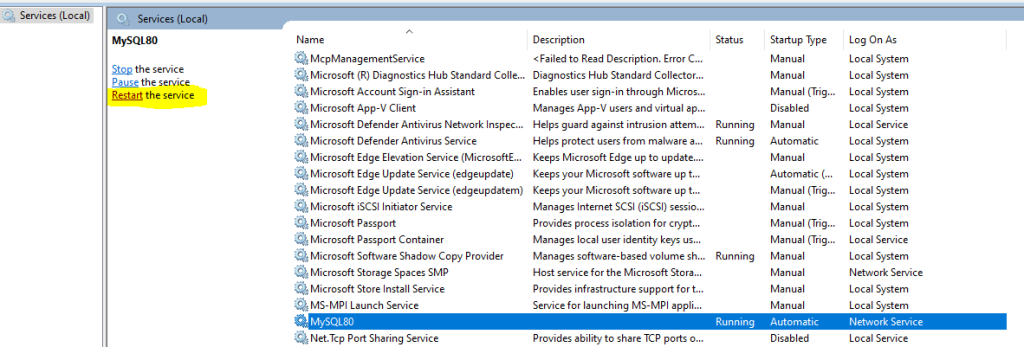
b. Restart the MySQL service to apply the configuration changes.
The subsequent action involves establishing a database user on the MySQL Master server. This user will be utilized by the slave server to retrieve transaction updates from the master.
c. On the master server, execute the following SQL commands:
CREATE USER ‘replication_user’@’10.1.1.23’ IDENTIFIED BY ‘password’;
GRANT REPLICATION SLAVE ON *.* TO 'replication_user'@'10.1.1.24' IDENTIFIED BY 'acomplexpassword';
In the provided command, 10.1.1.24 represents the IP address of our slave server. While it’s possible to substitute it with the ‘%’ sign to permit access from any source address, it’s not advisable to do so.
d. Now execute the below command.
FLUSH PRIVILEGES;
e. Next, without leaving the MySQL client session run the below commands.
USE testdb;
FLUSH TABLES WITH READ LOCK;
f. Execute the preceding command to suspend write operations to the ‘testdb’ database. Subsequently, take a backup of the database or databases for later restoration on the slave server, before initiating the slave configuration.
SHOW MASTER STATUS;
+---------------+----------+--------------+------------------+
| File | Position | Binlog_do_db | Binlog_ignore_db |
+---------------+----------+--------------+------------------+
| mysql-bin.002 | 108 | testdb | |
+---------------+----------+--------------+------------------+
1 row in set (0.00 sec)
I suggest you record the output generated by the aforementioned command, as we will utilize it when initiating the synchronization of the slave from the master.
Moving on to the second step!
Step 2: Configuring MySQL Slave Server
a. Generate the ‘testdb’ database on the slave server using the backup obtained during the master configuration process, as illustrated in this example.
b. Configure the slave server by providing master details, specifying its role as a slave server, and instructing it to retrieve updates for the designated database from the master.
This is done the same way as we configured our MySQL master server (that is – by modifying my.ini file):
server-id = 2
Note – In this context, it’s essential to highlight that we assigned the server-id as 2 (keeping most options consistent with the MySQL master server configuration performed earlier). Notably, the additional parameters incorporated include master-user (utilize the MySQL username established on the master server for replication), master-password (input the password for the replication user), and master-connect-retry.
c. Now restart the MySQL service on the slave server to apply the configuration changes.
d. Then, execute the below script before starting the replication:
set global server_id = 2;
SLAVE STOP;
CHANGE MASTER TO MASTER_HOST='10.1.1.23', MASTER_USER='replication_user', MASTER_PASSWORD='somecomplexpassword', MASTER_LOG_FILE='mysql-bin.002', MASTER_LOG_POS=108;
Kindly note the MASTER_HOST, MASTER_USER, MASTER_LOG_FILE (which we noted down when we ran SHOW MASTER STATUS on the master server), and MASTER_LOG_POS (which was also noted down from the master server) values we have used in the command above.
e. Upon successful execution of the script, execute the following:
SLAVE START;
quit;
f. In the end, run the below command in the master server to start the write operations for the ‘testdb’:
Unlock tables;
Upon completing the entire process, your MySQL database will be effectively replicated. Thus, guaranteeing that any modification made on the master server will seamlessly be updated on the slave server.
So, MySQL database replication serves as a vital tool for enhancing data management and fortifying system resilience. Nevertheless, it’s important to note that executing replication tasks can be demanding, given the variations in environments and the substantial engineering effort required.
Despite the long road, the benefits make the investment in MySQL database replication worthwhile for businesses seeking robust data solutions.
BONUS – Streamline your tech journey and expedite the configuration of MySQL master-slave replication by tapping into the expertise of our professionals at Nitor Infotech.
We are eager to propel your business forward with enthusiasm and proficiency!


