
Ever tried to create a web application and thought to yourself, “If only there was an effective way in which I could manage states within the application”? I’m sure it rings a bell for you just as it has for most of us. One solution for this issue is a package known as React Redux which is based on using unidirectional data flow pattern also known as Flux.
However, I have found that in any event, Redux proves to be slightly complicated and borderline difficult to use. Which is why, I am here to tell you more about a simpler option known as Mobx.
Simply put, Mobx is a scalable and standalone state management library that diligently follows Functional Reactive Programming (FRP) to maintain consistent state and ensure automatic performance of all derivations.
But before getting acquainted with Mobx, let’s focus on the following things:
| 1. | What is a State in React? | 2. | How to use State in React? | 3. | How to share a State in child component? | 4. | What are the different ways to share data/State in other components? |
Without further ado, let’s get started.
What is State & How to use State in React?
The state is essentially an instance of the React Component Class. It can be defined as an object of a set of observable properties that control the behavior of the component. When the state object changes, the component re-renders. And why do you pass the data as params (parameters) from one React component to another component? Because you don’t want to have a component rendering static data, but passing dynamic data to your component instead. That’s where Reacts props come into play. You can pass data in React by defining custom HTML attributes to which you assign your data with JSX syntax. So, don’t forget to put in the curly brackets.
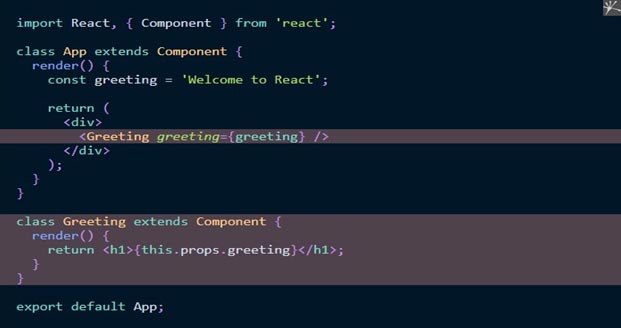
As you can see, props enable you to pass variables from one component to another down the component tree.
Here, we are passing only props from component to component without making it interactive, because nothing is there to change the props since they are read-only.
Now, what are the different ways to share State in other components?
Redux is a great option if you plan to have a central store. However, other approaches are possible. Here are a few possibilities:
| Parent to Child 1. Props 2. Instance Methods | Child to Parent 1. Call-back Functions 2. Event Bubbling | Sibling to Sibling 1. Parent Component | Any to Any 1. Observer Pattern 2. Global Variables 3. Context |
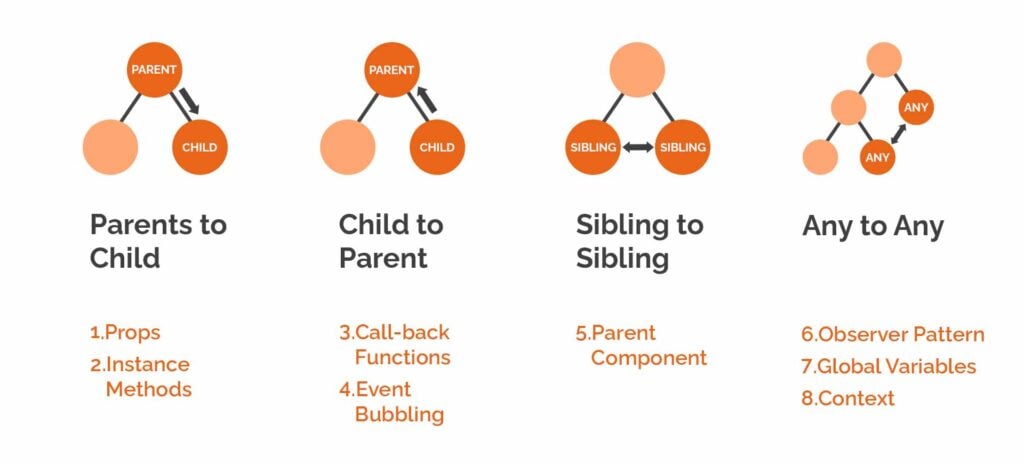
Context
Context works like props, but instead of providing data to a single child, it can be used to provide data to an entire subtree. (Child of a child, child of a child of a child, and so on). It can only send data down the tree (parent to subtree) and can be paired with call-back functions to pass data backup (subtree to parent).
Global Variables
Global variables are the duct tape of component communication. Don’t use them on a spaceship
 .
.
Observer Pattern
The Observer Pattern is a software design pattern in which an object can send messages to multiple other objects. No sibling or parent-child relationship is required to use this strategy.
Within the context of React, this would mean some components subscribe to receive particular messages and other components publish messages to those subscribers. Mobx: ” Simple, scalable state management. “
Now you know about Mobx. Here’s a list of its benefits:
- Globally defined, which means only one instance of data
- Only fetching remote data once
- Extensive dev tools.
In this tutorial, we are going to learn about Mobx which is an easier and simpler alternative to Redux (at least in my opinion).
You might be thinking, why do we need Mobx in the first place? Doesn’t React have its own state management?
Well, it does, but there are few problems with it.
- It’s not possible to share states with other components using Default React State
- With too many states, it becomes very difficult to maintain them in the long run.
- You might have heard of the ‘props drilling’ issue e. if you want to pass states from the parent component to its deeply nested child component, it becomes very difficult to manage all the props since we need to pass props to all components that come in between parent and child components.
These can be solved using Mobx. So let’s dive deeper into Mobx and understand its core concepts.
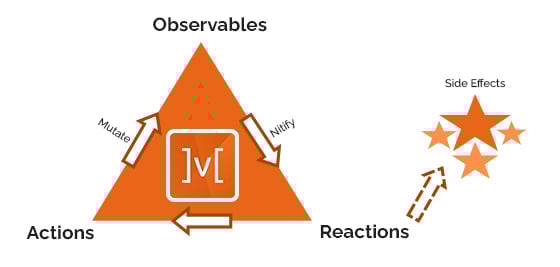
At the heart of Mobx are three important concepts: Observables, Actions and, Reactions.
Observables
Observable state is one of the main concepts of Mobx. The idea behind it is to enable an object to emit new changes on them to the observers. You can achieve this with the @observable decorator.
Actions
Actions are anything that modifies the state. You can mark your actions using the @action decorator. As such, you are supposed to use the @action on any function that modifies observables or has side effects.
Computed Values
Computed values are values that can be derived from a current state using pure functions. These values are represented by the @computed decorator. Computed values work in hand with observable states. With computed values, you can automatically derive values.
Reactions
Reactions in derivations are side effects that occur as a result of changes in your application state. They are similar to a computed value, but instead of producing a new value, a reaction produces a side effect for things like printing to the console, making network requests, incrementally updating the React component tree to patch the DOM, and so on. A reaction simply triggers a side effect, more like it performs a side operation. Reactions occur as a result of changes on observables and could affect the UI, or they could be background actions. Mobx provides three main types of reaction functions: when, autorun, and reaction.
Observer
Another reaction function available for React developers is the observer function. This one is not provided by the main Mobx package but, instead, provided by the Mobx-react library. To use the observer function, you can simply add the @observer decorator in front of it.
Store
The store is the source of data. Unlike redux, in Mobx data and functions which change the data live in the store. So, a store may contain observables and actions.
Stores create data sources. A store is basically an ES6 class. The state is automatically derived from a data source by Mobx by using ES6 decorators
- The store can expose the observable field(s), to which an observer can react.
- The store can additionally expose some derived observable fields too. Which are pure functions on observable fields? Mobx calls them as computed fields.
- The store can also change the values of observable fields via actions. Only in this way Mobx can allow you to change state.
In a nutshell Mobx works on the observable—observer flow. You declare some data to be observable and when that data changes all the observers that are using that data will be notified.
Let’s start with an example
create-react-app Mobx-example
Creating a React App is a comfortable environment for learning React, and is the best way to start building a new single-page application in React.
After completing installation type below commands
> Cals (for clearing command prompt) > cd Mobx-example
- start
The project will run like this: http://localhost:3000/

Open Project in VS code

Now Let’s Start the Coding
For Mobx we need to add some packages
npm install mobx mobx-react
npm install web-vitals
npm install --save-dev @babel/plugin-proposal-class-properties
npm install --save-dev
@babel/plugin-proposal-decorators
To use mobx decorator we need to install the above dev dependency.
npm i --save @fortawesome/fontawesome-svg-core
npm install --save @fortawesome/free-solid-svg-icons
npm install --save @fortawesome/react-fontawesome
The web-vitals library is a tiny (~1K), modular library for measuring all the Web Vitals metrics on real users, in a way that accurately matches how they’re measured by Chrome and reported to other Google tools (e.g. Chrome User Experience Report, Page
Speed Insights, Search Console’s Speed Report).
Note:
I have installed all the latest versions of dependency in my counter project.
"devDependencies" : {
"@babel/plugin-proposal-class-properties" : "^7.12.1" ,
"@babel/plugin-proposal-decorators" : "^7.12.12"
} "dependencies" : {
"@fortawesome/fontawesome-svg-core" : "^1.2.32" ,
"@fortawesome/free-solid-svg-icons" : "^5.15.1" ,
"@fortawesome/react-fontawesome" : "^0.1.14" ,
"cra-template" : "1.1.1" ,
"mobx" : "^6.0.4" ,
"mobx-react" : "^7.0.5" ,
"react" : "^17.0.1" ,
"react-dom" : "^17.0.1" ,
"react-scripts" : "4.0.1" ,
"web-vitals" : "^1.0.1"
},
Create two folders under the Src folder
- Components
- Store
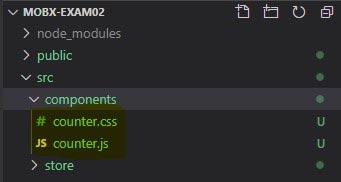
Create 2 files counter.js and counter.css

I have imported the observer decorator from the Mobx-react package.
Ex. observer( ()=>{ } return (<div></div>))
The observer function / decorator can be used to turn ReactJS components into reactive components.
How to use font awesome icon in React?
Just import below components like this.
import{ FontAwesomeIcon } from '@fortawesome/react-fontawesome'
import{ faMinus, faPlus, faRedoAlt } from '@fortawesome/free-solid-svg-icons'
Write a below code in JSX section

After running an application: npm start

Why am I using makeObservable?
Usage:
make Observable (target, annotations? options?)
It can be used to trap existing object properties and make them observable. Any JavaScript object (including class instances) can be passed into the target. Typically makeObservable is used in the construction of a class, and its first argument is this: The annotations argument maps annotations to each member.
Note: I am using the Mobx 6 version so, I need to use makeObservable () for enabling decorators.
Mobx before version 6 encouraged the use of Senex decorators to mark things as observable, computed, and action. However, decorators are currently not an ES standard, and the process of standardization is taking a long time. It also looks like the standard will be different from the way decorators were implemented previously. In the interest of compatibility, we have chosen to move away from them in Mobx 6, and recommend the use of make Observable/makeAutoObservable instead.
Creating observable state
Properties, entire objects, arrays, Maps, and Sets can all be made observable. The basics of making objects observable is specifying an annotation per property using makeObservable. The most important annotations are:
- Observable defines a trackable field that stores the state.
- Action marks a method as an action that will modify the state.
- Computed marks a getter that will derive new facts from the state and cache its
Collections such as arrays, Maps, and Sets are made observable automatically.
Create a Store file: counter.store.js

Importing make Observable, observable, action from Mobx package.
Create a Counter Store class { }
Typically, makeObservable is used in the construction of a class, and its first argument is this-After writing a constructor it is declared count variable and increment Count, decrement Count, and reset actions in the Counter Store class.
Create a class object and export as Named export cost counter Store = new Counter Store (); export { counter Store as CounterStore }
The observer Hockautomatically subscribes React components to any observables that are used during rendering. As a result, components will automatically re-render when relevant observables change.
export cost counter = observer (() => { } )
Wrapping a counter function with observer ( )
How to Inject store in component Ex.

And we are done!
Reach out to us at Nitor Infotech to learn more about our Mobility Engineering Services and see how you can conduct a comparative analysis of platforms for mobile app development.


