
Imagine having to manage separate application instances for each of your clients. This scenario presents a significant challenge in modern web application development. It involves managing infrastructure costs and addressing scalability concerns, all of which are complex issues to navigate. This not only complicates the development process but also jeopardizes the seamless user experience that modern applications aim to deliver.
This is where the concept of “multi-tenancy” comes into play as a solution. This allows developers to build scalable and efficient solutions that serve multiple clients or tenants. In this blog, we’ll delve into the world of multi-tenancy in ASP.NET Core, exploring its concepts, implementation, and best practices.
So, let’s start!
What is Multi-tenancy?
Multi-tenancy refers to the capability of a system to serve multiple clients or tenants, where each tenant is a distinct and independent entity with its data, configuration, and user base. It allows for cost-effective use of resources, as multiple clients can be served using a single application instance. It also simplifies maintenance and updates, as changes need to be made only once for all tenants.
Coming to the context of ASP.NET Core, tenants could be different organizations, clients, or users sharing the same application instance.
Every time you make an API call, it includes a tenant property as a parameter. This tells the API to only send data relevant to that specific tenant.
This helps in ensuring that the API only returns data relevant to that customer or group. It is especially useful in Software as a Service (SaaS) applications, where you need to keep the data and features isolated for different customers or groups using your application.

Know how a North American software company cut code deployment delays by 40% with Nitor Infotech’s Product Modernization expertise.
Types of Multi-tenancy
Here are the various types of multi-tenancy:
1. Database per Tenant: This approach offers distinct benefits and challenges. It enhances data isolation and security, ensuring that each tenant’s data remains separate. However, this method can be resource-intensive, requiring more storage and potentially increasing costs.
2. Shared Database, Shared Schema: This approach simplifies database management by using a single database schema for all tenants. However, each tenant’s data must be separated within the shared database to ensure data integrity. This can be achieved using a database schema, a shared column with a tenant ID, or by maintaining a separate database per tenant.
3. Shared Database, Separate Schemas: This approach involves using a single database with unique schemas for each tenant. It offers resource efficiency by sharing the database infrastructure. However, it can complicate schema management, as changes need to be coordinated across multiple schemas.
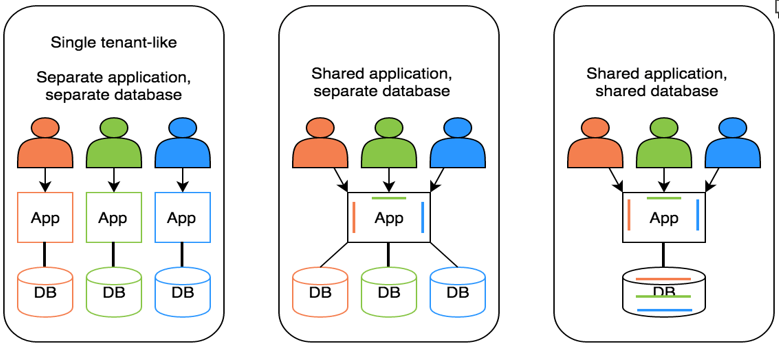
Fig: Types of Multi-tenancy
Clear about the basics? Now let me guide you through implementing multi-tenancy in ASP.NET Core.
Implementing Multi-tenancy with ASP.NET Core
To implement multi-tenancy in ASP.NET Core, you can follow these four major steps:
1. Tenant Identification
- There are various ways to identify tenants using a hostname, token-based, custom middleware, IP address, hostnames, path segments, request headers, etc.
- You need to extract tenant information from the request to identify the tenant using one of the above mechanisms.
2. Dependency Injection and Configuration
This process involves several sub-steps, including:
- Registering Services: Implement a central service registration mechanism where you register services at application startup. Use a dependency injection container (e.g., ASP.NET Core’s built-in DI container) to register services. Separate registration for global services that are common across all tenants and tenant-specific services.
- Tenant-Specific Services: Design services that can be scoped or instantiated per tenant, ensuring proper isolation. Utilize dependency injection to inject tenant-specific services into controllers, services, or middleware.
- Middleware: Implement middleware that identifies the tenant from the request, allowing for the resolution of tenant-specific services. Middleware can set the current tenant context for the request lifecycle.
- Options Design Pattern: Utilize the Options pattern for configuring tenant-specific settings. Define options classes for each tenant and configure them based on the tenant identifier.
- Tenant-Specific Configuration: Organize configuration settings in a way that allows for easy retrieval based on the current tenant context. Use configuration providers to load tenant-specific configuration settings.
- On-Demand Configuration: Implement mechanisms to load configuration settings on-demand based on tenant requirements. Consider lazy-loading configuration settings when they are first requested by a tenant.
3. Authentication and Authorization
Ensure a robust authentication and authorization system by addressing the following key aspects:
- Identity Management: Implement a comprehensive identity management system to accurately verify and manage the identities of tenants. This includes user registration, account verification, and password management.
- Tenant Resolution: Develop a reliable tenant resolution mechanism to identify and differentiate between various tenants. This involves resolving tenant-specific information during the authentication process to ensure the secure isolation of tenant data and resources.
- JWT Token: Utilize JSON Web Tokens (JWT) for secure and efficient authentication. Implement a token-based authentication system to generate and validate JWT tokens during user authentication. Ensure that these tokens carry the necessary claims and information for tenant-specific access.
- Role-Based or Claims-Based Authorization: Enforce role-based or claims-based authorization mechanisms to control access to tenant-specific resources. Define roles and permissions based on the principle of least privilege to restrict unauthorized access. Regularly review and update roles and permissions to align with the evolving needs of the system.
4. Routing and Controllers:
- Structure your routing and controllers to handle tenant-specific routes.
- Consider using route constraints or attribute-based routing to handle tenant-specific actions.
Hope you’ve understood the implementation. Now, let’s explore a sample project to implement multi-tenancy in an ASP.NET Core Web API application.
Project Sample (Database per Tenant)
Here are the steps outlined in the sample project:
1. Use a separate database and header strategy for this application.
2. Check the folder structure. It looks like this in our case:
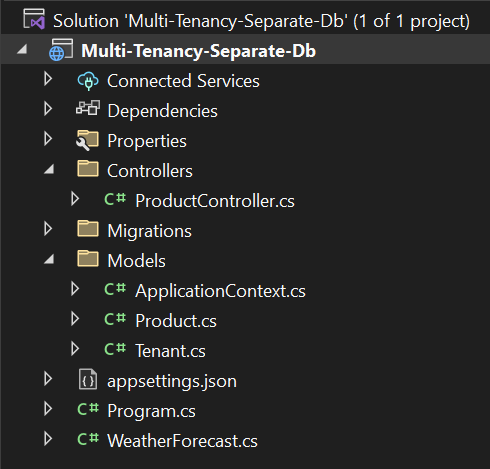
Fig: Folder Structure
3. After opening a .Net Web API project, we must create our Tenant.cs class, using this code:
public class Tenant

{

public int Id { get; set; }

public string Name { get; set; }

public string ConnectionString { get; set; }

}
4. Add tenants related information in appsettings.json, using this code:
"Tenants": [

{

"Id": 1,

"Name": "Apple",

"ConnectionString": "Server=(localdb)\\mssqllocaldb;Database=Apple-Db;Trusted_Connection=True;MultipleActiveResultSets=true"

},

{

"Id": 2,

"Name": "Samsung",

"ConnectionString": "Server=(localdb)\\mssqllocaldb;Database=Samsung-Db;Trusted_Connection=True;MultipleActiveResultSets=true"

}

]
5. Create the Product class to store tenant-specific information, using this:
public class Product

{

public int Id { get; set; }

public string Name { get; set; }

}
6. Create an application context that utilizes actual tenant information to fetch data using the connection string:
public class ApplicationContext : DbContext

{

private readonly Tenant _currentTenant;

public ApplicationContext(Tenant currentTenant) : base()

{

_currentTenant = currentTenant;

}

public DbSet<Product> Products { get; set; }

protected override void OnConfiguring(DbContextOptionsBuilder optionsBuilder)

{

optionsBuilder.UseSqlServer(_currentTenant.ConnectionString);

base.OnConfiguring(optionsBuilder);

}

}
7. Finally, create a controller that retrieves the tenant name from the header and uses it to fetch data from the specific tenant database:
public class ProductController : ControllerBase

{

private readonly IConfiguration _configuration;

public ProductController(IConfiguration configuration)

{

_configuration = configuration;

}

[HttpGet(Name = "GetProduct")]

public IEnumerable<Product> Get()

{

var headers = HttpContext.Request.Headers;

if (headers.ContainsKey("tenant"))

{

var tenant = _configuration.GetSection("Tenants").Get<List<Tenant>>()

.FirstOrDefault(x => x.Name == headers["tenant"].First());

if (tenant == null)

{

using (var applicationContext = new ApplicationContext(tenant))

{

return applicationContext.Products.ToList();

}

}

}

return null;

}

}
8. Then, you can view the output by passing the tenant in the header section.
9. We can use a path strategy, where different endpoints are used to retrieve products for each tenant given below:
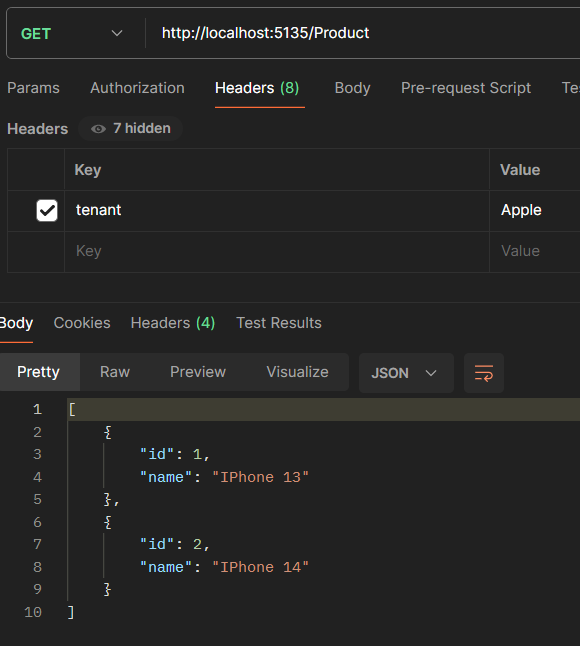
Fig: Tenant 1 – Apple
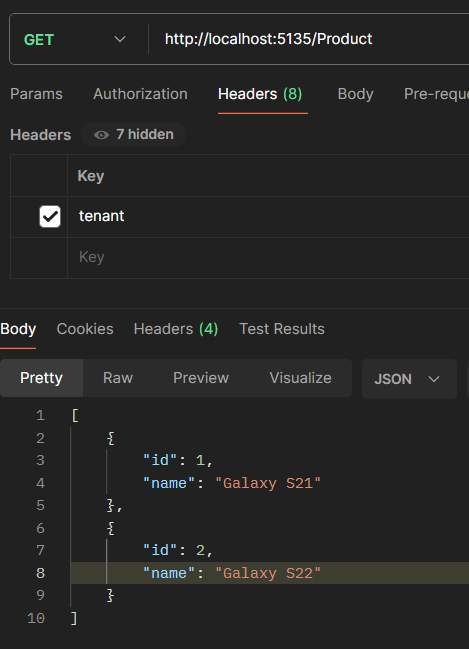
Fig: Tenant 2 – Samsung
For the final section, I would like to wrap up with some of the best practices that you can follow to manage multi-tenancy.
So, keep reading!
Best Practices and Considerations
Here are some best practices and considerations:
1. Performance Optimization: Offer tips for optimizing performance in a multi-tenant application, considering factors like caching and resource pooling.
2. Scalability: Discuss strategies for scaling a multi-tenant application, including considerations for load balancing and database scaling.
3. Testing and Debugging: Set up a CI pipeline that automatically builds and tests the application whenever changes are pushed to the repository. This ensures that code changes are regularly integrated and tested, reducing the likelihood of integration issues.
Note – When it comes to testing and debugging multi-tenant applications, it’s crucial to focus on techniques tailored to this architecture. Thus, emphasizing automation and CI/CD practices.
4. Monitoring and Logging: Logging should be implemented at the tenant level or context to ensure that logs are separated per tenant. This approach enables actions such as monitoring per tenant and contributes to a comprehensive SaaS solution.
5. Performance Optimization: Consider implementing caching mechanisms to reduce redundant data retrieval and enhance response times. Explore resource pooling strategies to efficiently manage and allocate resources across tenants.
6. Scalability: Explore strategies for scaling a multi-tenant application to manage increased loads. Consider using load-balancing techniques to evenly distribute traffic across servers. Additionally, look into scaling the database to handle the growing data needs of multiple tenants.
7. Maintainability & Flexibility:
- Configuration Management – Implement robust configuration management to centralize and manage configuration settings. This enhances maintainability by allowing quick adjustments to application settings without the need for code changes. Use configuration files or external tools for easy configuration updates.
- Code Modularity – Emphasize the importance of code modularity for ease of maintenance. Further, encourages the use of modular design principles, separating functionality into independent modules. This allows for easier updates, debugging, and scalability as each module can be developed, tested, and maintained independently.
- Multi-Tenant Framework – Utilize a dedicated multi-tenant framework to streamline the development and maintenance of multi-tenant applications. A well-designed framework can provide standardized solutions for common multi-tenancy challenges, reducing development time and ensuring a consistent and scalable architecture.
So, remember that multi-tenancy in ASP.NET Core opens new possibilities for building scalable and flexible applications. By understanding the different approaches and implementing best practices, you can create robust and efficient solutions that cater to the needs of multiple tenants. Thank you for reading my blog! If you enjoyed it, share your thoughts.
Also, familiarize yourself with Nitor Infotech as your long-term tech partner, helping you scale modern applications faster than ever.


