As you read about the development of Android, you will come across the word ‘compatibility’ in a variety of contexts. You might already know that there are two types of compatibility: app compatibility and device compatibility. For Android, the term ‘app compatibility’ means that your app will work correctly on a specific version of Android (usually the latest version).
Allow me to share a note of caution with you – testing your app against a new version of Android can be challenging. This is especially true if your app may be affected by changes across multiple platforms.
Many questions can come up:
• How do you determine which areas of your app might be affected?
• Should you test by changing the targetSdkVersion and what is the simplest way to do it?
• When you start testing, how should you isolate the issues that are causing problems?
• While you develop and test against the most recent version of Android, how should you verify that your app provides a flawless experience on other devices with various form factors and lower API levels?
Starting with Android 11, Google has added new tools to the platform and new features in Android Studio to make the testing process a little simpler.

Enhance your app’s reliability and deliver exceptional user experiences through effective usability testing.
In this blog, I am going to walk you through the process of mobile compatibility testing with an Android app. Let’s start!
New Tools in Android Studio App Compatibility Checker
In addition to manual testing on the new platform, Google also made it easier to use Android Studio to run automated tests on the latest OS.
Starting with Android Studio 4.2, hardware-enabled testing can now work on many physical or visual devices in conjunction. When running tests, you can now select multiple devices from the Target Device drop-down menu.
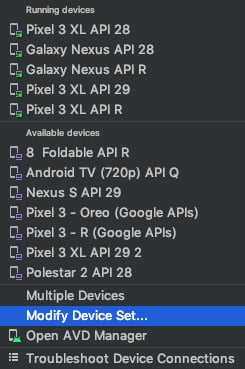
Multiple devices with different API levels can be run at the same time
This feature is designed to help you to identify problems as quickly as possible in your development cycle and allow you to compare differences between different Android properties. The results of these tests can be investigated using the new Test Matrix under View–> Windows Tool–> Run

The new Test Matrix lets you filter your test results for status, device, and API level
Device Compatibility for Android
Android is designed to work on many types of devices, from phones to tablets and televisions. As a developer, the scope of devices provides a powerful audience for your app. For your app to be successful on all these devices, it must tolerate certain variations and provide a user-friendly interface that adapts to different screen settings.
To get the largest possible user base for your app, you should try to support as many device configurations as you can using one APK or AAB. In most cases, you can do so by disabling the features you selected during the operation again to provide app resources with alternative configuration options (such as structures for different screen sizes). If necessary, however, you can limit the availability of your app on devices via the Google Play Store based on the following device features:
• Platform Version
• Screen Configuration
Platform Version
Different devices may run different versions of the Android platform, such as Android 6.0 or Android 7.0. Each version of the consecutive platform usually adds new APIs that are not available in the previous version. To indicate which set of APIs is available, each platform version stipulates an API level. For instance, Android 1.0 is API level 1 and Android 11 is API level 30.
The API level allows you to declare the minimum version with which your app is compatible, using the <uses-sdk> manifest tag and its minSdkVersion attribute. For example, Calendar Provider APIs added to Android 4.0 (API level 14). If your application cannot work without these APIs, you should declare level 14 API as a small version based on your application.
The minSdkVersion attribute announces the minimum version your operating system works with and the targetSdkVersion attribute refers to the highest version in which you have upgraded your application.
However, note that the attributes in the element are extracted from the corresponding elements in the build.gradle file. So, if you are using Android Studio, you should specify minSdkVersion and targetSdkVersion values instead.
Screen Configuration
Android works on devices of various sizes, from phones to tablets and TVs. To classify devices by their screen type, Android defines two features for each device: screen size (screen size) and screen density (pixel density on the screen, known as DPI). Screen size is the visual space provided by the application UI. To facilitate different configurations, Android combines these variations into functional groups that are easy to identify:
• Four generalized sizes: small, normal, large, and xlarge.
• Numerous generalized densities: mdpi (medium), hdpi (high), xhdpi (extra high), xxhdpi (extra-extra high), and others.
By default, your app is compatible with all screen sizes and congestion, because the system makes appropriate changes to your UI layout and image resources as required on each screen. You must provide a prepared bitmap image of normal screen congestion. As you make changes, check your structural behavior in all window sizes, especially in compact, medium, and extended building width. While you make changes, you should test your layout behavior across all ranges of window sizes, specifically at the compact, medium, and expanded layout widths.
Create a Flexible Layout
Irrespective of the hardware profile you wish to support first, you need to generate a layout that is responsive to even small variations in screen size.
Use ConstraintLayout:
The best way to create a responsive layout of different screen sizes is to use ConstraintLayout as the basic layout in your UI. ConstraintLayout lets you specify a location and the size of each view according to the location and other views in the layout. Due to this, all the views can move and stretch collectively as the screen size changes.
An easy way to build a structure with ConstraintLayout is to use Layout Editor in Android Studio. It allows you to drag new views into the building, paste your boundaries into parental and other sibling views, and edit viewing features, all without editing any XML manually.
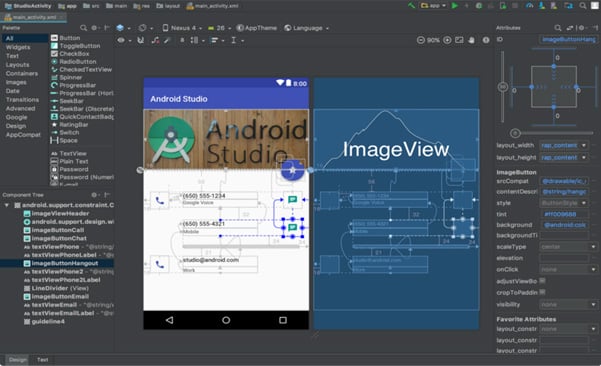
The Layout Editor in Android Studio showing a ConstraintLayout view
ConstraintLayout won’t solve every layout scenario, but no matter what layout you use, you should always avoid hard-coding layout sizes.
Avoid Hard-coded Layout Sizes:
To make sure that your layout is flexible and adjusts to various screen sizes, use “wrap_content” or “match_parent” for the width and height of most view components, as a replacement for hard-coded sizes.
“wrap_content” guides the view to set its size to the necessary dimensions so as to accommodate the content inside that view.
“match_parent” makes the view expand in the parent view.
For example:
<androidx.appcompat.widget.AppCompatTextView
android:layout_width="match_parent"
android:layout_height="wrap_content"
android:text="@string/sample" />
Although the actual layout for this view depends on other attributes in its parent view and any sibling views, this AppCompatTextView intends to set its width to fill the space that’s available (match_parent) and fix its height to precisely as much space is needed by the height of the text (wrap_content). This allows the view to adjust to various screen sizes and various lengths of text.
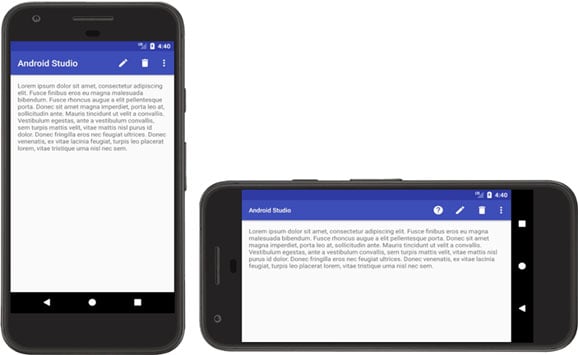
How the width of the text view using “match_parent” adapts as the screen width shifts with device orientation
Use Vector Graphics
With simple types of images (usually thumbnails), you can avoid creating different images at each congestion using vector graphics. Because vector images interpret the image in the form of geometric lines instead of pixels, they can be drawn in any size without measuring artifact. Vector graphics create an image using XML to describe patterns and colors, instead of using pixel bitmaps. Thus, vector graphics can reach any size without measuring artifacts, although they are usually advanced with images such as symbols, not photographs.
Vector images are usually provided as an SVG (Scalable Vector Graphics) files, but Android does not support this format. So, you should convert SVG files into a vector format for Android.
You can easily convert SVG to a vector downloaded in Android Studio using Vector Asset Studio as follows:
1. Within the Project window, right-click on the res directory, click New and then Vector Asset.
2. Select a Local file (SVG, PSD).
3. Locate the file you wish to import and make changes as needed.
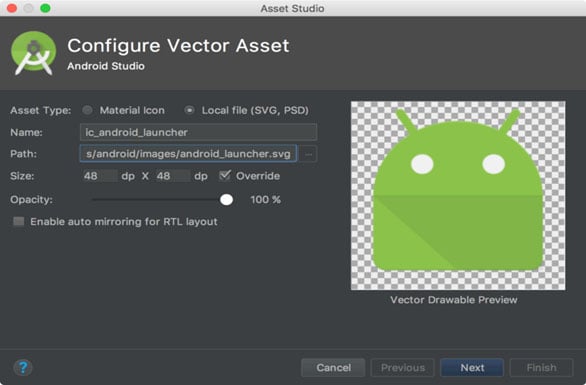
4. Click Next.
5. On the next screen, confirm the source set in which you want the file to be in your project and click Finish.
One drawable can be utilized on all pixel densities. This file will be placed in your default drawables directory (using density-specific directories is not required).
Test on all Pixel Densities
It is important to test your app on different devices with different pixel densities to ensure that the UI scales correctly. Testing on a physical device is easy, but you can also use the Android emulator if you don’t have access to a physical device for all other pixel densities.
So, that is how you can venture into mobile compatibility testing with an Android app. You can bookmark my blog and I hope it will function as a good reference point for you when you implement this testing!
Write to us at Nitor Infotech if you would like us to know your ideas about this topic. Click here to read how state-of-the-art mobile app development can enhance your business.


