
In many scenarios in the data engineering world, you may come across a tricky yet unavoidable requirement – ‘How to perform operations like insert/update on billions of rows without affecting the overall performance?’ We could argue that it will be as simple as running SQL queries over database/embedding them into the script, right?
Unfortunately, it will not be as simple as what I just described, as this approach will overwrite all the rows that cause performance bottlenecks and unnecessarily use up resources (viz. compute and storage).
To overcome such unforeseen obstacles, ‘Apache Hudi’ is something I can label as a super powerful tool to handle both bulk inserts and updates of records in billions of rows with better performance as compared to the traditional approach.
Allow me to give you a detailed explanation in this blog:
Apache Hudi: An Introduction
Apache Hudi is an open-source data management framework that can simplify incremental data processing and data pipeline development by providing record-level insert, update, upsert, and delete capabilities. Upsert is being able to either insert records into an existing/new dataset or update existing ones. Hudi efficiently manages data laid out in Amazon S3 and allows data to be ingested or updated almost real-time.
Key Features
Here are some of the features that make Hudi stand out:
- Hudi is a data lake built on top of HDFS.
- It provides ways to consume data incrementally from data sources like real-time data, offline datastore, or any hive/presto table.
- It consumes incremental data, updates /changes that might happen and persists those changes in the Hudi format in a new table.
- Hudi data lake has integrations with query engines like Spark, Hive, Presto, AWS Athena, and AWS Redshift.
- Processing in Hudi is incremental. This means we need not overwrite an entire partition or an entire directory for a small number of updates.
Hudi is very meticulous if you ask me, it maintains a timeline of all actions that have been performed on the table. Each of these actions could be at different instances of time giving a very quick snapshot of the table and also supporting retrieval of data according to the order in which it arrived. Hudi assures that actions performed are what you could call atomic and is very consistent with the timeline.
Tables in Hudi are broken up into partitions containing data files like hive tables, based on how the data is indexed and laid out in DFS. Hudi mainly consists of two table types:
- Copy on Write
- Merge on Read
The ‘Copy on Write’ table stores data using exclusively columnar file format (e.g., Parquet).
The ‘Merge on Read’ table stores data using a combination of columnar and row based (e.g., Avro) file formats. These determines how the data is going to be stored in Hudi.
This blog focuses on actively using AWS Cloud services. The setup for these services takes the least amount of time if you ask me. Before directly jumping into the effective solution, let’s take a quick look at the how we are going to be leveraging AWS services:
Apache Hudi with AWS Glue
‘Apache Hudi with AWS Glue’ provides a serverless kind of mechanism and allows end users to focus only on business questions at hand. Therefore, a data engineer has the liberty to focus only on data manipulation requirement and not on the installation and setup.
So, let’s dive into this exciting use case with Apache Hudi!
Prerequisite
- AWS Glue Connector for Apache Hudi
Environment Setup
- AWS Glue
- AWS Glue Connector for Apache Hudi
- AWS S3
- Subscribe to Hudi connector from AWS marketplace (discussed in detail in subsequent part)
- IAM Role with sufficient privileges to run jobs and create database in glue
- AWS lambda service (for triggering the Glue jobs)
- AWS Athena for querying data, AWS CloudWatch to see logs, etc.
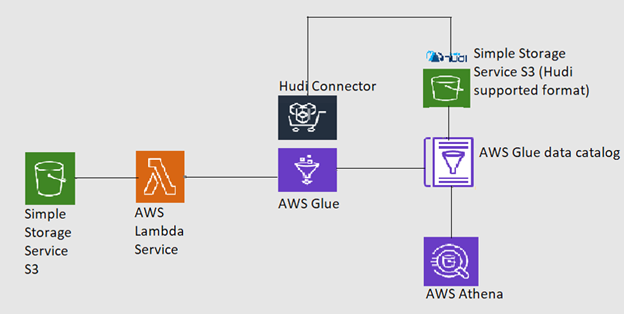
The architectural diagram for Apache Hudi using AWS Glue can be given as:
Laying the Foundation – Setting up AWS Glue Hudi connector
The AWS marketplace is full of various services and connectors useful for a wide range of application development. The Hudi connector can be used for a Glue service at absolutely no cost! To set it up, follow these steps:
a. Search for a marketplace in AWS console and type ‘hudi connector’ in the search-bar.
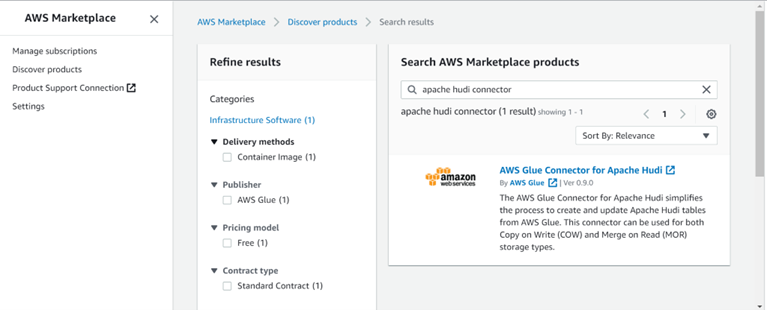
b. Select ‘AWS Glue Connector…’ and choose ‘Continue’ to subscribe. Once done, on configuration tab, mention the service and the glue version.
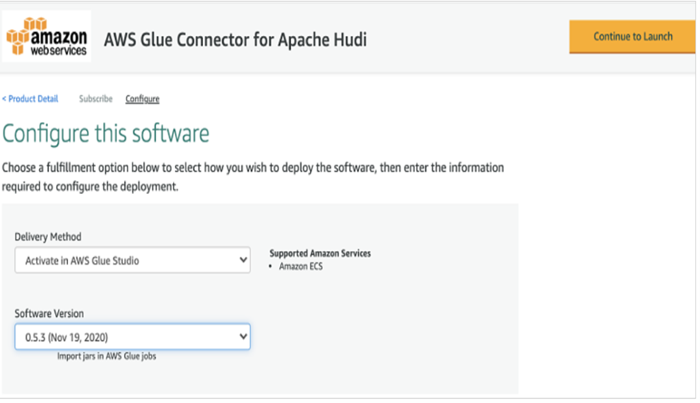
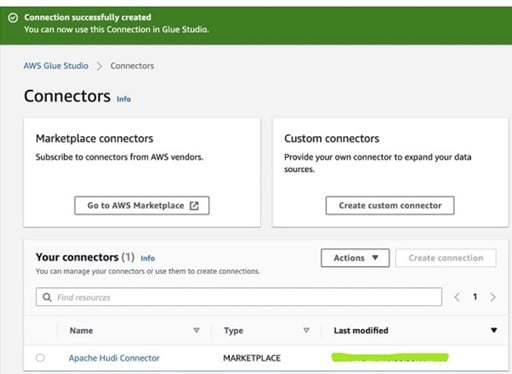
c. Choose the ‘Continue to Launch’ tab. Under the ‘Launch this software’ section choose ‘Usage Instruction’ and then ‘Activate Glue Connector’ as shown in the image below.
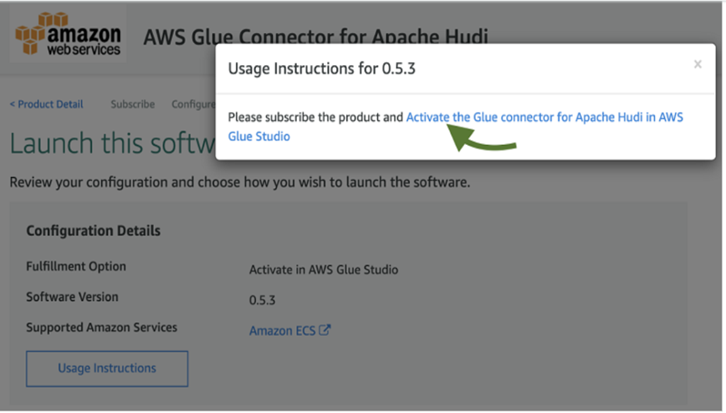
d. Once you have entered the name and description for the launched connector, a success window appears and you are ready to use the connector for free!
Now it’s time to put this connector to use for a Glue service. Let’s start with the Glue Job Configuration.
Glue Job configuration Setup
For this, switch to the AWS Glue Console to create a job for our bulk load application. For this choose Jobs section in ETL then choose ‘Add job’. Now, you will see a glue job configuration window. Feel free to use the following steps quickly setting up your job environment.
- Choose ‘Spark’ and the appropriate spark version in the dropdown menu for the spark script that we are going to write. Also select the ‘A new script to be authored by you’radio option for our brand-new script.
- Extend the ‘Security and Configurations’ tab and choose the appropriate ‘Worker type’ and ‘Number of workers’ as per bulk data load requirement.
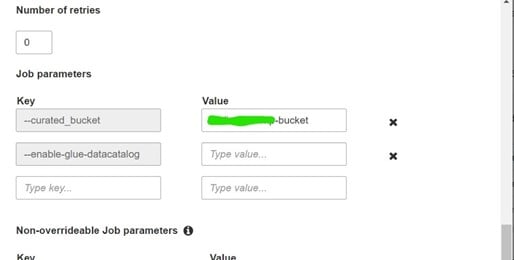
- One of the most important attributes is in the ‘Job Parameters’
It is of type key-value pair. We are going to label the keys as ‘curated_bucket’ which is being read by our glue job internally and Hudi-supported output files will fall into this bucket. In the value section, mention the name of the output bucket.
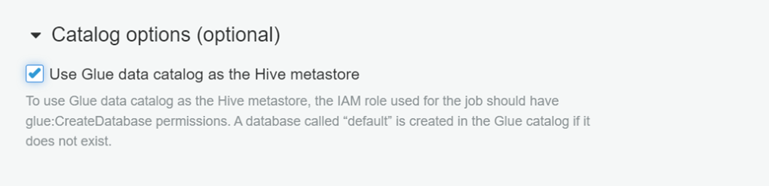
Go to the ‘Catalog Options’ tab and tick the ‘Use Glue data catalog as a Hive metastore’. This rules out the use of Glue catalog as a Hive metastore to store all metadata.
In this blog, we will be focusing on two main operations using Hudi – Bulk Data Load and Incremental Data Load. So, let’s focus on these operations one by one.
Apache Hudi for a Bulk Load
As we saw previously in the AWS Glue job setup, we will create a script in Pyspark so that it triggers whenever there is a large data ingested into the S3. For that we have a Lambda function in place to act as a trigger. Once the job runs successfully, a Hudi supported file format will get created on top of S3 destination folder. All the related metadata created into the glue catalog service will act as a hive metastore and thus point the tables created to the S3 destination bucket.
Data that is inserted can now be queried using AWS Athena. Once this setup is done, you are ready to write a script. Here is the code for a bulk data load job. In the first part, we are going to import essential modules in Pyspark and initialize SparkContext as well as GlueContext for a job.
from awsglue.context import GlueContext
from awsglue.job import Job
from awsglue.dynamicframe import DynamicFrame
from pyspark.sql import functions as F
from awsglue.utils import getResolvedOptions
from pyspark.sql.types import *
from datetime import datetime

args = getResolvedOptions(sys.argv, ['JOB_NAME','curated_bucket'])
spark = SparkSession.builder.config('spark.serializer','org.apache.spark.serializer.KryoSerializer')\
.config('spark.sql.hive.convertMetastoreParquet','false').getOrCreate()
sc = spark.sparkContext
glueContext = GlueContext(sc)
job = Job(glueContext)
job.init(args['JOB_NAME'], args)
inputDf = spark.read.option("inferSchema","true").option("header", "true").option("timestampFormat", "yyyy-MM-dd HH:mm:ss").csv("s3://medicare-relational-data-bucket/medicare_70k_claims.csv")\

inputDf = inputDf.toDF(*(c.replace(' ', '_').lower().replace("(","").replace(")","") for c in inputDf.columns))

inputDf.printSchema()
inputDf.show(5,truncate=False)

commonConfig = {'className' : 'org.apache.hudi', 'hoodie.datasource.hive_sync.use_jdbc':'false',
'hoodie.datasource.write.precombine.field': 'updated_at','hoodie.datasource.write.partitionpath.field': 'state' ,
'hoodie.datasource.write.recordkey.field': 'primary_key', 'hoodie.table.name': 'medicare_claims_Table', 'hoodie.consistency.check.enabled': 'true',
'hoodie.datasource.hive_sync.database': 'default', 'hoodie.datasource.hive_sync.table': 'medicare_claims_Table', 'hoodie.datasource.hive_sync.enable': 'true',
'path': 's3://' + args['curated_bucket'] + '/hoodie_data/medicare_claims_Table'}

unpartitionDataConfig = {'hoodie.datasource.hive_sync.partition_extractor_class': 'org.apache.hudi.hive.NonPartitionedExtractor',
'hoodie.datasource.write.keygenerator.class': 'org.apache.hudi.keygen.NonpartitionedKeyGenerator'}

initLoadConfig = {'hoodie.bulkinsert.shuffle.parallelism': 68, 'hoodie.datasource.write.operation': 'bulk_insert'}
combinedConf = {**commonConfig, **unpartitionDataConfig, **initLoadConfig}
glueContext.write_dynamic_frame.from_options(frame = DynamicFrame.fromDF(inputDf, glueContext, "inputDf"),
connection_type = "marketplace.spark", connection_options = combinedConf)
In the second part of this code, we will set up some important hudi parameters/fields such as ‘record_key’, ‘partition_path’ and ‘precombine field’. Record_key field is nothing but a ‘Primary Key’ in relation to the database. Pre-combined fields are used to compare two records based on the timestamp.
inputDf = spark.read.option("inferSchema","true").option("header", "true").option("timestampFormat", "yyyy-MM-dd HH:mm:ss").csv("s3://medicare-relational-data-bucket/medicare_70k_claims.csv")\

inputDf = inputDf.toDF(*(c.replace(' ', '_').lower().replace("(","").replace(")","") for c in inputDf.columns))

inputDf.printSchema()
inputDf.show(5,truncate=False)

commonConfig = {'className' : 'org.apache.hudi', 'hoodie.datasource.hive_sync.use_jdbc':'false',
'hoodie.datasource.write.precombine.field': 'updated_at','hoodie.datasource.write.partitionpath.field': 'state' ,
'hoodie.datasource.write.recordkey.field': 'primary_key', 'hoodie.table.name': 'medicare_claims_Table', 'hoodie.consistency.check.enabled': 'true',
'hoodie.datasource.hive_sync.database': 'default', 'hoodie.datasource.hive_sync.table': 'medicare_claims_Table', 'hoodie.datasource.hive_sync.enable': 'true',
'path': 's3://' + args['curated_bucket'] + '/hoodie_data/medicare_claims_Table'}

unpartitionDataConfig = {'hoodie.datasource.hive_sync.partition_extractor_class': 'org.apache.hudi.hive.NonPartitionedExtractor',
'hoodie.datasource.write.keygenerator.class': 'org.apache.hudi.keygen.NonpartitionedKeyGenerator'}

initLoadConfig = {'hoodie.bulkinsert.shuffle.parallelism': 68, 'hoodie.datasource.write.operation': 'bulk_insert'}
combinedConf = {*commonConfig, *unpartitionDataConfig, **initLoadConfig}
glueContext.write_dynamic_frame.from_options(frame = DynamicFrame.fromDF(inputDf, glueContext, "inputDf"), connection_type = "marketplace.spark", connection_options = combinedConf)
In the ‘Bulk Load data’ script, we have a dataset in the CSV format in the S3 bucket which can be read as spark dataframe and we will perform some basics transformation (as mentioned in script viz., column renamed, space removal) and add the output in Hudi-supported format into the S3 bucket (the curated bucket in this case).
Notice the dict ‘initLoadConfig’. You will find that the ‘hoodie.datasource.write.operation’ key has a value of ‘bulk_insert’, just as we hoped we would find. Now we are ready to run our job from the Glue portal and observe the output on the curated bucket in S3.
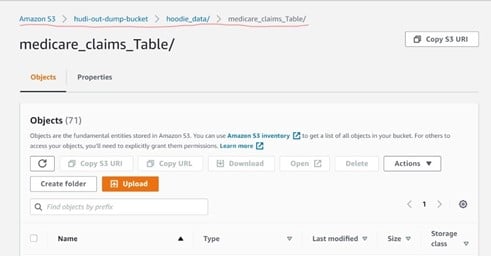
You will notice that the output path for hoodie tables (underline with red in the above image) as mentioned in our script gets created automatically. The Hoodie folder with metadata along with the partitioned output files is mentioned in the ‘Partitionpath.field’ .
As we successfully complete the first part of this blog that is ‘Using Apache Hudi for Bulk Loading Data’, let’s move to the second part I.e. ‘Using Apache Hudi for Incremental Loading of Data’.
Apache Hudi for Incremented Load
For this use case, we can set up an environment to emulate a streaming file uploaded to S3 and hence trigger our next job i.e., ‘Incremental Load’ job in Glue. For this, one can either manually upload a small chunk of files into S3 or write a script in python to emulate this behavior. Both approaches will lead to the same result as the latter approach is an automated one.
For this demo, we will write a small python script to emulate real-time data stream behavior which will break the data into small pieces and upload to S3 using Boto3 Client.
Here is the code snippet for Emulated Real time data ingestor:
import boto3
import uuid
import pandas as pd
import time

AWS_ACCESS_KEY_ID = 'AKIA4YPN2MM62CSYFGOB'
AWS_SECRET_ACCESS_KEY = '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'
BUCKET_NAME = 'myhudi-data'
LOCAL_FILE_PATH = r"C:\Users\pranit.gangurde\Downloads\upload_files"
DATASET_PATH = r"C:\Users\pranit.gangurde\Downloads\incremental_data.csv"

DATASET = pd.read_csv(DATASET_PATH)

def create_batch(batch_count, local_file_path):
df = DATASET.sample(batch_count)
df.to_csv(local_file_path,index = False, header = True,encoding='utf-8')

def upload_on_s3(filename, s3_key):
session = boto3.Session(
aws_access_key_id=AWS_ACCESS_KEY_ID,
aws_secret_access_key=AWS_SECRET_ACCESS_KEY,
)
s3 = session.resource('s3')
s3.meta.client.upload_file(Filename=filename, Bucket=BUCKET_NAME, Key=s3_key)

def ingest_realtime():
for i in range(5):
filename = str(uuid.uuid4()) + '.csv'
local_file_path = LOCAL_FILE_PATH + filename
create_batch(5, local_file_path)
upload_on_s3(local_file_path, filename)
print("Uploading for batch {} in progress......".format(i))
time.sleep(120)

If __name__ == “main”:
ingest_realtime()
It will ingest small files in CSV format in the S3 bucket in intervals of 120 seconds. Thus, it will serve the purpose of a real-time file, get uploaded to our input bucket, and also trigger the job!
Now let’s write a Glue job for an incremental load.
import sys
from pyspark.context import SparkContext
from pyspark.sql.session import SparkSession
from awsglue.context import GlueContext
from awsglue.job import Job
from awsglue.dynamicframe import DynamicFrame
from pyspark.sql.functions import col, concat,lit ,to_timestamp, monotonically_increasing_id, to_date, when
from awsglue.utils import getResolvedOptions
from pyspark.sql.types import *
from datetime import datetime
#import com.amazonaws.services.s3.AmazonS3Client

args = getResolvedOptions(sys.argv, ['JOB_NAME', 'curated_bucket', 'file_path'])

spark = SparkSession.builder.config('spark.serializer','org.apache.spark.serializer.KryoSerializer').config('spark.sql.hive.convertMetastoreParquet','false').getOrCreate()
sc = spark.sparkContext
glueContext = GlueContext(sc)
job = Job(glueContext)
job.init(args['JOB_NAME'], args)
new_file_path = args['file_path']

print("*" * 30)
print("*" * 30)
print("file_to_look" , new_file_path)
print("*" * 30)
print("*" * 30)

inputDf = spark.read.option("inferSchema","true").option("header", "true").option("timestampFormat", "yyyy-MM-dd HH:mm:ss").csv(new_file_path)

inputDf = inputDf.toDF(*(c.replace(' ', '_').lower().replace("(","").replace(")","") for c in inputDf.columns))

inputDf.printSchema()
inputDf.show()

commonConfig = {'className' : 'org.apache.hudi', 'hoodie.datasource.hive_sync.use_jdbc':'false', 'hoodie.datasource.write.precombine.field': 'updated_at',
'hoodie.datasource.write.partitionpath.field': 'state' ,'hoodie.datasource.write.recordkey.field': 'primary_key', 'hoodie.table.name': 'medicare_claims_Table',
'hoodie.consistency.check.enabled': 'true', 'hoodie.datasource.hive_sync.database': 'default', 'hoodie.datasource.hive_sync.table': 'medicare_claims_Table',
'hoodie.datasource.hive_sync.enable': 'true', 'path': 's3://' + args['curated_bucket'] + '/hoodie_data/medicare_claims_Table'
}

unpartitionDataConfig = {'hoodie.datasource.hive_sync.partition_extractor_class': 'org.apache.hudi.hive.NonPartitionedExtractor',
'hoodie.datasource.write.keygenerator.class': 'org.apache.hudi.keygen.NonpartitionedKeyGenerator'
}

incrementalConfig = {'hoodie.upsert.shuffle.parallelism': 68, 'hoodie.datasource.write.operation': 'upsert', 'hoodie.cleaner.policy': 'KEEP_LATEST_COMMITS',
'hoodie.cleaner.commits.retained': 10
}

combinedConf = {*commonConfig, *unpartitionDataConfig, **incrementalConfig}
glueContext.write_dynamic_frame.from_options(frame = DynamicFrame.fromDF(inputDf, glueContext, "inputDf"), connection_type = "marketplace.spark", connection_options = combinedConf)
As one can notice, we have an additional parameter ‘file_path’ to pass to our job. Also, in the second snippet we have provided additional configurations for optimization.
Notice the dict ‘incrementalConfig’. You will find that the ‘hoodie.datasource.write.operation’ key has a value of ‘upsert’, just as we hoped we would.
Once our job is written, we will now configure the AWS Lambda service to trigger the job as a data file gets ingested. For this, on the Lambda console write this ‘Python’ code:
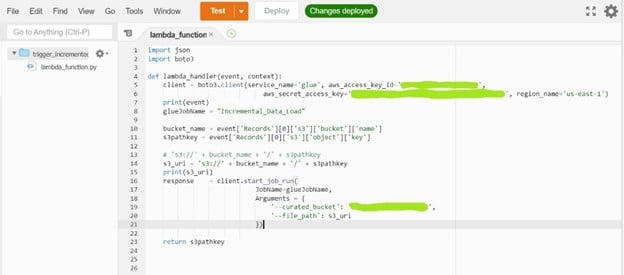
For the lambda function to work, we need to input credentials and the region_name.
You will need to keep in mind that our bucket and lambda function to be written must be in the same region. In order to add a trigger, we have to mention ‘S3’ in trigger service so that any object uploaded to S3 will trigger our ‘Incremental Load job’.
And there you have it! Just run the Python script for the data ingestor and you will notice the job will trigger automatically once the file is admitted into the S3 bucket. You can see the job running on the Glue window when you select the job name.

In case you encounter an error, you can easily check the error logs on AWS CloudWatch service and rectify them as mentioned in Log.
Follow the same path of AWS S3 curated bucket to see the output partitioned files.
Special Note: To understand this part better, you can modify the existing data with new values, say location or time_stamp or any other column value and easily recognize and manually upload it to S3 bucket to see the results.
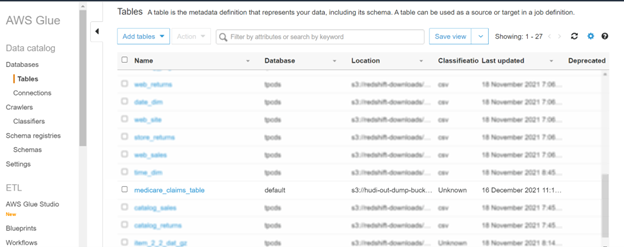
View output table in Glue Catalog
It’s very easy to check the output table. To see the generated table, go to ‘Tables’ section in Glue portal and look for the table name (in this case ‘medicare_claims_table’)
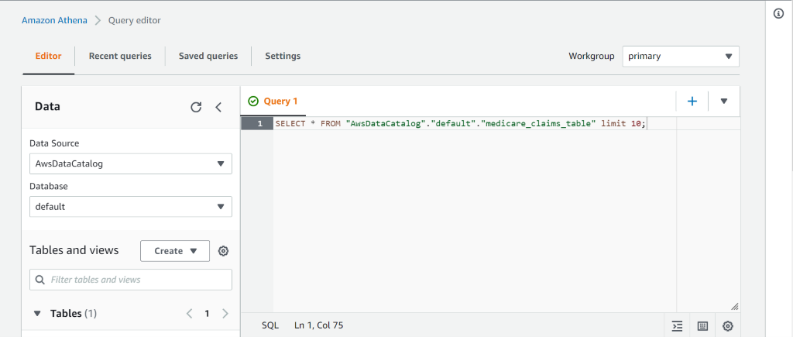
Tick the box in front of the table name and the activated action tab will be visible. Select the option ‘View data’, it will redirect to the new page of ‘AWS Ethena service’. On this Query Editor (SQL engine is embedded) we can easily query for data and look for records that are inserted/updated.

Query types in Apache Hudi
I have listed two types of queries for you here.
Snapshot queries
This query will give you the latest snapshot of your table as a delta action. It will provide near-real time datasets by merging both delta and base files of the latest file on the go.
Incremental queries
Incremental queries will highlight any new data written to the dataset as a commit/compaction. It enables incremental data pipelines by effectively providing change streams.
These queries are useful in accessing data change/update and depend on the Hudi table that we are accessing.
I hope my blog has given you a clear idea of you can simplify incremental data processing and update, insert (upsert) or delete data from the timeline with Apache Hudi. Hudi proves to be of great help in maintaining data in near-real time. If you are intrigued by the possibilities of big data, do read more about Nitor Infotech’s big data services that can help you to make improved business decisions. Reach out to us at Nitor Infotech if you have any queries, comments or suggestions related to this topic.


