
Highlights
Snowpipe is Snowflake’s serverless continuous data ingestion service that enables near real-time data loading through automated micro-batches. This blog explores how Snowpipe differs from traditional bulk loading, highlighting key advantages in compute management, cost efficiency, and automation. It walks through a practical implementation using AWS S3, SQS, Kinesis Firehose, Twitter APIs, and Snowflake to build a continuous data ingestion pipeline. The blog also examines how Snowpipe supports modern analytics, machine learning, and AI initiatives by ensuring timely access to fresh data. Learn how to build scalable, automated, and AI-ready data architectures using Snowpipe.
Today’s world is full of data, more appropriately Big Data, with is varied dimensions of Volume, Velocity, and Variety. Of course, there are other dimensions to it as well, such as Value and Veracity, but for the sake of this blog, we can put them aside.
There are numerous tools and applications that are hosted on cloud supporting ETL/ELT operations that have been evolving continuously in many aspects. However, a unique Cloud Data Warehouse Platform that has become an analysts’ favorite is Snowflake.
With its peculiar feature of separation of compute, this cloud and storage component leverages a massive advantage for running complex and parallel queries on large data. Additionally, the flexibility it offers in warehouse selection, scaling as well as data format ranges to work upon are an attractive feat for several business scenarios. While its numerous features offer a myriad of benefits, in this blog I will elaborate on one special feature of Snowflake called Snowpipe.
The What’s and How’s of Snowpipe
Before we delve into the what’s and how’s of Snowpipe, let’s take a look at how it is different from Bulk Loading.
Snowpipe enables loading data from files as soon as they’re available in a stage. This means you can load data from files in micro-batches, making it available to users within minutes, rather than manually executing COPY statements on a schedule to load larger batches.
The prominent differences are reflected in transactions, compute warehouse use, and cost.
Transactions– In Bulk data load, loads are always performed in a single transaction. Data is inserted into table alongside any other SQL statements submitted manually by users whereas in Snowpipe, loads are combined or split into single or multiple transactions based on the number and size of the rows in each data file. Rows of partially loaded files (based on the ON_ERROR copy option setting) can also be combined or split into one or more transactions.
Compute Resources– Bulk data load requires a user-specified warehouse to execute COPY statements while Snowpipe uses Snowflake-supplied compute resources.
Cost– Bulk data load is billed for the amount of time each virtual warehouse is active whereas Snowpipe is billed according to the compute resources used in the Snowpipe warehouse while loading the files.
Now that you know the difference between Snowpipe and Bulk data load, allow me to shine light on some other features of Snowpipe. A pipe is a named, first-class Snowflake object that contains a COPY statement used by Snowpipe. The COPY statement identifies the source location of the data files (i.e., a stage) as well as the target table. It supports all types of data types, including semi-structured data types such as JSON and Avro.
There are two different methods to implement a Snowpipe based on type and method of detecting a staged file.
- Automating Snowpipe using cloud messaging
- Calling Snowpipe REST endpoints
Before I elaborate, let me list out the prerequisites for deploying Snowpipes. You will need
- An active AWS account and within it, an IAM role for the snowflake with full access to the S3 bucket
- Sufficient privileges for access to AWS Kinesis service
- A Snowflake free trial account
- Tweeter’s Developer account for API keys and secret credentials
- Snowpipe with AWS SQS with S3
- VS Code setup with Python 3.x interpreter
- Installation of boto3.py, tweepy.py libraries

Discover how Nitor built a scalable analytics platform delivering 20+ business KPIs, self-service reporting, and actionable insights.
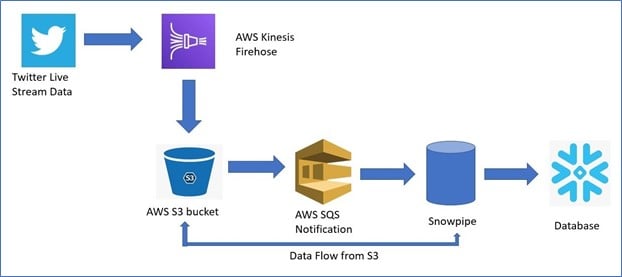
In this blog, I will take you through the cloud messaging with the help of AWS SQS for which you will have to install SnowSQL.
Here’s an overview of the execution flow
To execute this, you must have a Twitter developer account so that you can create an app in it.
You will then go to the Developer portal pane and create a project to get API credentials.
For the purpose of this demonstration, I have named the project Trainee_demo.
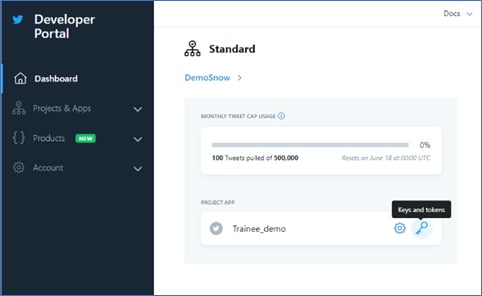
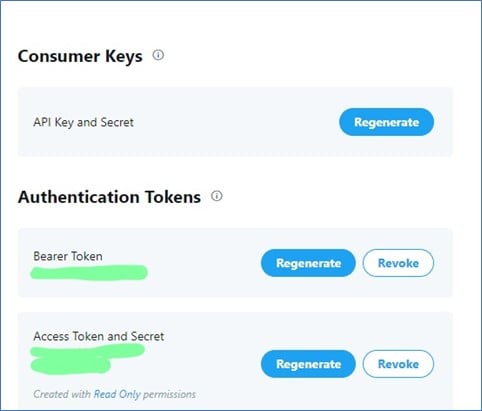
Now, to generate a key and token; click on the ‘Key’ symbol in front of project name, generate API key and Access token, and save it.
Circling back to our workhorse- Snowflake; lets create Object integration, External Stage, File Format, and of course the Pipe object. As you know data generated from Twitter API will be in JSON format and therefore, we will create a table having a VARIANT Column. VARIANT is a data type provided by Snowflake to deal with JSON data.
For this demo you can either use a Web UI or SnowSQL command line interface (CLI) which can be downloaded from snowflake. It important to note that the SQL queries written in SnowSQL CLI and WebUI will be the same.
In this demo I will use SnowSQL CLI tool to carry out further operations.
- First, we will connect to the Snowflake account and start creating a database using a public schema.
- Then we will create a table with any name and VARIANT as column type.
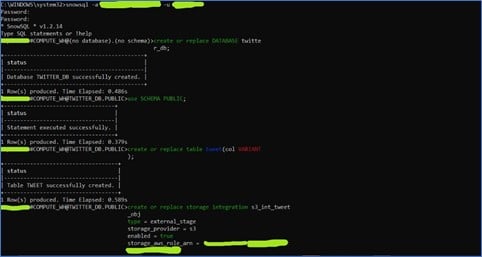
- Now, we will create a Storage Integration Object for AWS which tells Snowflake about the cloud storage provider used and its role.

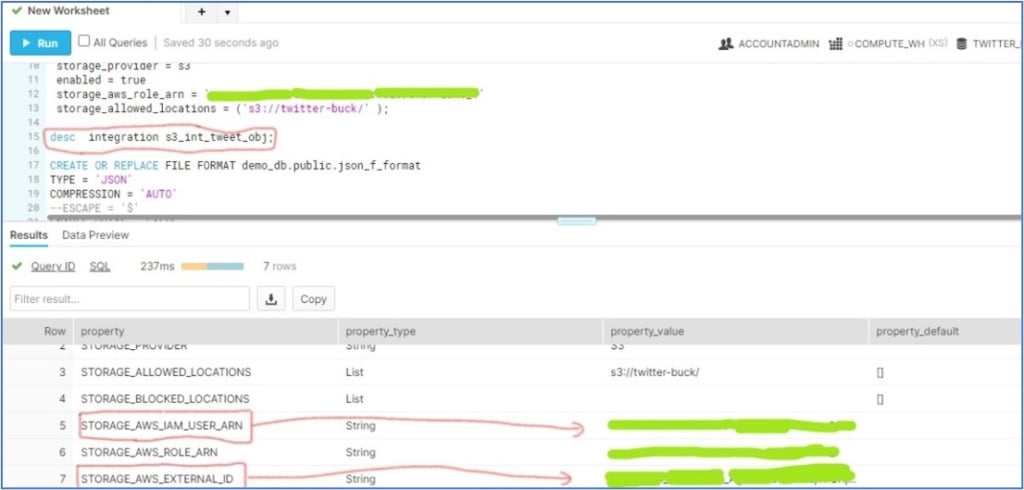
To update the ‘trust relation policy’ for the IAM user, we would describe the storage integration object in Snowflake’s WEbUI and update the trust relation in JSON format as follows:
(a) Copy the value fields one by one in front of the red box and save them as text.
(b) Open the IAM console in AWS and select the created role

(c) Click on the ‘Edit Trust Relation’ tab. You will see a JSON policy document as shown below:
Update the saved ‘STORAGE_AWS_IAM_USER_ARN’ and ‘STORAGE_AWS_EXTERNAL_ID’ values in JSON document.

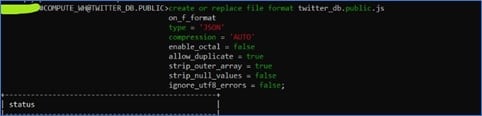
- By creating a File Format, we intend to mention the actual data format.
- Now, we will create an external stage. A Stage is nothing but an S3 bucket storage location from where SnowPipe will fetch the data.

Up until this point, we have configured the fundamental components required for a SnowPipe to work. Now, we will create a Snowpipe with ‘auto ingest = true’ for loading data into the table.

After creating a pipe, we will describe the pipe object created in WebUI to save the ‘notification_channel’ value.

We have completed an essential Snowflake setup. Now, we can head towards the AWS console in order to create:
- SQS notification for a S3 bucket and
- AWS kinesis Firehose stream
For creating an event notification first go to the S3 bucket (assume you have created it already) and then select the ‘Properties’ blade in it. In these properties, we can see a ‘create event notification’ option as:

Select it and name the event as you like and select ‘event type’ as ‘All object create events’.
Now, in ‘Destination’ select ‘SQS Queue’ and specify the SQS Queue ARN by selecting ‘Enter SQS Queue ARN’.
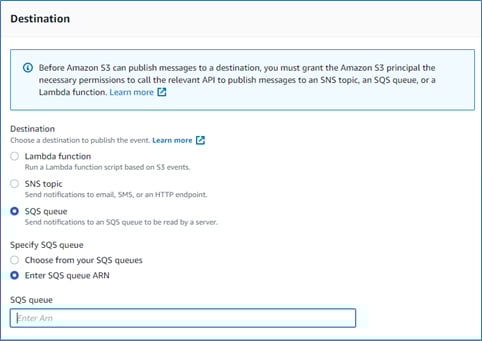
Paste the ‘notification_channel’ of the SnowPipe you have created in last step and save the changes.
Now, we are ready to conclude by creating an AWS Firehose stream for our twitter live stream data.
- Search for a ‘kinesis’ in search bar and select Kinesis as a service.

- Select ‘Kinesis Data Firehose’ as an option and hit ‘create delivery stream’.

- Enter the delivery stream name and ‘Choose a source’ as ‘Direct PUT or other sources’.

- Keep the ‘Process records’ as default and choose destination as ‘Amazon S3 ’.

- Select the bucket name that you created.
- Choose the buffer size and buffer interval. Kinesis buffers a stream of incoming data until a buffer size or buffer interval is reached. For this demonstration we will be aggressive and set both to a minimum of 1 MB and 60 seconds respectively.

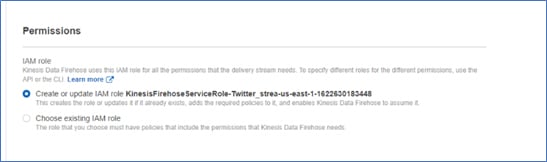
- Keep the other settings as default and create an in-built role with AWS assigned role for the Kinesis Firehose stream.
- Finally, review the kinesis stream parameters, configuration, and proceed to create stream.
Once you have created an AWS Kinesis Firehose stream, you can run the stream by using Python code as given below.

- Put the ‘aws_access_key’ and ‘secrete access key’ for your roles as shown.
- Also update the ‘consumer key’, ‘consumer secret’ and ‘access token’, ‘access token secret’ from twitter developer API
- RUN the code and go to the S3 bucket you have created.


- Checking the S3 bucket for live streaming data, we can note following observation:

- We can check this streaming data automatically queued to the Snowpipe by running following SQL:

Status ‘sent’ means data is queued to Snowpipe’ and now you are ready to use it for analysis.
Explore more: Snowflake as a Cloud Data Warehouse: A Deep Dive into Its Environment – Nitor Infotech
How Does Snowpipe Support AI and Machine Learning Workloads?
AI systems depend on timely and reliable data. Real-time data ingestion ensures that machine learning models, analytics platforms, and AI applications work with the most current information available.
According to McKinsey’s State of AI research, data availability and quality remain among the most significant factors influencing successful AI adoption.
Snowpipe supports AI initiatives by:
- Delivering fresh data for model training
- Supporting real-time analytics pipelines
- Enabling predictive analytics use cases
- Improving data readiness for Generative AI applications
- Supporting event-driven and intelligent automation systems
As organizations continue investing in AI, real-time ingestion services such as Snowpipe play an increasingly important role in building AI-ready data architectures.
Why Does Snowpipe Matter for Modern Data Engineering?
Modern businesses require fast access to trusted data. Traditional batch-based loading processes can introduce delays that impact reporting, analytics, and decision-making.
Snowpipe helps reduce operational complexity by automating data ingestion while leveraging Snowflake-managed compute resources. This enables data engineering teams to focus on delivering insights rather than managing infrastructure.
Key Takeaways
- Snowpipe enables near real-time data ingestion in Snowflake.
- It automatically loads data as soon as files arrive in cloud storage.
- Snowpipe eliminates the need to manage dedicated compute resources for ingestion.
- Real-time data ingestion supports analytics, machine learning, and AI initiatives.
- Snowpipe helps organizations build scalable and AI-ready data pipelines.
In this way you can follow these steps to effectively use SnowPipe for continuous data loading and perform real time analysis.
Reach out to us at Nitor Infotech to know more about how you can effectively manage your data.
Frequently Asked Questions
1. What is Snowflake?
Snowflake is a cloud-native data platform that enables organizations to store, process, manage, and analyze large volumes of structured…Read more
2. How do Snowflake and Snowpipe support AI and machine learning initiatives?
Snowflake provides a scalable cloud data platform for storing and processing large volumes of data, while Snowpipe…Read more


